T300 — Support Manual
Heavy-duty delivery robot for industrial material transfer, supporting up to 300 kg with delivery, cruise, and lifting modes.
Page 1: Overview
What is the T300?
The T300 is a heavy-duty delivery robot designed for industrial material transfer and large-load commercial applications. Built on a load carrier chassis with an open and flexible carrying space, it handles payloads up to 300 kg and can be equipped with different accessories to suit various transport needs.
The T300 uses both Visual-SLAM and Laser-SLAM for autonomous navigation on indoor surfaces. It features a 10.1-inch LCD touchscreen, dual 10W stereo speakers, and runs on Android. The robot supports delivery to multiple destinations with automatic route planning, cruise mode for repetitive loop routes, and — on the WTIDL1 model — autonomous lifting mode for picking up and dropping off materials without manual intervention.
With a 30 Ah battery providing 6 to 12 hours of operation (depending on load), a replaceable battery design for continuous operation, and a minimum path clearance of just 60 cm, the T300 is built for warehouses, factories, and large commercial environments where heavy material transport is a daily requirement.
Models and Variants
| Model | Weight | Lifting Mode | Key Difference |
|---|---|---|---|
| WTID01 | 65 kg | No | Standard delivery and cruise |
| WTIDL1 | 81 kg | Yes | Adds autonomous lifting/unloading |
Both models share the same core specifications: 300 kg load capacity, same dimensions, same battery. The WTIDL1 weighs 16 kg more due to the integrated lifting mechanism.
At a Glance
- Use case: Industrial material transfer in warehouses, factories, and large commercial spaces
- Load capacity: 300 kg
- Battery life: 6 hours (max load) to 12 hours (no load)
- Charging: Approx. 2 hours to 90%, charger or charging pile
- Battery: Replaceable (swap for continuous operation)
- Navigation: Visual-SLAM, Laser-SLAM
- Minimum path width: 60 cm
- Operating system: Android
Page 2: Specifications
| Specification | Value |
|---|---|
| Models | WTID01, WTIDL1 |
| Overall dimensions (L x W x H) | 835 x 500 x 1350 mm |
| Chassis dimensions (L x W x H) | 780 x 500 x 240 mm |
| Overall weight | 65 kg (WTID01) / 81 kg (WTIDL1) |
| Maximum load capacity | 300 kg |
| Operating voltage | DC 20.8V - 29.2V |
| Battery capacity | 30 Ah |
| Battery life (no load) | 12 hours |
| Battery life (max load) | 6 hours |
| Charging time | Approx. 2 hours (0% to 90%) |
| Charger input | AC 100V-240V, 50/60 Hz |
| Charger output | 29.2V, 15A |
| Cruise speed | 0.2 - 1.2 m/s (adjustable) |
| Navigation | Visual-SLAM, Laser-SLAM |
| Minimum path clearance | 60 cm |
| Maximum surmountable height | 20 mm |
| Maximum surmountable gap | 35 mm |
| Screen | 10.1-inch LCD |
| Speaker | 10W x 2 stereo |
| Operating system | Android |
| Working temperature | 0 to 40 degrees C |
| Working humidity | Up to 85% RH |
| Storage temperature | -20 to 60 degrees C |
| Storage humidity | Up to 85% RH |
| Operating altitude | Below 2000 m |
| Road surface | Indoor, flat, smooth surfaces |
Page 3: Product Components
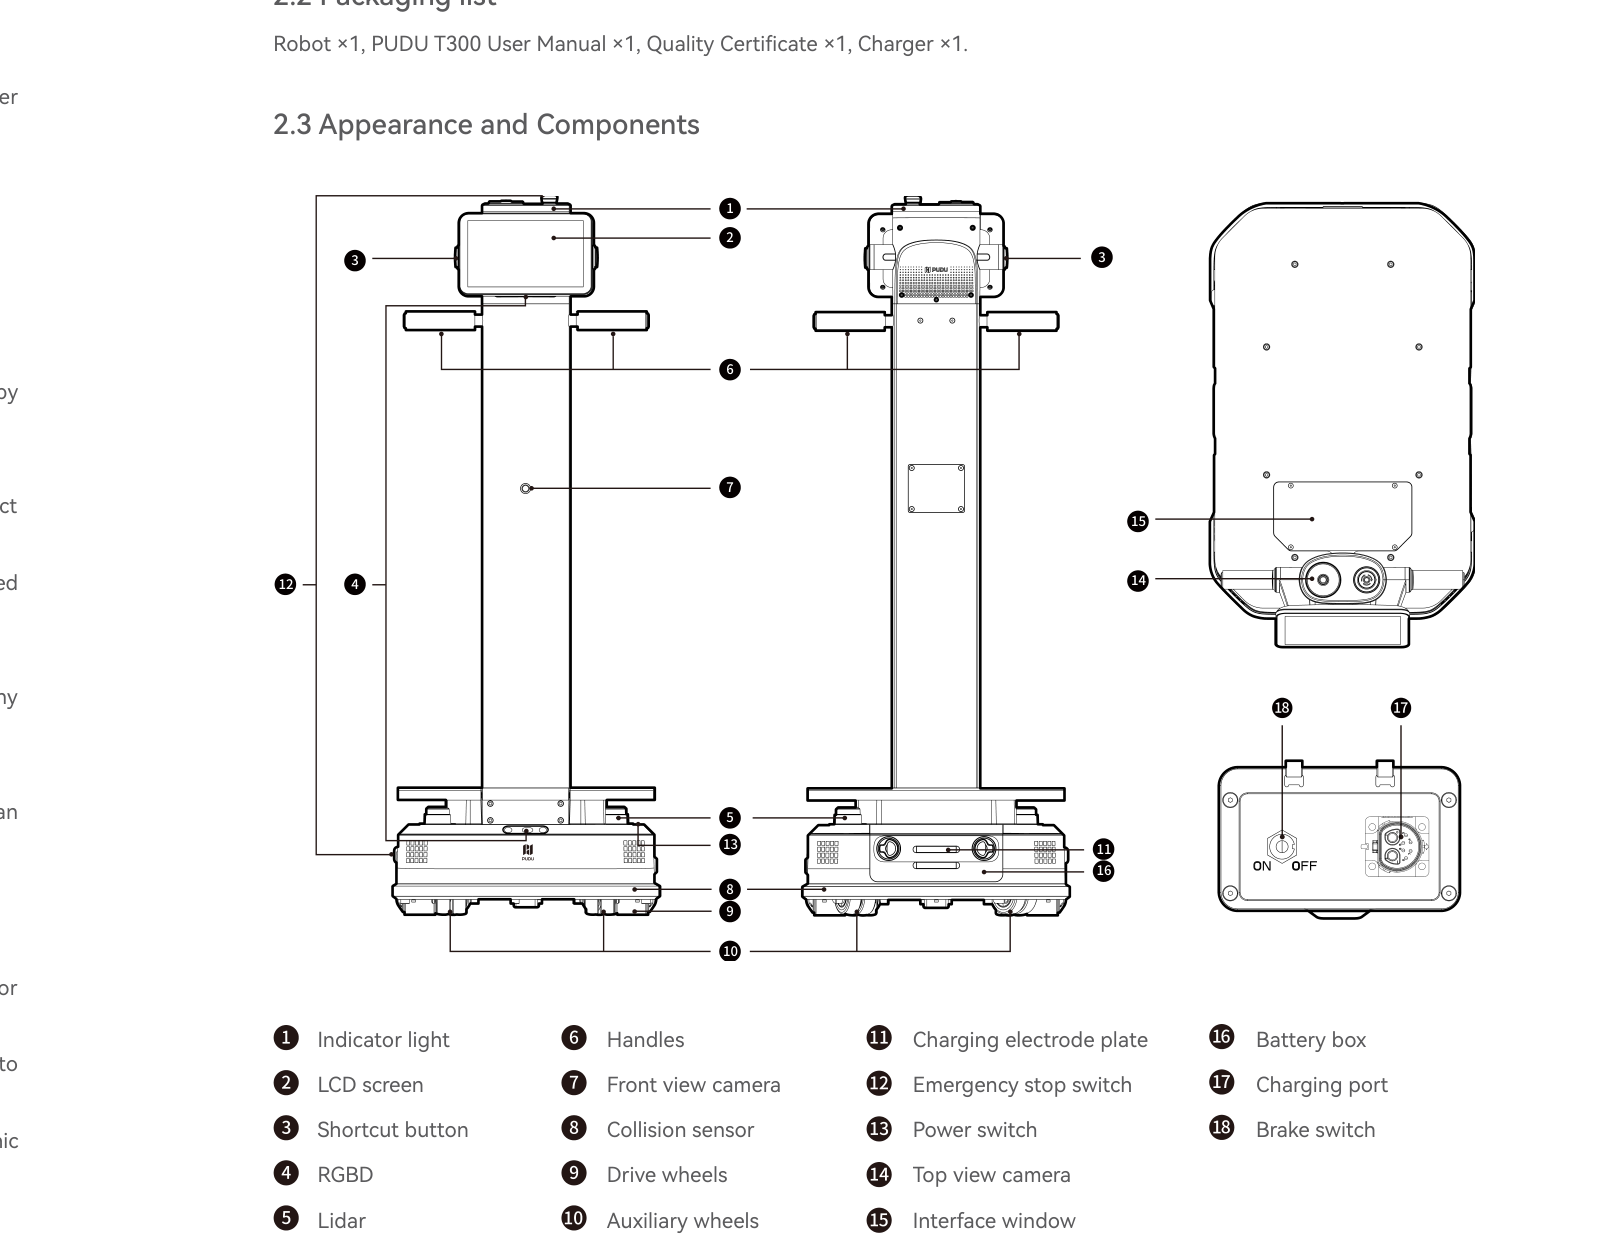
External Components
| # | Component | Description |
|---|---|---|
| 1 | Indicator light | Status and battery level indicator |
| 2 | LCD screen | 10.1-inch touchscreen for task management |
| 3 | Shortcut button | Quick-access button for common functions |
| 4 | Handles | For manually repositioning the robot |
| 5 | Drive wheels | Powered wheels providing locomotion |
| 6 | Auxiliary wheels | Support wheels for stability |
| 7 | Charging electrode plate | Contact plates for charging pile docking |
| 8 | Emergency stop switch | Red button; halts all movement immediately |
| 9 | Power switch | Press-and-hold for on/off control |
| 10 | Battery box | Removable battery compartment |
| 11 | Charging port | Socket for direct charger connection |
| 12 | Brake switch | Locks/unlocks drive wheels for manual movement |
| 13 | Collision sensor | Detects physical contact with obstacles |
| 14 | Interface window | Access panel for external ports |
Sensors and Navigation
| Sensor | Purpose |
|---|---|
| Lidar | Primary distance sensing and laser-SLAM mapping |
| RGBD sensor | Depth perception and visual-SLAM positioning |
| Front view camera | Forward visual recognition |
| Top view camera | Overhead visual input |
| Collision sensor | Physical contact detection for obstacle avoidance |
Ports and Interfaces
The T300 provides external ports under the interface window for hardware expansion and IoT integration:
| Port | Description |
|---|---|
| 24V power supply | Max 2.5A output, DC plug pin diameter 2.5 mm. Powers external accessories. |
| USB 2.0 | Data communication port |
| LED IO | External accessory signal interface |
| Nano SIM card slot | Cellular connectivity for remote management |
| OTG | Device debugging port |
Page 4: Safety Instructions
Before You Start
- Fully charge the battery to 100% before first use.
- Confirm the operating environment meets requirements: 0-40 degrees C, up to 85% RH, below 2000 m altitude.
- Ensure all pathways are at least 60 cm wide and free of cables, debris, and liquid.
- Verify the floor is flat, smooth, and indoor. The T300 is not suitable for steps, steep slopes, or outdoor surfaces.
- Distribute payload weight evenly across the carrying surface. Do not exceed 300 kg.
Electrical Safety
- Only use the charger supplied with the robot. Replace immediately if damaged.
- Ensure mains voltage matches the charger specification (AC 100V-240V, 50/60 Hz).
- Charge when battery drops below 20%. Do not operate on low battery for extended periods.
- Do not drop or impact the charger.
- Dispose of batteries per local regulations. Improper disposal can cause explosion.
Operating Safety
- Do not block any sensors (lidar, RGBD, cameras, collision sensor).
- Never clean or perform maintenance while powered on.
- No open flames, flammable, or explosive items on the robot.
- Do not load or unload while the robot is moving.
- Do not push or carry the robot while it is in motion.
- Only trained professionals may disassemble or repair the robot.
- When manually moving the robot, observe local regulations for maximum single-person lifting weight and keep the robot upright.
- Do not allow play or blocking in front of the moving robot.
- Protect the robot from violent impacts or shocks.
- Clean only with a dry cloth. No caustic chemicals or detergents.
Environmental Requirements
- Do not use or charge in high-temperature, high-pressure, or explosion-risk areas.
- Do not use on wet floors or in areas with liquid or sticky substances on the ground.
- Do not use where wireless devices are prohibited.
- Only use on flat indoor surfaces. Not suitable for steps or steep slopes.
- Operate within stated conditions: 0-40 degrees C, up to 85% RH, below 2000 m altitude.
- Dispose of the robot and accessories per local regulations, not as household waste.
Warnings
- The T300 weighs 65 kg (WTID01) or 81 kg (WTIDL1). Follow safe lifting practices and local regulations when manually moving it.
- Always set the brake switch to OFF before pushing the robot manually. Return it to ON before powering on.
- Never attempt to physically restrain the robot during operation. Use the emergency stop switch.
Page 5: Basic Operation
Powering On
- Position the robot at its designated startup location.
- Ensure the brake switch is set to ON.
- Press and hold the power switch for 3 seconds.
- Wait for the indicator light to turn blue, confirming successful startup.
- Wait for the LCD screen to fully load before sending any tasks.
Powering Off
- Press and hold the power switch for 3 seconds.
- A shutdown prompt appears on the LCD screen.
- Tap "Power off" on the screen.
- Wait until both the indicator light and the screen turn off, confirming successful shutdown.
Pausing Operation
- While the robot is executing a task and moving, tap anywhere on the touchscreen to pause.
- The robot stops in place.
- Tap the screen again to resume from where it stopped.
- For emergency situations, use the physical emergency stop switch instead.
Emergency Stop
To activate: Press the red emergency stop switch firmly. All movement stops immediately.
To release: Turn the emergency stop switch clockwise to release it. Follow the on-screen prompts to resume normal operation.
Important: Never try to physically restrain the robot without pressing the emergency stop first.
Brake Switch
The brake switch is a critical T300-specific control that manages drive wheel locking.
Brake ON (normal operating position): - The drive wheels automatically lock (self-lock) when the robot is powered off or encounters certain abnormal conditions. - This prevents the robot from rolling unintentionally. - Always keep the brake switch set to ON during normal operation.
Brake OFF (manual movement position): - Releasing the brake unlocks the drive wheels, allowing the robot to be pushed manually. - Set the brake to OFF before pushing the robot by hand. - Always return the brake to ON after repositioning.
Maintenance check (every 6 months): 1. Set the brake to OFF. 2. Gently push the robot to confirm the wheels roll freely. 3. Set the brake back to ON. 4. Confirm the wheels resist movement.
Moving the Robot Manually
- Power off the robot completely.
- Set the brake switch to OFF.
- Push the robot by the handles to the desired location.
- Set the brake switch back to ON.
- Power on when ready to resume operation.
Important: The T300 weighs 65-81 kg. Observe local regulations for maximum single-person lifting weight. Keep the robot upright at all times during manual transport.
Page 6: Charging and Battery
Charging Methods
Method 1: Direct Charger
- Power off the robot or leave it in standby.
- Connect the supplied charger to the robot's charging port.
- Plug the charger into a mains outlet (AC 100V-240V).
- Charging takes approximately 2 hours from 0% to 90%.
- Monitor the indicator light for charging status.
Method 2: Charging Pile (Docking Station)
- Tap "Return to Charging" on the robot interface.
- The robot navigates to the charging pile automatically.
- The robot aligns its electrode plates with the pile contacts and begins charging.
- Ensure at least 1 metre of clear space in front of the charging pile for approach.
Battery Replacement
The T300 has a replaceable battery in an accessible battery box, enabling continuous operation by swapping charged batteries.
Replacement procedure: 1. Power off the robot completely. 2. Open the battery compartment cover. 3. Disconnect the power connector from the battery. 4. Remove the battery from the compartment. 5. Insert the replacement battery. 6. Reconnect the power connector firmly. 7. Close the compartment cover. 8. Power on the robot.
Battery Information
| Detail | Value |
|---|---|
| Battery capacity | 30 Ah |
| Operating voltage | DC 20.8V - 29.2V |
| Runtime (no load) | Approx. 12 hours |
| Runtime (300 kg load) | Approx. 6 hours |
| Charging time (0% to 90%) | Approx. 2 hours |
| Charger output | 29.2V, 15A |
| Battery type | Replaceable |
Charging Indicators
The indicator light shows the charging and battery status. Refer to the robot's screen for exact percentage.
Battery Care Tips
- Charge when the battery drops below 20%. Do not operate on low battery for extended periods.
- Repeated deep discharges (below 20%) degrade battery health over time.
- Maintain a regular charging schedule during breaks in operation rather than waiting for full depletion.
- Heavier loads and higher speeds consume more battery. At 300 kg, expect approximately 6 hours; unloaded, approximately 12 hours.
- Operate within 0 to 40 degrees C for optimal battery performance.
- Only use the supplied charger (29.2V, 15A). Third-party chargers risk battery damage and void the warranty.
- Keep spare batteries charged and ready for swap to enable continuous operation.
Page 7: Modes and Functions
Delivery Mode
Description: The primary function. Materials for multiple destinations are placed on the robot. The robot plans the optimal route, delivers items to all assigned destinations in sequence, and automatically returns to the standby point when finished.
Steps: 1. Place materials on the robot's carrying surface. 2. Use the touchscreen to assign delivery destinations. 3. Assign multiple destinations if needed — the robot optimises the route automatically. 4. Tap Start to begin the delivery run. 5. The robot navigates to each destination in sequence. 6. At each stop, the robot pauses for material unloading. 7. After all deliveries are complete, the robot returns to its standby point.
Best use case: Warehouses, factories, and commercial facilities where materials need to be delivered to multiple points in a single run.
Cruise Mode
Description: The robot follows a pre-set path in a continuous loop, pausing at designated stop points along the route for loading or unloading.
Steps: 1. Configure the cruise route and stop points in the system. 2. Start cruise mode from the touchscreen. 3. The robot follows the loop route continuously. 4. At each configured stop point, the robot pauses for a set duration. 5. Load or unload materials during each pause. 6. The robot continues to the next stop point automatically.
Best use case: Repetitive transport circuits in warehouses and factories where materials move along the same path regularly.
Lifting Mode (WTIDL1 Model Only)
Description: The robot autonomously picks up and drops off materials at configured points without manual handling. This mode is only available on the WTIDL1 model and is not supported on the WTID01.
Steps: 1. Configure lifting points and drop-off points in the system. 2. Place materials precisely at the designated lifting point in the correct orientation. 3. Start the lifting task from the touchscreen. 4. The robot navigates to the lifting point and automatically identifies the materials. 5. The lifting mechanism engages and picks up the materials. 6. The robot transports the materials to the configured drop-off point. 7. The robot unloads the materials at the destination.
Best use case: Automated material handling workflows where human intervention at pickup and dropoff should be minimised.
Important notes for lifting mode: - Confirm the robot is the WTIDL1 model before attempting to use this mode. - Materials must be placed precisely at the designated lifting point in the correct orientation. - The lifting mechanism area must be free of debris or obstructions. - Test with lighter loads first when configuring new lifting points.
Additional Features
- Auto-return: After completing all deliveries, the robot automatically returns to its standby point.
- Charging pile docking: Tap "Return to Charging" on the interface to send the robot to the charging pile automatically.
- External ports: 24V power, USB 2.0, LED IO, SIM card, and OTG ports enable integration with external accessories and IoT systems.
Page 8: Maintenance and Servicing
Maintenance Schedule
| Part | Frequency | Method |
|---|---|---|
| Drive wheels and auxiliary wheels | Weekly | Wipe surface with a clean cloth. Inspect for wear and replace if necessary. |
| Visual sensor and lidar | Weekly | Wipe surface with a clean cloth. Address dirt or damage immediately to avoid navigation issues. |
| Robot body and housing | Monthly | Wipe surface with a clean cloth. Check that housing is flat and securely fixed. |
| Indicator lights and sound | Monthly | Verify all indicator lights and audible warnings function correctly (robot powered on). |
| Emergency stop switch | Monthly | Test the switch to confirm it stops the robot correctly (robot powered on). |
| Brake switch | Every 6 months | Set brake to OFF, gently push robot to confirm brake releases. Set back to ON after testing. |
| Safety stickers and nameplates | Every 6 months | Check that all labels, stickers, and nameplates are intact and legible. |
Cleaning
- Always power off the robot before cleaning.
- Use only a clean, dry cloth on all surfaces including sensors, screen, body, and wheels.
- Never use caustic chemicals, liquid cleaners, or detergents.
- Pay particular attention to the visual sensor and lidar. Any dirt or damage to these components can cause navigation failures.
- Clean the screen with a dry cloth. Dirt or moisture impairs touch response.
When to Replace Parts
- Drive/auxiliary wheels: Replace if showing significant wear or if the robot pulls to one side despite clean sensors and even load distribution.
- Brake switch: Replace if the switch does not properly engage or release after inspection (escalate to HUTECH support).
- Battery: Replace if runtime drops below half the expected duration under normal conditions. The T300's replaceable battery design makes this straightforward.
- Safety stickers and nameplates: Replace if illegible or missing.
- Charger cable: Replace immediately if damaged. Contact HUTECH support for an original replacement.
Page 9: Troubleshooting
Issue 1: Robot does not power on
What you see: Holding the power switch for 3 seconds produces no response. Indicator light and screen remain off.
Likely causes: Battery fully depleted. Battery not connected properly. Power switch fault.
What to check: 1. Connect the supplied charger directly to the charging port and wait 15-20 minutes. 2. Confirm the charger is receiving mains power (check the outlet with another device). 3. Attempt to power on again by holding the power switch for 3 seconds. 4. If still unresponsive, power off, open the battery compartment, and check that the battery power connector is firmly seated. 5. Reconnect the battery connector, close the compartment, and try again.
Solution: If the robot starts after charging, the battery was depleted. If the connector was loose, reseat it. Establish a regular charging routine.
Escalate if: The robot does not respond after charging and verifying the battery connection. Contact HUTECH technical support — the battery or internal power system may need service.
Issue 2: Robot does not charge
What you see: Plugging in the charger or docking at the charging pile produces no indication of charging on screen or indicator light.
Likely causes: Damaged charger or cable. Dirty charging contacts. Mains power issue. Charging pile misalignment.
What to check: 1. Verify the mains outlet is live by testing with another device. 2. Inspect the charger cable for visible damage. 3. Clean the charging port and charging electrode plates with a dry cloth. 4. If using a charging pile, ensure the robot is properly aligned with the pile contacts. 5. Try the direct charger cable to rule out a charging pile issue.
Solution: Replace a damaged charger. Clean dirty contacts. Reposition the robot on the charging pile.
Escalate if: Charging does not start with a confirmed working charger and clean contacts. Contact HUTECH support for battery or charging circuit inspection.
Issue 3: Robot gets lost or stops mid-route
What you see: Robot halts during a delivery, spins in place, or fails to reach the destination.
Likely causes: Dirty or blocked sensors (visual, lidar). Environment changed since map creation. Path narrower than 60 cm. New obstacles in route.
What to check: 1. Power off the robot and inspect all sensors (lidar, RGBD, front and top cameras) for dirt or obstructions. 2. Clean sensor surfaces with a dry, lint-free cloth. 3. Verify the route is at least 60 cm wide throughout. 4. Check for new obstacles, reflective surfaces (mirrors, glass), or changes in the environment layout. 5. Ensure the floor is clean and dry — liquid or debris on the floor can interfere with navigation.
Solution: Clean all sensors. Remove obstacles from the route. If furniture or walls have been moved, the facility map may need updating by a trained technician.
Escalate if: Navigation issues persist after sensor cleaning and path verification. Contact HUTECH support for map recalibration.
Issue 4: Emergency stop switch does not work
What you see: Pressing the emergency stop switch does not halt the robot.
Likely causes: Switch already engaged and needs releasing. Mechanical fault. Wiring issue.
What to check: 1. Check if the button is already depressed — twist it clockwise to release and try pressing again. 2. Inspect the button for visible damage or debris. 3. As an alternative, tap the screen to pause the task. 4. If neither method works, hold the power switch for 3 seconds to initiate shutdown.
Solution: Release a stuck button by twisting clockwise. Clear debris from around the switch.
Escalate if: The emergency stop switch is damaged or non-functional. Cease operating the robot immediately and contact HUTECH technical support. This is a critical safety component.
Issue 5: Brake switch not engaging or releasing properly
What you see: Wheels do not lock when the brake is set to ON and the robot is powered off. Or the robot cannot be pushed when the brake is set to OFF.
Likely causes: Brake switch mechanism fault. Debris interfering with the switch. Drive wheel issue.
What to check: 1. Confirm the brake switch is fully toggled to the correct position (ON or OFF). 2. Power off the robot and test: with brake ON, try pushing gently — wheels should resist. With brake OFF, the robot should roll freely. 3. Inspect the brake switch area for debris or damage. 4. Check that the drive wheels are not blocked by foreign objects.
Solution: Ensure the switch is fully engaged in the desired position. Remove any debris around the switch or wheels.
Escalate if: The brake switch does not engage or release properly after inspection. Contact HUTECH support — the brake mechanism may need replacement.
Issue 6: Robot moves erratically or drifts
What you see: Robot veers to one side, makes unexpected turns, or collides with objects despite a clear path.
Likely causes: Dirty or worn drive/auxiliary wheels. Sensor obstruction. Uneven load distribution. Low battery. Wet or uneven floor surface.
What to check: 1. Power off the robot and inspect all wheels for debris, wear, or damage. 2. Clean all sensors (lidar, RGBD, cameras, collision sensor) with a dry cloth. 3. Check that the load is evenly distributed across the carrying surface. 4. Verify the battery level is adequate (above 20%). 5. Examine the floor for wet patches, debris, or uneven sections along the route.
Solution: Clean wheels and sensors. Redistribute the load evenly. Charge the robot. Ensure the floor is dry, flat, and smooth.
Escalate if: Erratic movement continues under proper conditions with clean wheels and sensors. Contact HUTECH support for motor or sensor calibration.
Issue 7: Screen is unresponsive or frozen
What you see: Touchscreen does not respond to taps. Display is frozen. Screen is black while indicator light is on.
Likely causes: Software crash. Screen hardware fault. System overload.
What to check: 1. Wait 30 seconds to see if the system recovers. 2. If the robot is moving, press the emergency stop switch first. 3. Hold the power switch for 3 seconds and tap "Power off" if the screen responds. 4. If the screen does not respond, hold the power switch longer until the robot shuts down. 5. Wait 10 seconds, then power on again.
Solution: A restart typically resolves screen freezes. Clean the screen surface as dirt or moisture can impair touch response. If the issue recurred after a specific task, note the conditions for the support team.
Escalate if: The screen remains unresponsive after restarting, or freezes recur frequently. Contact HUTECH technical support.
Issue 8: Battery drains much faster than expected
What you see: Runtime significantly shorter than rated (12 hours no load / 6 hours max load). Battery percentage drops rapidly.
Likely causes: Heavy or maximum load. High speed setting. Aged battery. Frequent start-stop cycles. Extreme operating temperature.
What to check: 1. Record actual runtime from full charge to 20% under your operating conditions. 2. Check the current speed setting — higher speeds consume more power. 3. Weigh the typical payload — closer to 300 kg means closer to 6-hour runtime. 4. Verify the operating temperature is within 0-40 degrees C. 5. Check how often the battery has been run below 20% — repeated deep discharges degrade battery health.
Solution: Reduce speed if possible. Keep loads within rated limits. Maintain a regular charging schedule that avoids deep discharge. Swap to a fresh battery if the facility has spares.
Escalate if: Runtime is less than half the expected duration for your load conditions despite following all guidelines. The battery may need replacement — contact HUTECH technical support.
Issue 9: Lifting mode not working (WTIDL1 only)
What you see: Robot does not lift materials at the configured lifting point. Lifting mechanism does not engage. Materials are dropped during transport.
Likely causes: Wrong model (WTID01 does not support lifting). Lifting points not configured correctly. Materials not positioned properly at the lifting point. Mechanical fault in the lifting mechanism.
What to check: 1. Confirm the robot is the WTIDL1 model (check the label or settings screen). 2. Verify that lifting points and drop-off points are correctly configured in the system. 3. Ensure materials are placed precisely at the designated lifting point in the correct orientation. 4. Check that the lifting mechanism area is free of debris or obstructions. 5. Test with a lighter load to rule out overweight issues.
Solution: Reconfigure lifting and drop-off points if they were set incorrectly. Reposition materials at the lifting point. Clear any obstructions from the lifting mechanism.
Escalate if: The lifting mechanism does not engage or makes unusual sounds. Contact HUTECH technical support — the lifting hardware may need servicing.
Issue 10: Robot cannot dock with charging pile
What you see: Robot approaches the charging pile but fails to connect. Repeatedly attempts and reverses. No charging indication after docking.
Likely causes: Dirty charging electrode plates. Pile misalignment. Pile not powered. Approach path blocked. Pile location has changed since mapping.
What to check: 1. Verify the charging pile is powered and active. 2. Clean the electrode plates on both the robot and the pile with a dry cloth. 3. Ensure the approach path is clear for at least 1 metre in front of the pile. 4. Check that the charging pile has not been moved from its mapped position. 5. Try charging with the direct charger cable to verify the robot's charging circuit works.
Solution: Clean contacts. Clear the approach path. If the pile was relocated, have a technician update the map.
Escalate if: Docking consistently fails despite clean contacts and a clear path. Contact HUTECH support for pile alignment check and robot docking calibration.
Page 10: Frequently Asked Questions
Charging and Battery
How long does the T300 take to charge? About 2 hours to reach 90% using the supplied charger (29.2V, 15A output). It supports both direct charger connection and a charging pile (docking station). Tap "Return to Charging" on the interface and the robot navigates to the pile automatically.
How long does the battery last? 6 to 12 hours depending on load. With no load, approximately 12 hours. At maximum load (300 kg), approximately 6 hours. Actual duration depends on speed setting, load weight, route complexity, and environmental conditions.
Can the battery be replaced? Yes. The T300 has a replaceable battery in an accessible battery box. Power off the robot, open the battery compartment, disconnect the power connector, remove the battery, insert a replacement, reconnect, and close the compartment. This allows continuous operation by swapping charged batteries.
When should I charge the robot? When the battery level drops below 20%. Running on low battery for extended periods reduces overall battery lifespan. Maintain a regular charging schedule during breaks in operation rather than waiting for the battery to fully deplete.
Operation
How do I power on the T300? Move it to the designated startup location. Press and hold the power switch for 3 seconds until the indicator light turns blue. Wait for the LCD screen to fully load before sending tasks.
How do I power off the T300? Hold the power switch for 3 seconds. Tap "Power off" on the shutdown prompt. Wait until both the indicator light and the screen turn off.
What is the brake switch for? It locks the drive wheels when the robot is powered off or in abnormal states. With brake ON, wheels self-lock to prevent unintentional rolling. Set the brake to OFF to push the robot manually. Always return it to ON during normal operation. Test the brake every 6 months.
How do I pause and resume a task? Tap anywhere on the touchscreen to pause. Tap again to resume. For emergencies, use the physical emergency stop switch.
What is the minimum width the T300 needs to pass through? 60 cm. It handles obstacles up to 20 mm high and gaps up to 35 mm wide. Designed for flat indoor surfaces only.
What external ports does the T300 have? Under the interface window: 24V power supply (max 2.5A, DC plug pin diameter 2.5 mm), USB 2.0, LED IO, Nano SIM card slot, and OTG port. These enable hardware expansion and IoT integration.
Safety
What should I do in an emergency? Press the emergency stop switch immediately. Once the situation is safe, turn the switch clockwise to release it and follow on-screen prompts to resume. Never physically restrain the robot without pressing the emergency stop first.
What is the maximum weight the T300 can carry? 300 kg. At this load, battery life is approximately 6 hours versus 12 hours unloaded. Overloading risks damage to the drive system, impairs navigation accuracy, and creates safety hazards. Distribute weight evenly across the carrying surface.
Is the T300 suitable for outdoor use? No. It is designed for indoor use on flat, smooth surfaces only. Outdoor conditions including rain, uneven terrain, and temperature extremes are outside its design parameters. Operating environment must be within 0-40 degrees C and below 85% relative humidity.
Maintenance
How should I clean the T300? Wipe with a clean, dry cloth while powered off. Never use caustic chemicals, liquid cleaners, or detergents. Pay particular attention to the visual sensor and lidar — dirt or damage to these causes navigation failures.
General
What is the difference between the WTID01 and WTIDL1 models? The WTIDL1 adds lifting mode and weighs 81 kg versus 65 kg for the WTID01. Both share the same core specs (300 kg load, same dimensions, same battery). The WTIDL1 can automatically identify, lift, transport, and unload materials at configured points.
Page 11: Service and Escalation
When to Contact Support
- The robot does not power on after charging and verifying the battery connection.
- Charging does not work with a confirmed working charger and clean contacts.
- Navigation problems persist after sensor cleaning and path verification.
- The emergency stop switch is physically damaged or non-functional.
- The brake switch does not engage or release properly after inspection.
- Erratic movement continues under proper conditions with clean sensors and wheels.
- The screen remains unresponsive after a restart.
- Battery runtime is less than half the expected duration under normal conditions.
- The lifting mechanism (WTIDL1) does not engage or makes unusual sounds.
- The robot repeatedly fails to dock with the charging pile.
Before You Call
Gather the following information:
- Robot model number (WTID01 or WTIDL1)
- Serial number (located on the robot body)
- Description of the issue and when it started
- Steps you have already taken to troubleshoot
- Battery level and charging status
- Current load weight and speed settings
- Any recent changes to the operating environment
Support Contact
- HUTECH Robotics (first-line support): ai.hutechrobotics.com
- Manufacturer Support Technical Support: techservice@pudutech.com
- Service process: the manufacturer provides warranty and post-warranty support. During the warranty period, spare parts are provided at no charge. After the warranty or for non-covered issues, standard fees apply. Remote diagnosis first; on-site technician visits arranged if needed.