SH1 -- Support Manual
Professional miniature upright scrubber-dryer for small and medium-sized indoor environments, combining washing, brushing, and vacuum drying in a single pass.
Page 1: Overview
What is the SH1?
The SH1 is a professional miniature upright scrub-and-dry cleaning machine designed for small and medium-sized indoor environments with complex layouts. Unlike the autonomous CC1 robots, the SH1 is a manually operated push-behind unit -- an operator walks behind the machine and steers it across the floor.
The SH1 combines washing, brushing, and vacuum drying in a single pass using high-speed, high-pressure disc brushes. It is compact enough to navigate tight spaces, corridors, and areas around furniture that larger autonomous robots cannot reach. With a productivity rating of 1,100 to 1,600 sq m/h, the SH1 handles significant floor area on a single battery charge.
The machine supports Wi-Fi connectivity and the PUDULink app for smart monitoring features including real-time task reports, staff management, device tracking, lease management, and anti-theft protection. It can be used on both indoor and outdoor flat surfaces, making it more versatile than the indoor-only CC1 range.
At a Glance
| Detail | Value |
|---|---|
| Model | SHFC02 |
| Type | Manual push-behind scrubber-dryer |
| Cleaning Functions | Washing, brushing, vacuum drying (8 cleaning modes) |
| Battery Life | 70 min (Normal) / 100 min (ECO) |
| Productivity | 1,100--1,600 sq m/h |
| Solution Tank | 4 L (removable) |
| Recovery Tank | 4 L (removable) |
| Weight | 27 kg |
| Working Width | 44 cm |
| Squeegee Width | 49 cm |
| Smart Features | Touchscreen, Wi-Fi, PUDULink app |
Page 2: Specifications
| Feature | Value |
|---|---|
| Model | SHFC02 |
| Dimensions -- Working Position (L x W x H) | 49 x 53 x 120 cm |
| Dimensions -- Store Position (L x W x H) | 49 x 35 x 127 cm |
| Weight | 27 kg (59.52 lbs) |
| Operating Voltage | DC 22 -- 29.4 V |
| Power Input | AC 100 V -- 240 V, 50/60 Hz |
| Power Output | 29.4 V, 8 A |
| Battery Capacity | 18 Ah (removable) |
| Charging Time | 2.5 hours |
| Runtime -- Normal Mode | 70 minutes |
| Runtime -- ECO Mode | 100 minutes |
| Rated Power | 380 W |
| Brush Speed | 350 rpm |
| Productivity | 1,100 -- 1,600 sq m/h |
| Working Width | 44 cm |
| Squeegee Width | 49 cm |
| Solution Tank Capacity | 4 L (removable) |
| Recovery Tank Capacity | 4 L (removable) |
| Wi-Fi | 2.4 GHz, 19.83 dBm |
| Charge on Machine | Yes |
| Smart Features | Touchscreen, liquid level detection, Wi-Fi, PUDULink app |
| IP Rating | IPX4 |
| Working Temperature | 1 to 40 C |
| Storage Temperature | -20 to 60 C |
| Humidity | 93% RH or less |
Page 3: Product Components
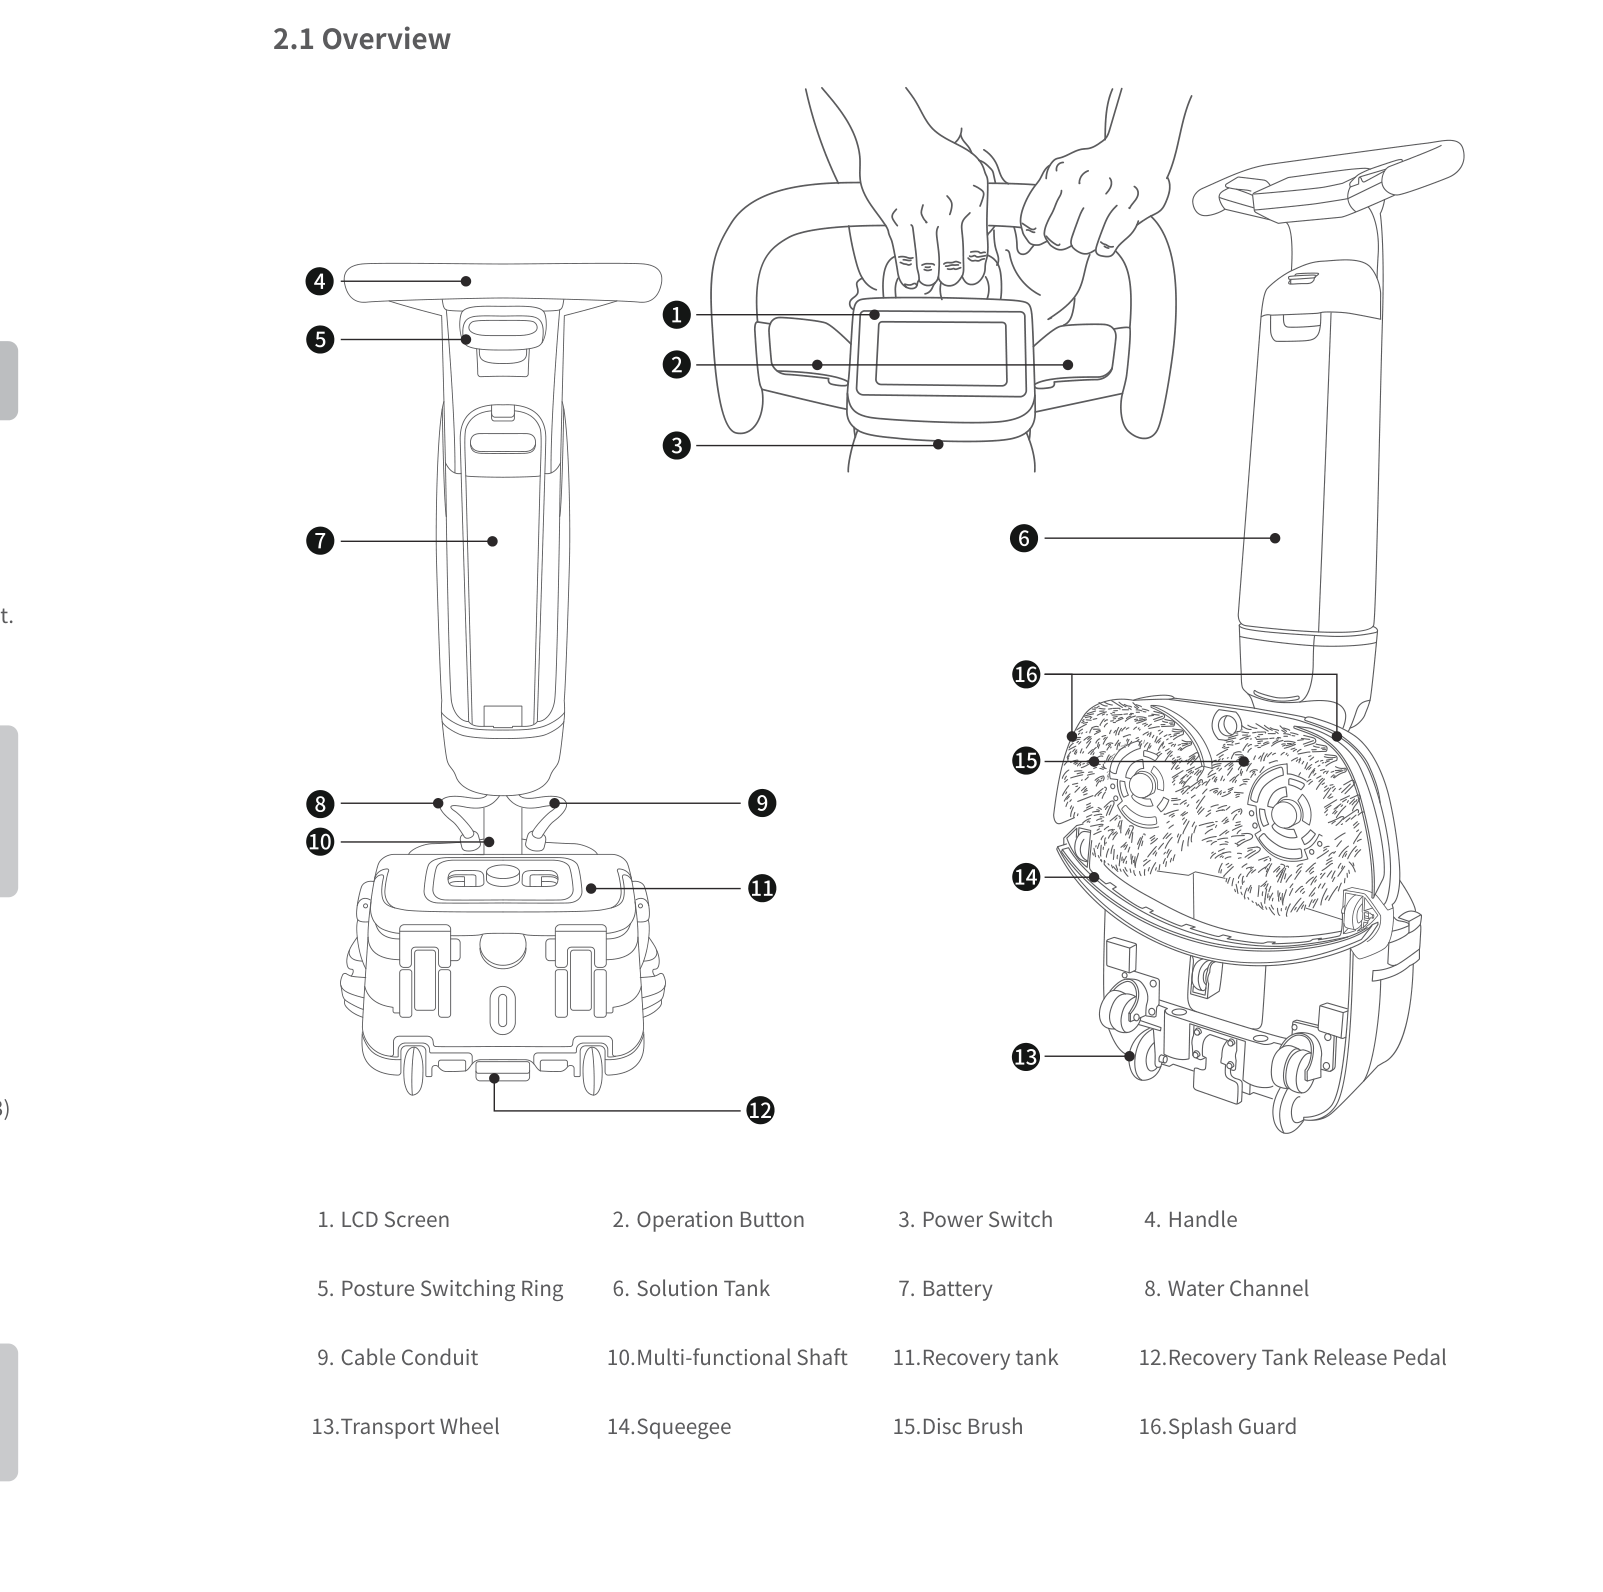
External Components
- LCD touchscreen -- displays modes, status, and settings
- Operation button (start/stop) -- configurable for single or dual-button start
- Power switch
- Handle
- Posture switching ring -- changes between working, store, and park positions
- Multi-functional shaft (lockable)
- Screen protector (flip-open cover, if fitted)
Sensors and Navigation
The SH1 is a manually operated machine and does not use autonomous navigation sensors. It features:
- Liquid level detection for both tanks
- Wi-Fi connectivity (2.4 GHz) for PUDULink app integration
- Flowmeter for water usage monitoring
Cleaning Components
- Disc brushes (left and right) -- high-speed rotating brushes for scrubbing; interchangeable between left and right positions
- Splash guards (left and right) -- clip-on guards to contain spray
- Squeegee -- with vacuum hose connection for water recovery
- Solution tank (4 L, removable) -- holds clean water and detergent
- Recovery tank (4 L, removable) -- collects dirty water
- Recovery tank float -- must always be installed to prevent vacuum motor damage
- Vacuum motor filter -- must always be installed
- Water outlet filter -- must always be installed
- Solution tank filter -- removable for cleaning
- Water channel
- Small cleaning tool partner -- attaches to tool holders on sides of machine
Ports and Interfaces
- Transport wheel -- for moving the machine in park position
- Cable conduit
- Battery box -- houses the removable battery
- Charging cable connection point
Page 4: Safety Instructions
Before You Start
- All operators must be trained or have fully read the manual before using the SH1.
- Never operate the SH1 without the recovery tank float, vacuum motor filter, and water outlet filter installed.
- Never operate without the recovery tank installed.
- Do not leave the machine in working position when not in use -- this damages the disc brush and squeegee.
- Clean up large debris from the floor before use to prevent motor overload.
Electrical Safety
- Use only original chargers and batteries.
- Match the supply voltage to the charger label voltage.
- Fully charge the battery before first use.
- If unused for extended periods, remove the battery and charge fully every 3 months.
- In case of battery failure, remove the battery immediately and contact support.
- Do not compress, puncture, or impact the charger.
Operating Safety
- Do not clean or maintain the device while powered on and working.
- Do not replace disc brushes or the squeegee while the device is running.
- Do not wear ties, scarves, or dangling accessories near rotating parts.
- Avoid touching any moving or rotating parts during operation.
- Do not operate the machine without the recovery tank.
Water and Chemical Safety
- Fill water below 45 degrees Celsius.
- Use special cleaner or low-foam cleaner only.
- Do not mix different types of detergents -- risk of hazardous gases.
- Do not add flammable, strong acid, or strong alkaline detergents.
- Do not use water pressure cleaners to clean the device.
- Do not immerse the equipment in water.
- Empty both tanks before vehicle transport.
Environmental Requirements
- Indoor and outdoor flat ground only; avoid bumpy surfaces, steps, and stairs.
- Operating temperature: 1 to 40 C.
- Storage temperature: -20 to 60 C.
- Humidity: 93% RH or less.
- Keep away from flammable dust, liquid, or vapour.
- Do not leave on ramps or slopes -- the device may tip over.
Battery Safety
- Use water-based fire extinguishers for battery fires, then cool with water to prevent re-ignition.
- Keep battery and charger away from water; keep hands dry during handling.
- Do not charge near flammable or explosive objects.
- Do not heat or burn the battery.
Warnings
- Never operate without the three required filters (recovery tank float, vacuum motor filter, water outlet filter).
- Never leave the machine in working position when idle.
- Always secure the posture switching ring -- listen for the click that confirms the lock.
Page 5: Basic Operation
Powering On
- Ensure the battery is installed in the battery box (press and hold the clip, push until you hear a click).
- Press and hold the power switch for 3 seconds.
- The LCD touchscreen activates and displays the home screen.
Powering Off
- Press and hold the power switch until the screen turns off.
- For storage, switch to store position.
- For extended storage, remove the battery.
Pausing Operation
- Press the operation button to stop the cleaning action.
- The machine remains powered on but brushes and suction stop.
- Press the operation button again to resume.
Emergency Stop
The SH1 does not have a dedicated emergency stop switch. To stop immediately:
- Release the operation button (brushes and suction stop).
- Press and hold the power switch to power off completely.
Moving the Robot Manually
- Switch to park position using the posture switching ring.
- Unlock the multi-functional shaft.
- Tilt the machine back onto the transport wheel.
- Push to the desired location.
- For transport up stairs, remove the solution and recovery tanks to reduce weight (from 27 kg).
Machine Positions
Working Position: Machine angled forward. Disc brushes and squeegee contact the floor. Used during active cleaning.
Store Position: Machine upright at approximately 65 degrees. Multi-functional shaft locks. Used for post-cleaning maintenance and storage.
Park Position: Machine tilted back on the transport wheel. Multi-functional shaft must be unlocked. Used for moving the machine between locations.
A click sound from the posture switching ring confirms each position is locked. If you do not hear the click, the position is not secured.
First-Time Setup
When powering on for the first time, a setup wizard guides through:
- Language selection (note: some models only support Simplified Chinese).
- WLAN configuration -- connect to a 2.4 GHz Wi-Fi network.
- Mode recommendations -- select stain type, floor material type, and accessory type. The system automatically recommends four tailored cleaning modes.
Starting a Cleaning Session
- Fill the solution tank with water (below 45 C) and approved cleaner.
- Install the solution tank (align grooves, press until snap button clicks).
- Ensure the recovery tank is installed with float, vacuum motor filter, and water outlet filter in place.
- Switch to working position (listen for click).
- Power on the machine.
- Select the desired cleaning mode on the touchscreen.
- Press the operation button to start (single or dual-button, depending on settings).
- Push the machine forward at a steady pace.
Operation Button Configuration
The operation button can be configured for single-button or dual-button start in Settings. Default: both sides must be pressed simultaneously. Can be changed to allow starting by pressing either side individually.
Page 6: Charging and Battery
Charging Methods
The SH1 supports charging with the battery installed in the machine or with the battery removed:
- On-machine charging: Connect the charging cable to the battery while it remains in the battery box. The screen displays charging progress and estimated remaining time.
- Separate charging: Remove the battery and connect the charging cable directly.
Battery Information
| Detail | Value |
|---|---|
| Type | Removable lithium battery |
| Capacity | 18 Ah |
| Operating Voltage | DC 22 -- 29.4 V |
| Charging Time | 2.5 hours |
| Normal Mode Runtime | 70 minutes |
| ECO Mode Runtime | 100 minutes |
Battery Replacement
The SH1 battery is fully removable:
To remove: 1. Press the clip on top of the battery. 2. Slide the battery out of the battery box.
To install: 1. Press and hold the clip on top of the battery. 2. Push the battery into the battery box until you hear a click confirming it is seated.
Charging Indicators
The battery has a level display button with four LED indicators:
| Indicator | Meaning |
|---|---|
| Red flashing | Below 5% |
| 1 solid white | 5--25% |
| 2 solid white | 25--50% |
| 3 solid white | 50--75% |
| 4 solid white | 75--100% (fully charged) |
Press the battery level display button at any time to check the charge level.
Charging Display on Screen
- When charging on-machine, the screen shows progress and estimated time remaining.
- During charging, the Settings menu remains accessible. After 5 minutes of inactivity, the screen returns to the charging display.
- When fully charged, the screen indicates maximum capacity. The machine stays powered on.
- When the charging cable is disconnected, the machine enters standby mode.
- Charging while the machine is off will not auto-power it on.
Battery Care Tips
- Fully charge before first use.
- Keep the charge above 10% and charge promptly when low.
- If unused for more than 7 days, the battery may enter sleep mode. Press and hold the battery level display button to reactivate.
- For extended storage (more than 3 months), remove the battery and perform a full charge every 3 months.
- Do not leave the battery fully depleted for extended periods.
- The machine automatically shuts down after 20 minutes of inactivity to conserve battery.
Page 7: Cleaning Modes and Functions
The SH1 offers eight primary cleaning modes selectable via the touchscreen. Swipe to access additional modes beyond the four displayed on the home screen. You can select 1 to 4 frequently used modes for the home screen in Settings.
Heavy Duty Mode
| Setting | Level |
|---|---|
| Brush Speed | High |
| Suction | High |
| Water Output | High |
Best for: Tough stains, heavy soiling, ground-in dirt. Maximum cleaning power with highest water and energy consumption.
Normal Mode
| Setting | Level |
|---|---|
| Brush Speed | Medium |
| Suction | High |
| Water Output | Medium |
Best for: Standard daily cleaning. The default everyday mode. Runtime: approximately 70 minutes.
ECO Mode
| Setting | Level |
|---|---|
| Brush Speed | Low |
| Suction | Low |
| Water Output | Low |
Best for: Light cleaning, energy saving. Extends runtime to approximately 100 minutes. Suitable for low-traffic areas or maintenance passes.
Low Residue Mode
| Setting | Level |
|---|---|
| Brush Speed | Low |
| Suction | High |
| Water Output | Low |
Best for: Environments where minimal water residue on the floor is critical. High suction with low water output ensures rapid drying.
Soak Mode
| Setting | Level |
|---|---|
| Brush Speed | High |
| Suction | None |
| Water Output | High |
Best for: Pre-soaking stubborn stains before a full scrub-and-dry pass. The squeegee can be raised using the lift handle to prevent vacuuming during soaking.
How to use: 1. Select Soak mode on the touchscreen. 2. Raise the squeegee using the lift handle (push up from underneath). 3. Make a pass over the stained area to soak it. 4. Switch to Heavy Duty or Normal mode. 5. Lower the squeegee (push down). 6. Make a second pass to scrub and dry.
Water Suction Mode
| Setting | Level |
|---|---|
| Brush Speed | Medium |
| Suction | High |
| Water Output | None |
Best for: Picking up standing water without dispensing more. Useful after spills or flooding.
Brush Max Mode
| Setting | Level |
|---|---|
| Brush Speed | High |
| Suction | None |
| Water Output | None |
Best for: Dry brushing without water. The squeegee can be raised. Useful for agitating dry stains before a wet pass.
Accessory / ECO Accessory Mode
| Setting | Level |
|---|---|
| Brush Speed | None |
| Suction | High / Low |
| Water Output | None |
Best for: Using external cleaning attachments. Suction only, no brushes or water.
Squeegee Lift
In Soak and Brush Max modes, the squeegee can be raised to prevent water recovery: - Place hands underneath the squeegee lift handle and push upward to raise. - Push down to lower when ready to resume water recovery.
Additional Features
Consumable Reminder: The SH1 has a built-in consumable reminder (disabled by default). When enabled, it tracks wear status and shows three levels: "Healthy," "Medium Wear and Tear," and "Please Replace." A reminder displays at each power-on for any consumable past its expected lifespan.
Power-On Authentication: Can be enabled via PUDULink. A 4-digit password is required at each startup. Multiple passwords can be set.
Anti-Theft Locking: Configurable via PUDULink. The machine can be remotely locked or auto-locked when offline for an extended period.
Lease Management: The machine supports rental expiration dates via PUDULink. When the rental period expires, the machine auto-locks.
Operating Data: In Settings, view Total Hours of Cleaning Work and Total Power-On Time for utilisation tracking.
UI Style: Light mode and dark mode available in Settings.
Firmware Upgrade: Check for updates in Settings. Update over Wi-Fi when available.
Tutorial Videos: Built-in tutorial videos in Settings covering operation, maintenance, and consumable replacement.
Auto-Shutdown: If no manual operation occurs for more than 20 minutes, the machine automatically shuts down.
Page 8: Water System and Cleaning Solution
Clean Water Tank (Solution Tank)
- Capacity: 4 litres (removable)
- Purpose: Holds clean water and cleaning solution for dispensing during scrubbing.
- Filling: Remove by pressing the top. Open the rubber cap. Fill with water below 45 C. Add approved cleaning solution. Reinstall by aligning grooves and pressing until snap button clicks.
Dirty Water Tank (Recovery Tank)
- Capacity: 4 litres (removable)
- Purpose: Collects dirty water via the squeegee and vacuum system.
- Removal: Step on the recovery tank release pedal to detach.
Filling and Draining
Filling the solution tank: 1. Remove the solution tank from the machine (press the top). 2. Open the rubber cap. 3. Fill with clean water below 45 C. 4. Add special cleaner or low-foam cleaner as needed. 5. Close the cap. 6. Reinstall by aligning grooves and pressing until the snap button clicks.
Emptying the recovery tank: 1. Press the recovery tank release pedal to detach. 2. Remove the rubber cap and pour out dirty water. 3. Clean the window cover and filter. 4. Rinse the interior. 5. Reassemble and reinstall.
Cleaning Solution
- Use special cleaner or low-foam cleaner only.
- Water temperature must be below 45 C.
- Do not mix different types of detergents -- this can produce hazardous gases.
- Do not use flammable, strong acid, or strong alkaline detergents.
- Follow the cleaner manufacturer's dilution instructions.
Water Usage Information
The SH1's water output varies by mode:
| Mode | Water Output |
|---|---|
| Heavy Duty | High |
| Normal | Medium |
| ECO | Low |
| Low Residue | Low |
| Soak | High |
| Water Suction | None |
| Brush Max | None |
| Accessory | None |
The solution tank holds 4 litres, which provides cleaning coverage depending on the selected mode and walking speed.
Page 9: Maintenance and Servicing
Maintenance Schedule
| Component | Frequency | Method |
|---|---|---|
| Disc brushes | After every use | Remove by rotating toward centre; clean; check for tangles at mounting point; reinstall by rotating outward |
| Squeegee | After every use | Squeeze both sides and pull outward to remove; clean squeegee and vacuum tube separately |
| Solution tank | After every use | Empty remaining water; add small amount of clean water and rinse interior |
| Recovery tank | After every use | Press release pedal to remove; empty dirty water; clean window cover and filter |
| Machine body | After every use | Wipe with a clean damp cloth using neutral cleaner or water; no corrosive agents |
| Recovery tank float | Weekly | Remove from recovery tank top; rinse with clean water |
| Vacuum motor filter | Regularly (check after each use) | Remove and clean; press back to install |
| Solution tank filter | Regularly | Remove by counter-clockwise rotation; rinse and clean; reinstall by tightening clockwise |
| Water outlet filter | Regularly | Remove with a tool; clean; press back to install |
| Flowmeter | Periodically | Refer to maintenance video guide for detailed instructions |
| Battery | When low | Charge promptly; check level via battery display button |
Replacing Consumables
Disc brushes: 1. Switch to store position. 2. Hold the disc brush bristles and rotate quickly toward the centre of the machine to detach. 3. Clean the brush and check for tangles at the mounting point. 4. To install a new brush, align with the chassis mount and rotate outward until it locks. 5. Left and right brushes are interchangeable. 6. Replace when bristles are visibly worn down.
Squeegee rubber strips: 1. Squeeze both sides of the squeegee and pull outward to remove from the machine. 2. Pivot the slide latch outward to unlock the rubber strip holder. 3. Separate the holder from the casing. 4. Remove front and rear rubber strips. 5. The strips are symmetrical -- when one side wears out, flip to the unworn side before purchasing a full replacement. 6. The front rubber strip is slightly shorter than the rear. Do not swap them during installation. 7. Reassemble in reverse order and reinstall on the machine.
Filters: - Recovery tank float: remove from recovery tank top, rinse weekly. - Vacuum motor filter: remove and clean regularly; press back to install. - Solution tank filter: remove by counter-clockwise rotation; rinse; reinstall clockwise. - Water outlet filter: remove with a tool; clean; press back.
Cleaning the Recovery Tank (Detailed)
- Step on the recovery tank release pedal to detach.
- Remove the rubber cap and pour out dirty water.
- Press the bilateral catches to lift and remove the recovery tank window cover.
- Remove the recovery tank filter (if fitted) and empty solid waste; flush with water.
- Open the recovery tank top using the latches.
- Remove the float and rubber ring for rinsing (weekly).
- Clean the tank bottom.
- Before reassembling, ensure the bottom barb snaps into the correct position.
- Close and lock the latches.
Cleaning the Machine Body
- Wipe with a clean damp cloth using neutral cleaner or water.
- Do not use corrosive agents.
- Do not use water pressure cleaners.
- Do not immerse the machine in water.
When to Replace Parts
| Sign | Action |
|---|---|
| Disc brush bristles worn down or flattened | Replace disc brushes |
| Squeegee rubber strips worn, cracked, or deformed | Flip to unworn side first; replace if both sides are worn |
| Solution tank filter permanently clogged | Replace filter |
| Vacuum motor filter damaged or blocked | Replace filter |
| Cleaning quality degrades despite clean components | Inspect all consumables; replace as needed |
Page 10: Troubleshooting
Machine will not power on
What you see: Pressing and holding the power switch produces no response. Screen stays off.
Likely causes: No battery installed; battery inserted incorrectly; battery completely empty; battery in sleep mode after extended storage.
What to check: 1. Check that a battery is installed in the battery box. 2. Remove and reinstall the battery, listening for the click that confirms proper seating. 3. Press the battery level display button to check the charge level. 4. If unused for more than 7 days, press and hold the battery level display button to activate the battery. 5. If the battery is empty (red flashing or no indicator), charge it fully.
Solution: Insert or reseat the battery correctly. Activate a dormant battery by holding the display button. Charge a depleted battery for 2.5 hours before retrying.
Escalate if: Machine does not power on with a fully charged, properly installed battery. In case of battery failure, remove the battery immediately.
Poor water recovery (wet floor after cleaning)
What you see: Floor remains wet after the machine passes. Dirty water not being picked up.
Likely causes: Squeegee raised; rubber blades worn; squeegee blocked; vacuum hose blocked or disconnected; recovery tank not installed properly or top not sealed; recovery tank filter jammed; vacuum motor filter blocked.
What to check: 1. Verify the squeegee is in the lowered position. 2. Inspect squeegee rubber blades for wear, cracks, or deformation. 3. Check the squeegee for blockages and clear any debris. 4. Verify the squeegee vacuum hose is securely connected. 5. Inspect the vacuum hose for blockages. 6. Confirm the recovery tank is properly installed and the top is tightly closed. 7. Check the recovery tank filter for clogs. 8. Inspect the vacuum motor filter for blockages.
Solution: Lower the squeegee if raised. Replace worn rubber blades (they are symmetrical and can be flipped first). Clear all blockages in squeegee, vacuum hose, and filters. Reinstall recovery tank ensuring it seats correctly and seals tightly. Clean all filters.
Escalate if: Water recovery remains poor after all components are clean, properly installed, and seals are intact. The vacuum motor may be faulty.
Insufficient or no water flow to the floor
What you see: Floor stays dry during cleaning. Machine runs but no water is dispensed.
Likely causes: Solution tank empty; tank not properly seated; solution tank filter blocked; dirt in tank; mode does not dispense water (Water Suction, Brush Max, or Accessory modes).
What to check: 1. Remove the solution tank and check the water level. Refill if empty. 2. Reinstall the solution tank (align grooves, press until snap button clicks). 3. Check the solution tank filter (remove by counter-clockwise rotation, rinse). 4. Inspect the tank for sediment; clean if necessary. 5. Verify the selected mode uses water (Heavy Duty, Normal, ECO, Low Residue, or Soak).
Solution: Refill with water below 45 C and approved cleaner. Clean or replace the solution tank filter. Switch to a water-dispensing mode.
Escalate if: Water does not flow with a full tank, clean filter, and water-dispensing mode selected. The water pump or solenoid may be faulty.
Machine will not charge
What you see: Battery indicators do not change when charger is connected.
Likely causes: Charger cable not properly connected (metal clip not engaged); non-original charger; power outlet issue; charger damaged; battery fault.
What to check: 1. Verify the charging cable metal clip is fully engaged with the battery. 2. Confirm you are using the original charger. 3. Test the power outlet with another device. 4. Check the charger for visible damage. 5. Press the battery display button to check the current level.
Solution: Reconnect the charger, ensuring the metal clip clicks into place. Replace with an original charger if needed. Try a different power outlet.
Escalate if: Battery does not charge with a confirmed working original charger and secure connection. The battery or charger may need replacement. In case of battery failure, remove the battery immediately.
Disc brush not spinning or spinning weakly
What you see: Disc brushes do not rotate, rotate intermittently, or spin with reduced power.
Likely causes: Large debris caught under brush or at mounting point; brush not properly installed; motor overload from large particles; brush worn out.
What to check: 1. Power off the machine. 2. Switch to store position and remove the disc brushes. 3. Check mounting points for tangles, string, or debris. 4. Inspect disc brush bristles for severe wear. 5. Clear large debris from the floor before restarting.
Solution: Remove debris from brush and mounting area. Reinstall properly (rotate outward to lock). Replace worn disc brushes. Pre-sweep large debris before using the SH1.
Escalate if: Brushes still do not spin after clearing debris and proper installation. The brush motor may be faulty.
Streaks or uneven cleaning results
What you see: Visible dirty lines, uneven cleaning, or streaks on the floor after a pass.
Likely causes: Squeegee not making full floor contact; rubber strips worn, broken, or deformed; wrong mode for soiling level; disc brush worn; insufficient cleaning solution.
What to check: 1. Check that the squeegee is lowered and flush against the floor. 2. Inspect rubber strips for wear, cracks, or deformation. 3. Verify the cleaning mode matches the soiling level (use Heavy Duty for stubborn stains). 4. Check disc brush bristle condition. 5. Confirm the solution tank has water and cleaner.
Solution: Flip or replace worn squeegee rubber strips. Replace worn disc brushes. Use a stronger mode for heavy soiling. Ensure adequate cleaning solution. For edge cleaning, press the squeegee closely against the wall.
Escalate if: Streaks persist after replacing squeegee strips and brushes.
Squeegee leaves water trail along walls or edges
What you see: Water marks or dirty residue along walls and edges after cleaning.
Likely causes: Squeegee not pressed close to wall during edge cleaning; rubber strips worn unevenly; machine not angled correctly.
What to check: 1. During edge cleaning, push the machine so the squeegee closely follows the wall. 2. Inspect squeegee rubber strips for uneven wear. 3. Check that the machine is in the correct working position angle.
Solution: Angle the machine so the squeegee presses tightly against the wall during edge passes. Flip or replace unevenly worn rubber strips. Practice consistent edge-following technique.
Escalate if: Usually a technique issue. Escalate only if rubber strips are defective.
Battery drains faster than expected
What you see: Runtime noticeably shorter than rated 70 minutes (Normal) or 100 minutes (ECO).
Likely causes: Battery not fully charged; consistently using Heavy Duty mode; battery degraded from age or misuse; battery not maintained during storage.
What to check: 1. Charge fully (all four indicators solid white) before testing. 2. Note which cleaning mode is used; Heavy Duty drains fastest. 3. Check battery age and storage history. 4. Verify the charger is providing full power.
Solution: Always fully charge before each session. Use ECO mode when possible. If stored without periodic charging, perform several full charge/discharge cycles. Replace the battery if significantly degraded.
Escalate if: A fully charged new battery provides significantly less than 70 minutes in Normal mode.
Machine tips over or feels unstable
What you see: Machine falls or tilts unexpectedly during use or storage.
Likely causes: Left on a ramp or slope; operating on uneven ground; multi-functional shaft not locked; bumpy or stepped surface.
What to check: 1. Confirm the machine is on a flat, hard surface. 2. Verify the multi-functional shaft is locked (listen for click). 3. Check the ground for slopes, steps, or unevenness.
Solution: Always operate and store on flat, level ground. Never leave on a ramp or slope. Ensure the posture switching ring has clicked into the locked position. Lift and carry the machine over uneven ground or stairs.
Escalate if: Machine feels unstable on flat ground. The shaft or locking mechanism may be damaged.
Foul odour from the machine
What you see: Unpleasant smell, especially around the recovery tank area.
Likely causes: Recovery tank not emptied after use; not cleaned regularly; dirty water residue in vacuum hose; solution tank contaminated.
What to check: 1. Remove and empty the recovery tank. 2. Open the top and inspect for residue buildup. 3. Check the float and rubber ring for slime. 4. Inspect the vacuum hose for standing dirty water. 5. Check the solution tank for contamination.
Solution: Empty and thoroughly clean the recovery tank after every use. Rinse the float, rubber ring, and all filters weekly. Flush the vacuum hose with clean water. Clean or replace the solution tank if contaminated. Never leave dirty water standing in the machine overnight.
Escalate if: Usually resolved with thorough cleaning. No escalation needed unless odour persists after complete cleaning.
Touchscreen not responding
What you see: Screen is on but does not respond to touch. Swipe to change modes does not work.
Likely causes: Wet or dirty screen; screen protector interfering; software glitch.
What to check: 1. Dry the screen with a clean, soft cloth. 2. Clean any dirt or cleaning solution from the surface. 3. Power cycle: hold power switch to turn off, wait 10 seconds, turn on again.
Solution: Clean and dry the screen surface. Power cycle the machine.
Escalate if: Screen remains unresponsive after cleaning and power cycle.
Unusual noise during operation
What you see: Grinding, scraping, or rattling sounds during cleaning.
Likely causes: Foreign object in disc brush or squeegee; brush not seated properly; splash guard loose; squeegee dragging improperly.
What to check: 1. Power off immediately. 2. Switch to store position. 3. Remove disc brushes and inspect mounting points for foreign objects. 4. Check the squeegee for trapped debris. 5. Verify splash guards are properly clipped in. 6. Inspect the transport wheel for obstructions.
Solution: Remove foreign objects. Reseat disc brushes and splash guards properly. Ensure squeegee vacuum hose is correctly connected.
Escalate if: Noise persists after clearing all obstructions.
Wi-Fi or PUDULink app connection failure
What you see: SH1 does not appear in the PUDULink app, or connection drops frequently.
Likely causes: Wi-Fi network is not 2.4 GHz (5 GHz not supported); machine out of range; password changed; app not updated.
What to check: 1. Confirm the Wi-Fi network is 2.4 GHz. 2. Move the machine closer to the router. 3. Verify Wi-Fi credentials are correct. 4. Check for PUDULink app updates.
Solution: Connect to a 2.4 GHz network. Move within range. Re-enter credentials in machine settings. Update the app.
Escalate if: Connection issues persist with confirmed 2.4 GHz network and correct credentials.
Residual water after cleaning
What you see: Puddles or wet spots remain on the floor after the machine passes.
Likely causes: Squeegee not lowered; recovery tank full; vacuum hose blocked; squeegee rubber worn.
What to check: 1. Confirm the squeegee is lowered. 2. Check if the recovery tank is full -- empty if needed. 3. Inspect the vacuum hose for blockages. 4. Check squeegee rubber strips for wear.
Solution: Lower the squeegee. Empty the recovery tank. Clear vacuum hose blockages. Replace worn rubber strips.
Escalate if: Residual water persists after all components are clean and properly installed.
Page 11: Frequently Asked Questions
Getting Started
How heavy is the SH1? 27 kg (approximately 60 lbs). For transport, use park position. Remove tanks to reduce weight when carrying up stairs.
What is the difference between store, park, and working positions? Working: angled forward for cleaning. Store: upright at 65 degrees for maintenance and storage. Park: tilted back on transport wheel for moving. Never leave in working position when idle.
What should I hear when changing positions? A click sound confirming the posture switching ring has locked. If no click, the position is not secured.
Can the SH1 be used outdoors? Yes, on flat outdoor surfaces. Avoid bumpy, stepped, or unpaved ground.
What cleaning area can the SH1 cover per hour? 1,100 to 1,600 square metres per hour depending on mode and walking speed.
Does the SH1 have smart features? Yes. Wi-Fi (2.4 GHz) and PUDULink app for real-time task reports, staff management, device tracking, lease management, and anti-theft locking.
Can I view operating data? Yes. Settings menu shows Total Hours of Cleaning Work and Total Power-On Time.
Does the SH1 support power-on authentication? Yes, via PUDULink. A 4-digit password is required at each startup when enabled.
Does the SH1 have anti-theft protection? Yes. Configurable via PUDULink. The machine can be remotely locked or auto-locked when offline.
Does the SH1 support lease management? Yes. The machine auto-locks when the rental period expires. Managed via PUDULink.
What happens if the SH1 is left in standby too long? It automatically shuts down after 20 minutes of inactivity.
What interface styles are available? Light mode and dark mode, selectable in Settings.
Charging
How long does the SH1 battery last? 70 minutes in Normal mode, up to 100 minutes in ECO mode.
How do I charge the battery? Plug the charging cable into the battery with the metal clip aligned. Charging takes about 2.5 hours. Four LED indicators show the level.
Is the battery removable? Yes. Press the clip and slide out. Press and hold the clip and push in to install (listen for click).
How do I activate a stored battery? Press and hold the battery level display button. Batteries may enter sleep mode after 7+ days of inactivity.
How many cleaning modes does the SH1 have? Nine modes total: Heavy Duty, Normal, ECO, Low Residue, Soak, Water Suction, Brush Max, Accessory, and ECO Accessory. Select 1--4 for the home screen.
Cleaning Operations
What are the different cleaning modes? Heavy Duty (tough stains), Normal (daily), ECO (light/energy saving), Low Residue (minimal water left), Soak (pre-soak stubborn stains), Water Suction (pick up standing water), Brush Max (dry brushing), and Accessory modes (external attachments).
Can I raise the squeegee during cleaning? Yes. In Soak and Brush Max modes, push up the squeegee lift handle from underneath.
Does the SH1 have a consumables reminder? Yes, but disabled by default. When enabled, it shows "Healthy," "Medium Wear and Tear," or "Please Replace" at each power-on.
Water and Solution
What cleaning solution can I use? Special cleaner or low-foam cleaner only. No strong acids, alkalis, or flammable liquids. Do not mix different detergent types. Water must be below 45 C.
How much water does the SH1 hold? 4 litres in the solution tank and 4 litres in the recovery tank. Both are removable.
Modes
What is ECO mode? Low brush speed, low suction, low water output. Extends runtime to approximately 100 minutes. Best for light cleaning.
What is Soak mode? High brush speed, no suction, high water output. Pre-soaks stubborn stains. Raise the squeegee for best results, then follow with a scrub-and-dry pass.
What is Water Suction mode? Medium brush speed, high suction, no water output. Picks up standing water without dispensing more.
Safety
What must always be installed before operating? The recovery tank float, vacuum motor filter, and water outlet filter. Also the recovery tank itself.
What should I do before transporting the SH1? Empty both tanks to prevent leakage. Use park position for pushing. Remove tanks to reduce weight when carrying.
Maintenance
How do I change the disc brushes? In store position, grip bristles and rotate toward centre to detach. Clean and check mounting point. Reinstall by rotating outward until locked. Left and right are interchangeable.
How do I replace squeegee rubber strips? Remove squeegee, unlock slide latch, separate holder from casing. Strips are symmetrical -- flip to unworn side before full replacement. Front strip is shorter than rear.
How do I clean the recovery tank properly? Release pedal to detach. Empty. Remove window cover. Clean filter. Open top latches. Remove float and rubber ring for rinsing (weekly). Clean tank bottom. Ensure bottom barb snaps correctly. Close and lock.
Page 12: Service and Escalation
When to Contact Support
- Machine does not power on with a fully charged, properly installed battery.
- Battery does not charge with a working original charger and secure connection.
- Disc brushes do not spin after clearing debris and confirming proper installation.
- Vacuum motor appears faulty (poor water recovery despite clean components and seals).
- Water pump does not dispense water with a full tank, clean filter, and correct mode.
- Touchscreen remains unresponsive after cleaning and power cycle.
- Unusual noise persists after removing all foreign objects.
- Machine feels unstable on flat ground (shaft or locking mechanism may be damaged).
- Wi-Fi module fails with confirmed 2.4 GHz network and correct credentials.
- Non-dismissible anomalies appear on screen (board abnormal, SN abnormal).
- Any battery failure -- remove the battery immediately and do not attempt to use it.
Before You Call
- Machine model and serial number (SHFC02).
- Description of the issue and when it started.
- Steps already taken to troubleshoot.
- Photos or videos of the issue if possible.
- Current battery level (press the battery display button).
- Any error messages or anomaly prompts on screen.
Support Contact
- HUTECH Robotics: ai.hutechrobotics.com
- Manufacturer Support: techservice@pudutech.com