BellaBot -- Support Manual
An indoor delivery robot with cat-like personality, designed for restaurants, hotels, and hospitality venues.
Page 1: Overview
What is the BellaBot?
BellaBot is an autonomous indoor delivery robot built by the manufacturer for the hospitality industry. It navigates restaurants, hotels, and similar venues using a combination of laser SLAM and visual SLAM positioning, delivering food and drinks to tables without staff needing to leave the kitchen or bar area.
The robot features a 10.1-inch LCD face screen with a cat-like personality that responds to touch with emotional expressions and voice. It carries up to four trays of dishes simultaneously, plans optimal delivery routes across multiple tables, and returns to the pickup point automatically. Staff simply load the trays, enter the table numbers, and send the robot on its way.
BellaBot supports six operating modes -- Delivery, Cruise, Direct, Birthday, Escorting, and Special -- covering everything from standard meal service to birthday celebrations, customer greeting, and promotional rounds. It includes AI voice interaction activated by saying "Bella, Bella" or by standing in front of the robot.
Models and Variants
| Model | Description |
|---|---|
| BL100 | Standard BellaBot |
| BL101 | BellaBot variant |
| BL102 | BellaBot variant |
| BLFD02 | BellaBot variant |
At a Glance
- Weight: 55 kg
- Dimensions: 565 x 537 x 1290 mm
- Battery life: 12--24 hours (depending on usage and load)
- Charging time: 4.5 hours
- Trays: 4 layers, 10 kg max per tray
- Speed: 0.2--1.2 m/s (adjustable)
- Navigation: Laser SLAM + Visual SLAM
- Minimum aisle width: 70 cm
- Screen: 10.1-inch LCD
- Connectivity: Wi-Fi (2.4G / 5G), Bluetooth, 3G, 4G LTE
Page 2: Specifications
| Feature | Value |
|---|---|
| Operating voltage | DC 23--29.4 V |
| Power input | AC 100--240 V, 50/60 Hz |
| Power output | 29.4 V / 8 A |
| Battery capacity | 25.6 Ah |
| Charging time | 4.5 hours |
| Battery life | 12--24 hours |
| Cruise speed | 0.2--1.2 m/s (adjustable) |
| Navigation | Laser + Visual integrated SLAM |
| Min. travel width | 70 cm |
| Max. surmountable height | 10 mm |
| Max. climbing angle | 5 degrees |
| Tray dimensions | 410 mm x 500 mm |
| Number of trays | 4 |
| Height between trays (top to bottom) | 230 / 200 / 200 / 180 mm |
| Tray load | 10 kg per layer |
| Machine material | ABS / aviation-grade aluminium alloy |
| Robot weight | 55 kg |
| Robot dimensions | 565 x 537 x 1290 mm |
| Screen size | 10.1-inch LCD |
| Operating system | Android |
| Microphone | 6-mic circular array |
| Speaker power | 2 x 10 W stereo |
| Working temperature | 0 to 40 C |
| Working humidity | 85% RH or less |
| Storage temperature | -40 to 65 C |
| Working altitude | Below 2000 m |
| Surface requirement | Indoor, flat and smooth ground |
| IP rating | IP20 |
| Connectivity | Wi-Fi (2.4G / 5G), Bluetooth, 3G, 4G LTE |
Page 3: Product Components
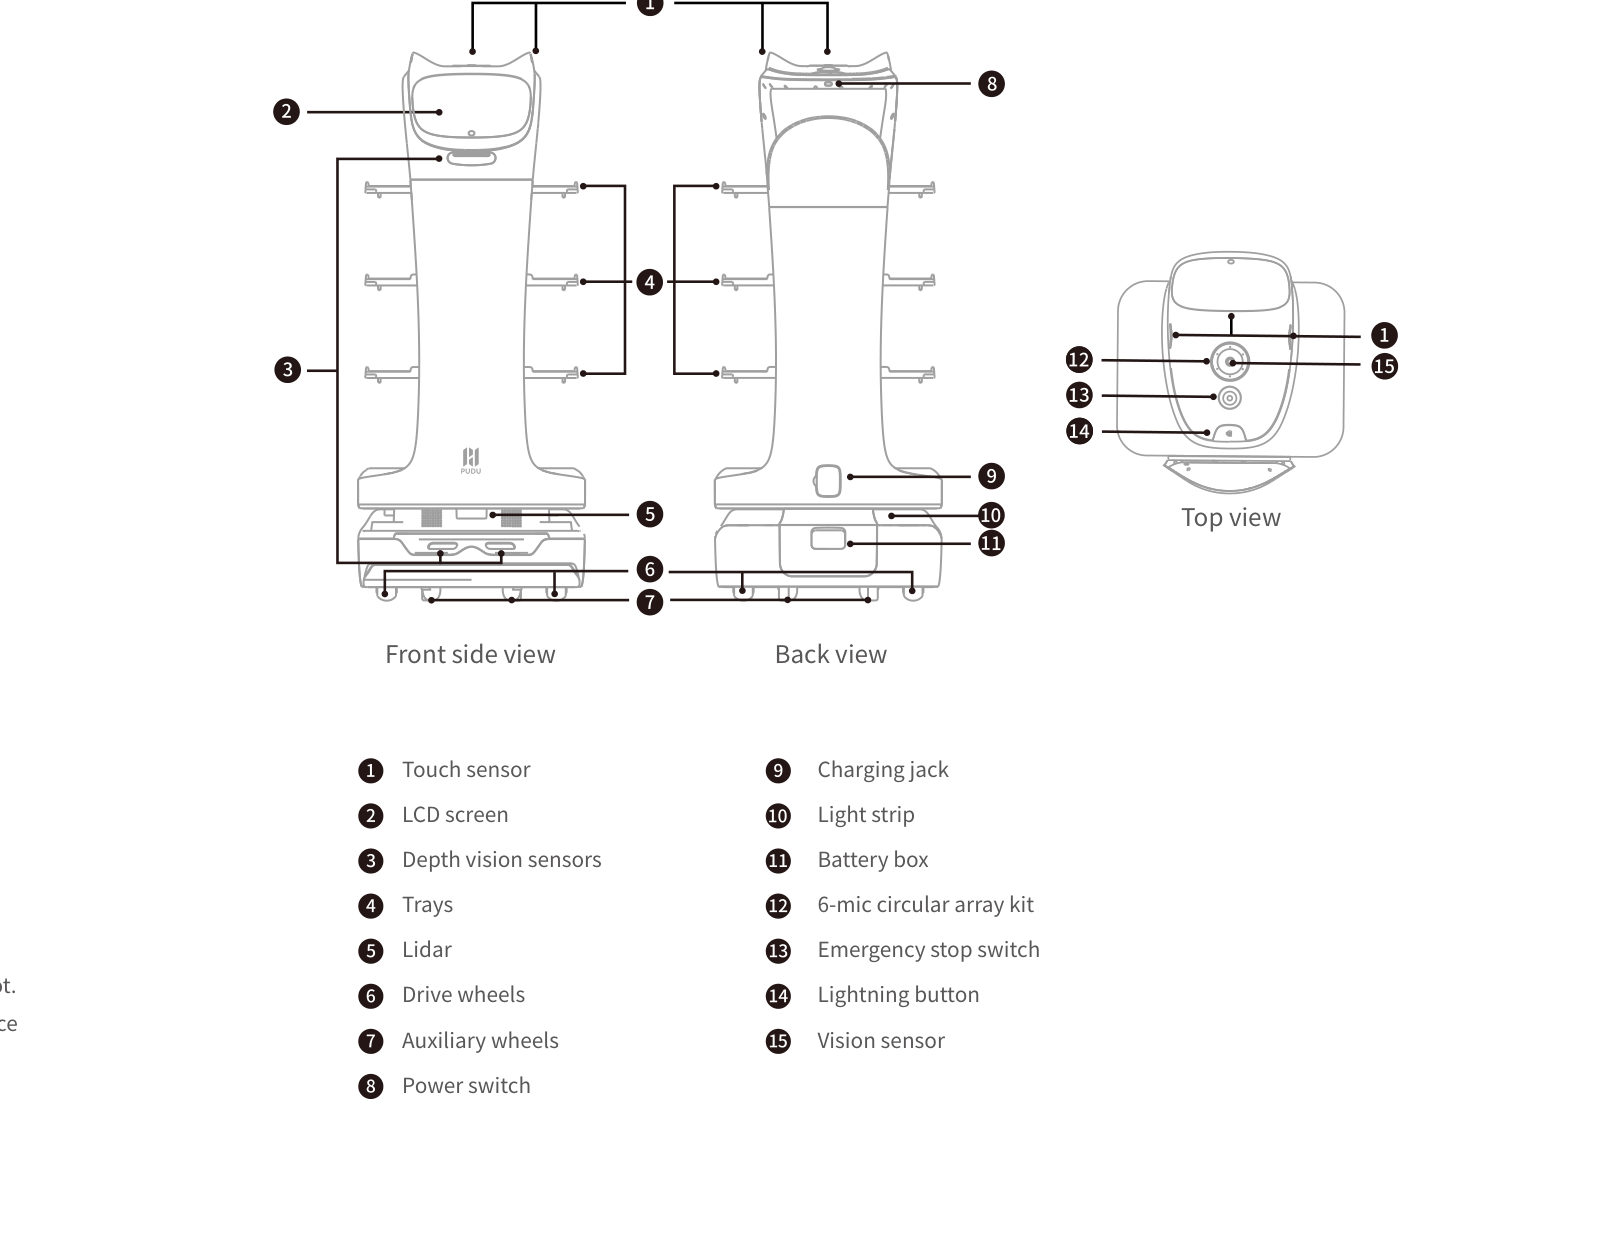
External Components
Top Section
- Touch sensor (head area) -- Detects touch input on the robot's head and ears, triggering emotional expressions and voice responses.
- LCD screen -- 10.1-inch face display showing the cat-like animated face, task status, and interactive prompts.
- Vision sensor (top camera) -- Upward-facing camera used for visual SLAM positioning via ceiling markers.
- 6-mic circular array kit -- Six-microphone array for voice recognition and AI voice interaction.
- Emergency stop switch -- Red switch on top of the robot. Press to immediately halt all movement.
- Lightning button -- Quick pause/resume button.
Mid Section
- Depth vision sensors -- Forward-facing cameras for obstacle detection and depth perception.
- Trays (4 layers) -- Four removable trays for carrying dishes. Spaced at 230 / 200 / 200 / 180 mm (top to bottom).
Lower Section
- Lidar sensor -- Laser scanner for SLAM navigation and environment mapping.
- Light strip (bottom) -- LED strip around the base indicating robot status.
Rear
- Charging jack -- Port for connecting the original charger.
- Battery box -- Rear-mounted compartment housing the battery pack, with key switch for power isolation.
- Power switch -- Press and hold for 1 second to power on, 3 seconds to shut down.
Underside
- Drive wheels -- Motorised wheels for movement.
- Auxiliary wheels -- Support wheels for balance and stability.
Sensors and Navigation
- Lidar sensor -- Laser-based scanner for mapping and autonomous navigation (laser SLAM).
- Vision sensor (top camera) -- Upward-facing camera for visual SLAM positioning using ceiling markers.
- Depth vision sensors -- Forward-facing cameras for real-time obstacle detection and avoidance.
- Touch sensor -- Capacitive sensor on the head area for interactive touch responses.
- 6-mic circular array -- Picks up voice commands for AI interaction. Activated by saying "Bella, Bella" or by proximity detection.
Ports and Interfaces
- Charging jack -- Located at the rear. Accepts the original charger connector with locking fastener.
- Key switch -- Inside the battery box. Must be set to ON for the robot to operate.
Page 4: Safety Instructions
Before You Start
- Confirm the key switch inside the battery box is set to ON.
- Charge the battery fully before first use. A full charge takes approximately 4.5 hours.
- Verify that all sensors are clean and unobstructed.
- Ensure the venue floor is flat, smooth, dry, and free of obstacles.
Electrical Safety
- Use only the original rechargeable battery and charger.
- Verify that the mains voltage matches the charger rating (AC 100--240 V, 50/60 Hz) before connecting.
- Ensure the charging connector fastener is fully engaged to prevent overheating.
- Charge promptly when the battery drops to 20%. Prolonged low-battery use damages battery life.
- Do not charge in high-temperature, high-pressure, or explosive environments.
Operating Safety
- Do not cover the top camera while the robot is operating.
- Do not clean or maintain the robot while it is powered on.
- Do not place open flames, stoves, or flammable/explosive items on the robot.
- Do not load or unload dishes while the robot is in motion.
- Do not move or transport the robot while it is working.
- Only trained personnel may disassemble or repair the robot.
- Keep the robot upright during transport. Never lift by the trays or the box.
- Children must not play with the robot.
Environmental Requirements
- Temperature: 0 to 40 C operating; -40 to 65 C storage.
- Humidity: 85% RH or less.
- Altitude: Below 2000 m.
- Floor: Indoor, flat and smooth ground only. Maximum bump height 10 mm, maximum incline 5 degrees.
- Do not use on wet surfaces or surfaces covered with liquids.
- Do not use where wireless devices are prohibited.
Warnings
- Explosion risk: Do not expose the battery to fire, extreme heat, or physical damage. Use only the original battery. Incorrect battery handling can cause fire or explosion.
- Overheating risk: Always ensure the charger connector fastener is fully clicked into place. A loose connection can cause overheating.
- Disposal: Dispose of the robot, battery, and accessories according to local regulations. Do not place batteries in general waste.
Page 5: Basic Operation
Powering On
- Open the rear battery cover and confirm the key switch is turned to ON. Close the cover.
- Move the robot to its designated startup location (under a positioning marker for visual SLAM, or at the laser SLAM startup point).
- Press and hold the power switch for 1 second.
- The bottom light strip will illuminate, confirming the robot is on.
- The Pudu App will start automatically. If it does not, tap the App icon on the Android system desktop.
Powering Off
- Ensure the robot has completed all active tasks and is stationary.
- Press and hold the power switch for 3 seconds.
- The screen and light strip will turn off, confirming the robot has shut down.
Pausing Operation
- Tap the screen once, or press the lightning button, to pause the robot mid-task.
- The robot will stop in place immediately.
- To resume, tap the screen again or press the lightning button a second time.
- In non-Cruise modes, the robot will automatically resume after a configurable pause time (default 10 seconds, range 5--600 seconds).
- In Cruise mode, auto-resume time is separately configurable (default 10 seconds, range 5--600 seconds).
Emergency Stop
- In any emergency, press the red emergency stop switch on top of the robot firmly.
- The robot will halt all movement instantly.
- To resume after the emergency is resolved:
- Rotate the emergency stop switch clockwise to release it.
- Tap the screen or press the lightning button to restart operation.
Moving the Robot Manually
- Power off the robot completely before moving it.
- Keep the robot upright at all times.
- Grip the robot body securely. Never lift by the trays or the battery box.
- Move to the desired location and place on a flat, smooth surface before powering on.
Page 6: Charging and Battery
Charging Methods
Method 1: Direct Charger
- Power off the robot.
- Connect the original charger to a mains outlet (AC 100--240 V).
- Plug the charging connector into the charging jack at the rear of the robot.
- Ensure the fastener on the connector is fully clicked into place.
- Charging takes approximately 4.5 hours from empty to full.
- The charger indicator light will confirm charging status.
Battery Information
- Battery capacity: 25.6 Ah
- Expected battery life: 12--24 hours per charge (varies with payload, task frequency, and environment)
- When to charge: Charge promptly when the battery drops to 20% or lower. Running below 20% regularly will degrade battery health.
- First-use charging: Fully charge the battery before first use (approximately 4.5 hours).
- Battery protection setting: In Advanced Settings, you can set a minimum battery level below which the robot cannot operate. This prevents over-discharge and extends battery life. Not available when battery is already below 30%. Factory reset is blocked below 10%.
Checking Battery Level When Powered Off
- Open the rear battery cover.
- Press the battery level button on the battery pack.
- LED indicators will show the current charge level:
- Red: 0--10%
- Progresses through to green for 90--100%.
Battery Replacement Procedure
- Hold the power switch for 3 seconds to shut down the robot.
- Open the rear battery box cover.
- Turn the key switch to OFF.
- Lift the battery handle to the horizontal position.
- Extract the battery with both hands.
- Insert the replacement battery with both hands.
- Press the handle back to the vertical position.
- Turn the key switch to ON.
- Close the rear cover.
Battery Care Tips
- Charge before the battery drops below 20%.
- Do not leave the battery fully drained for extended periods.
- Store the robot in a temperature range of -40 to 65 C when not in use.
- Operate only within 0 to 40 C.
- Use only the original charger and battery.
Page 7: Modes and Functions
Delivery Mode
What it does: Delivers dishes to multiple tables simultaneously using optimal route planning.
How to use it: 1. Place dishes on the trays at the pickup position. 2. Enter the table number(s) for each tray on the screen. 3. Tap Start. The robot plans the fastest route and delivers to each table. 4. Once all dishes are collected by customers, the robot returns to the pickup position automatically.
Best for: Standard meal service in restaurants.
Additional options: - Smooth Mode: Limits speed to 0.5 m/s for dishes containing soup or liquid. Three states: enable once (current task only), enable permanently, or repeat last task setting. - Sequential Delivery: When enabled in Advanced Settings, dishes are delivered in the order entered rather than by optimal route. - Repeat Previous Task: Auto-fills the previous task's table numbers for repeated deliveries. - Automatic pickup time: If Done is not tapped within the set time (default 180 seconds, range 1--600), the robot auto-completes and moves on. - Single-layer Multi-table: Allows up to 20 table numbers per tray. - Tray Error Reminder: Alerts with a voice warning when dishes are taken from the wrong tray (English and Chinese only). Does not work with goblets, fully glass items, or items shorter than 5 cm.
Cruise Mode
What it does: The robot circulates along a preset path carrying self-service items, recommending them to customers by voice.
How to use it: 1. Load drinks, desserts, napkins, or other items onto the trays. 2. Select Cruise Mode and choose the preset path. 3. The robot will follow the route, announcing items to customers as it passes.
Best for: Self-service drinks rounds, dessert promotion, or snack distribution.
Direct Mode
What it does: Manual point-to-point navigation for one-off delivery tasks.
How to use it: 1. Place the item on a tray. 2. Select Direct Mode and choose the destination point. 3. The robot travels directly to the selected point.
Best for: Specific one-off deliveries that do not follow the standard table layout.
Birthday Mode
What it does: Delivers birthday cakes or gifts accompanied by customisable background music.
How to use it: 1. Place the cake or gift on a tray. 2. Select Birthday Mode and choose the destination table. 3. Select the background music (default or imported custom music). 4. The robot delivers while playing the chosen music.
Best for: Birthday celebrations in restaurants.
Escorting Mode
What it does: Greets customers at the entrance and leads them to their assigned table.
How to use it: 1. Select Escorting Mode at the greeting position. 2. Choose the destination table. 3. The robot greets the customer and navigates to the table. 4. Once the customer is seated, the robot returns to the greeting position.
Best for: Customer greeting and seating in busy venues.
Auto-complete time: If Done is not tapped within the set time (default 15 seconds, range 1--30), the robot returns automatically.
Special Mode
What it does: Delivers gifts or dishes for special occasions with selectable background music and voice reminders.
How to use it: 1. Place the item on a tray. 2. Select Special Mode and choose the destination table. 3. Select background music and voice reminder. 4. The robot delivers while playing the chosen music.
Best for: Marriage proposals, celebrations, expressions of blessings.
Additional Features
Voice Interaction - Say "Bella, Bella" or stand in front of the stationary robot to activate AI voice interaction. - Requires an active network connection (Wi-Fi or cellular). - While the voice interface is displayed, the robot's motor is locked and it cannot be moved.
Touch Interaction - Touch the robot's head or ears when stationary to trigger emotional expressions and voice responses. - First touch: friendly expression. Continued touching: pleasant expressions. Repeated touching: progressively less pleased reactions.
Lucky Draw (Interactive Function) - Can be enabled for Delivery, Birthday, and Special modes. - After dishes are delivered, customers tap the screen to participate. - Winning probabilities are set as decimals summing to 1. - Winners are prompted to contact a waiter. Non-winners see the screen for 3 seconds before the next task begins. - Cannot be enabled at the same time as the tray sensor auto-complete.
Custom Voice Announcements - Up to 5 custom voices per mode, 50 characters each. - Configurable for Delivery, Cruise, Guiding, and Special modes. - Custom voice packets can be uploaded via the Cloud Platform. - Long-press a custom voice to delete it.
Music Import 1. Navigate to the Music interface on the robot. 2. Connect the robot and your phone to the same Wi-Fi network. 3. Scan the QR code on screen to upload music files. 4. Supported formats: mp3, wav, flac, aac, pcm, wma, ape. 5. Manage playlists for Birthday, Cruise, and Delivery modes through List Editing.
Speed Settings - Adjustable in Settings > Speed Settings. - Full range: 0.1--1.2 m/s (0.33--3.93 ft/s). - Recommended delivery speed: below 0.9 m/s. - Recommended cruise speed: 0.2 m/s or 0.6 m/s. - Higher speeds (1.0, 1.1, 1.2 m/s) available in Advanced Settings.
Braking Levels - Level 1: Emergency stop/start, shortest braking distance. - Level 2: Light/medium loads, smooth braking. - Level 3: Heavy loads, smoothest braking.
Multi-Robot Docking Modes - One-to-one: Fixed pickup location per robot. - Free docking: Nearest available pickup by priority. - Waiting: Robot waits at a temporary dock until a pickup becomes free.
PuduBeeper and Third-Party Integration - Enable Robot API in Advanced Settings to connect with PuduBeeper or third-party POS/ordering systems. - External systems can dispatch delivery tasks to the robot automatically.
Map Management - Multiple maps can be installed. Switch between them in Settings > Map Settings. - Table numbers, docking locations, and settings synchronise automatically when switching maps.
Mode Protection - Password protection can be enabled for Delivery, Cruise, Guiding modes, and the Settings interface. - When enabled, a password is required to cancel tasks, modify tasks, exit modes, or access settings. - Contact HUTECH technical support for the password.
Distribution Parameters (Advanced) - Automatic pickup time: 1--600 seconds (default 180) - Auto-complete time of guiding: 1--30 seconds (default 15) - Cycle broadcast time of delivery arrival: 1--30 seconds (default 15) - Non-cruise pause resume time: 5--600 seconds (default 10) - Cruise mode pause resume time: 5--600 seconds (default 10)
Factory Reset - Available in Advanced Settings. - Deletes downloaded music, custom voice packets, and maps. - Cannot be performed when battery is below 10%.
Page 8: Maintenance and Servicing
Maintenance Schedule
| What to Check | How Often | How to Do It | Robot Must Be |
|---|---|---|---|
| Trays | Weekly | Wipe surfaces with a clean, dry cloth. If tray pads have oil stains, remove and wash separately. Replace only after fully dry. | Powered off |
| Drive wheels and auxiliary wheels | Weekly | Wipe with a clean cloth. If tangled with hair or debris, lay the robot on its side on a protective mat and clear the wheels. | Powered off |
| Vision sensor (top camera) | Weekly | Clean with a clean cloth or specialised lens cleanser. Address contamination immediately. | Powered off |
| Depth vision sensors | Weekly | Clean with a clean cloth or specialised lens cleanser. Address contamination immediately. | Powered off |
| Lidar sensor | Weekly | Clean with a clean cloth or specialised lens cleanser. | Powered off |
| Robot body | Monthly | Wipe the entire surface with a clean, dry cloth. | Powered off |
Cleaning the Robot
- Always power off the robot before cleaning.
- Use only a clean, dry, lint-free cloth for all surfaces.
- For sensors, use a specialised lens cleanser if a dry cloth is insufficient.
- Never use water or any other liquid to clean the robot. Always keep the robot dry.
- If oil or food splatter gets on sensors, clean immediately -- dirty sensors cause navigation failures.
- Tray pads can be removed and washed separately. Replace only when completely dry.
When to Replace Parts
- Wheels: If drive or auxiliary wheels show significant wear, cracking, or persistent vibration after cleaning.
- Sensors: If a sensor consistently gives incorrect readings after thorough cleaning, it may need replacement.
- Battery: If runtime has degraded to less than half the original performance, the battery pack likely needs replacing. See the battery replacement procedure in Page 6.
- Trays: If trays are warped, cracked, or no longer seat securely.
Page 9: Troubleshooting
If you cannot resolve an issue using this guide, contact HUTECH Robotics support.
Robot Will Not Power On
What you see: The robot does not respond when you press the power button. No light strip, no screen activity.
Likely causes: - Battery fully drained - Power button not held long enough - Key switch set to OFF - Battery not seated correctly - Battery box cover not properly closed
What to check: 1. Open the rear battery cover and press the battery level button. If no lights appear, the battery is completely drained. 2. Confirm the key switch inside the battery box is turned to ON. 3. Check the battery pack is fully inserted and the handle is pressed down vertically. 4. Ensure the rear cover is properly fitted and latched. 5. Press and hold the power switch for at least 1 second.
Solution: Charge the battery if drained. Reseat the battery if loose. Flip the key switch to ON.
Escalate if: The battery indicators show charge, the key switch is ON, the cover is secure, but the robot still does not power on.
Robot Will Not Charge
What you see: Charger is connected but the robot does not charge. Charger indicator light is off.
Likely causes: - Charger connector not properly engaged - Key switch set to OFF - Battery not properly installed - Battery box cover not secured - Damaged charger
What to check: 1. Confirm the charger connector fastener is fully clicked into place on the charging jack. 2. Open the rear cover and verify the key switch is set to ON. 3. Verify the battery pack is correctly seated. 4. Check if the charger indicator light is illuminated. If not, the charger may be faulty. 5. Try a different mains outlet to rule out a power source issue.
Solution: Reseat the charger connector. Flip the key switch to ON. Reseat the battery. Replace the charger if the indicator shows no power.
Escalate if: The charger indicator remains off across multiple outlets, or the battery does not accept charge after confirming all connections.
Robot Not Moving or Stuck
What you see: Robot halts unexpectedly, moves very slowly, or takes unusual routes.
Likely causes: - Obstacles blocking the path - Dirt or oil on depth vision sensors - Passageway narrower than 70 cm - Reflective or mirrored surfaces near the route
What to check: 1. Clear any obstacles in the robot's path. 2. Inspect the depth vision sensors for stains, oil, or food splatter and clean them. 3. Measure the aisle width -- it must be at least 70 cm. 4. Look for mirrors, reflective metal panels, or glass at the robot's sensor height. If present, apply matte stickers 16--20 cm above the ground to reduce reflections.
Solution: Remove obstacles. Clean sensors. Widen the path or reroute. Apply anti-reflective stickers.
Escalate if: The robot continues to stop or behave erratically after all environmental checks are resolved.
Robot Lost or Navigation Failure
What you see: Screen displays "I'm lost. Please push me under the positioning mark" or "Location failed, please click retry button."
Likely causes: - Robot was not powered on at the correct startup location - Selected map does not match the actual venue - Significant changes to the environment at the startup location - Vision sensor is dirty or blocked
What to check: 1. For visual navigation, confirm the robot is positioned directly beneath the ceiling marker. 2. Tap "Map selection" on screen and verify the correct map is loaded. 3. Check the vision sensor (top camera) for dirt, oil, or obstructions and clean if needed. 4. Verify the vision sensor fill light is red (active). If the light is off, the sensor may be faulty. 5. Try rebooting the robot at the correct startup location.
Solution: Move the robot under the marker. Select the correct map. Clean the vision sensor. Reboot.
Escalate if: The vision sensor fill light is not red, or positioning fails after cleaning the sensor and rebooting.
Emergency Stop Will Not Release
What you see: Robot completely stops and does not respond to screen taps.
Likely causes: - Emergency stop switch was pressed (possibly accidentally by a customer or staff member)
What to check: 1. Locate the emergency stop switch on top of the robot. 2. Check if the switch is depressed (engaged). 3. Rotate the switch clockwise to release it. 4. Tap the screen or press the lightning button to resume.
Solution: Release the emergency stop by rotating clockwise. Resume via screen tap or lightning button.
Escalate if: The switch will not release or the robot does not resume after releasing it.
Screen Not Responding
What you see: The LCD screen does not display anything or does not respond to touch.
Likely causes: - Robot is powered off - Screen hardware failure - Software crash
What to check: 1. Check if the bottom light strip is on. If not, the robot may be off -- try powering on. 2. Press and hold the power switch for 3 seconds to force a shutdown, then restart. 3. Verify the battery has charge (check indicator on battery pack).
Solution: Reboot the robot. Ensure the battery is charged.
Escalate if: The light strip is on (robot is powered) but the screen remains blank or unresponsive after a reboot.
Sensor Blocked or Dirty
What you see: Robot stops frequently, navigates poorly, or tray detection does not work.
Likely causes: - Oil, food splatter, or dirt on vision sensors, depth sensors, or Lidar - Tray sensors obstructed
What to check: 1. Power off the robot. 2. Inspect the vision sensor (top camera), depth vision sensors, and Lidar for any contamination. 3. Clean with a clean, lint-free cloth or specialised lens cleanser. 4. For tray sensor issues, remove and reseat each tray to ensure proper alignment.
Solution: Clean all affected sensors. Reseat trays if tray detection is the issue.
Escalate if: Sensors still behave erratically after thorough cleaning and reseating.
Tray Sensor Detection Anomaly
What you see: Robot does not automatically complete the task after dishes are removed, or completes the task while dishes are still on the tray.
Likely causes: - Trays not installed correctly - Tray sensors dirty or obstructed
What to check: 1. Remove and reseat each tray, ensuring they click securely into position. 2. Clean the tray sensors with a clean cloth or lens cleanser. 3. Test by placing and removing a dish to see if the sensor responds correctly.
Solution: Reseat trays. Clean tray sensors. If trays are warped or damaged, request replacements.
Escalate if: Sensors still behave erratically after cleaning and reseating trays.
Tray Sensor Not Working With Certain Items
What you see: Tray sensor does not detect items placed on the tray, or auto-complete does not trigger for specific objects.
Likely causes: - Items are goblets, objects made entirely of glass, or items shorter than 5 cm - Tray sensor switch is disabled in settings - Interactive function (lucky draw) is enabled at the same time as tray sensor
What to check: 1. Check what type of item is being placed. The tray sensor does not work with goblets, fully glass objects, or objects shorter than 5 cm. 2. Verify that Tray Sensor Switch is enabled in Settings > Tray Settings. 3. Check if the Interactive Function (lucky draw) is enabled -- it cannot be active at the same time as the tray sensor. 4. Confirm that only one dish is placed per tray (auto-complete only works when a single tray corresponds to a single dish).
Solution: Use appropriate items that the sensor can detect. Disable the interactive function if tray sensor auto-complete is needed. Ensure one dish per tray for auto-complete.
Escalate if: The tray sensor fails to detect standard plated dishes after verifying all settings.
Unusual Noises During Operation
What you see: Grinding, clicking, or rattling sounds during movement.
Likely causes: - Debris tangled in drive or auxiliary wheels - Loose tray or component - Motor issue
What to check: 1. Power off the robot. 2. Inspect drive wheels and auxiliary wheels for tangled hair, string, or debris. 3. Check that all trays are securely seated and nothing is loose. 4. Lay the robot on its side on a protective mat if needed to inspect the underside.
Solution: Remove debris from wheels. Reseat loose components.
Escalate if: Unusual noises persist after clearing all debris and securing all components.
Motor or Sensor Error Message on Screen
What you see: Screen displays "Motor parameters error," "Sensor parameters error," "Sensor connection error," or "Motor rotation anomaly."
Likely causes: - Temporary sensor or motor communication glitch - Physical obstruction around drive wheels - Hardware fault
What to check: 1. Follow the on-screen prompt -- tap OK or "Continue operation" to see if the robot recovers. 2. If the error persists, power off the robot and check the drive wheels and auxiliary wheels for tangled hair, debris, or obstructions. 3. Reboot the robot and re-enter the task.
Solution: Clear debris from wheels. Reboot and retry. Follow on-screen prompts.
Escalate if: The error message reappears after rebooting and clearing any physical obstructions.
Battery Draining Too Quickly
What you see: Battery life is significantly shorter than the rated 12--24 hours.
Likely causes: - Heavy payload on all trays consistently - High frequency of tasks with minimal idle time - Battery degradation from prolonged low-charge use - Operating in extreme temperatures
What to check: 1. Review the typical daily workload -- heavy loads and constant motion reduce battery life. 2. Check if the robot has been regularly run below 20% before charging (this degrades battery health). 3. Confirm the operating temperature is within 0--40 C. 4. Compare current runtime to original performance when the robot was new.
Solution: Optimise task scheduling to include rest periods. Charge before battery drops below 20%. Ensure the operating environment is within temperature range.
Escalate if: Battery life has degraded to less than half the original runtime, suggesting the battery pack needs replacement.
Robot Cannot Connect to Wi-Fi
What you see: Robot fails to join the Wi-Fi network or repeatedly drops connection.
Likely causes: - Incorrect Wi-Fi credentials - Wi-Fi signal too weak at the robot's location - Router not broadcasting on a compatible frequency - Too many devices on the network
What to check: 1. Verify the Wi-Fi network name and password are entered correctly. 2. Check signal strength at the robot's operating area -- the robot supports 2.4 GHz and 5 GHz bands. 3. Ensure the router is configured to broadcast on a compatible band. 4. Try moving the robot closer to the router for initial setup.
Solution: Re-enter credentials. Improve signal coverage. Switch Wi-Fi band if needed.
Escalate if: The robot cannot connect despite correct credentials and strong signal.
Software Update Failure
What you see: Software update fails or does not start. Robot remains on an old version.
Likely causes: - Battery level below 20% - No network connection (Wi-Fi required) - Download interrupted
What to check: 1. Check the battery level -- it must be above 20% for a successful upgrade. 2. Verify the robot is connected to Wi-Fi (not just cellular) as updates require a stable connection. 3. Navigate to Settings > Software Update and check if a new version is available. 4. Attempt the download again if it was previously interrupted.
Solution: Charge the battery above 20%. Connect to a stable Wi-Fi network. Retry the update.
Escalate if: The update repeatedly fails despite adequate battery and a stable network connection.
Page 10: Frequently Asked Questions
Getting Started
Q: How do I turn the robot on? A: Press and hold the power switch for 1 second. Make sure the key switch inside the battery box is set to ON first, and position the robot at its startup location (under the ceiling marker for visual SLAM).
Q: How do I turn the robot off? A: Press and hold the power switch for 3 seconds. The screen and light strip will turn off.
Q: Does the App start automatically? A: Yes. After powering on, the App starts automatically. If it does not, tap the App icon on the Android desktop.
Q: What surfaces can the BellaBot operate on? A: Flat, smooth indoor surfaces only -- tile, hardwood, or flat carpet. It can handle small bumps up to 10 mm and inclines up to 5 degrees. It cannot operate on wet, uneven, or outdoor surfaces.
Q: Does the robot need Wi-Fi to work? A: Yes. Wi-Fi is required for initial setup, map management, software updates, and cloud features. The robot supports 2.4 GHz, 5 GHz, Bluetooth, 3G, and 4G LTE.
Q: What is the minimum aisle width? A: 70 cm minimum clearance.
Charging
Q: How long does it take to charge? A: Approximately 4.5 hours from empty to full.
Q: How long does the battery last? A: Between 12 and 24 hours depending on payload weight, task frequency, and environmental conditions.
Q: When should I charge? A: Charge when the battery drops to 20% or lower. Regularly running below 20% shortens battery lifespan.
Q: Can I use a different charger? A: No. Only use the original charger. Third-party chargers may damage the battery, void the warranty, and create safety hazards.
Q: How do I check the battery level when the robot is off? A: Open the rear battery cover and press the button on the battery pack. LED indicators show the charge level from red (0--10%) to green (90--100%).
Q: Can I set a battery protection level? A: Yes. In Advanced Settings, you can set a minimum battery level below which the robot cannot operate.
Operation
Q: How much weight can each tray hold? A: Up to 10 kg per tray, across four trays.
Q: How do I pause the robot? A: Tap the screen once or press the lightning button. Tap or press again to resume.
Q: What is Smooth Mode? A: A delivery mode that slows the robot to 0.5 m/s to reduce spilling when carrying dishes with soup or liquid. It has three states: enable once, enable permanently, or repeat last.
Q: What is the recommended delivery speed? A: Below 0.9 m/s for delivery. For cruise mode, 0.2 m/s or 0.6 m/s. The full range is 0.1--1.2 m/s.
Q: What are braking levels? A: Three levels: Level 1 (emergency, shortest distance), Level 2 (light/medium load, smooth), Level 3 (heavy load, smoothest).
Q: Can the robot deliver to the same table on multiple trays? A: Yes. Enable Single-layer Multi-table in Advanced Settings -- up to 20 table numbers per tray.
Q: How does voice interaction work? A: Say "Bella, Bella" or stand in front of the stationary robot. Requires a network connection.
Q: How does touch interaction work? A: Touch the robot's head or ears when stationary to trigger expressions. First touch is friendly; repeated touching progresses through pleasant, unpleasant, and angry expressions.
Q: Can I customise voice announcements? A: Yes. Up to 5 custom voices per mode, 50 characters each. Upload via the Cloud Platform.
Q: How do I import music? A: Connect robot and phone to the same Wi-Fi, then scan the QR code in the Music interface. Supported formats: mp3, wav, flac, aac, pcm, wma, ape.
Q: What is the lucky draw feature? A: An on-screen prize draw after delivery. Set winning probabilities as decimals summing to 1. Cannot be used with tray sensor auto-complete.
Q: Can I switch between multiple maps? A: Yes. Go to Settings > Map Settings. Table numbers, docking locations, and settings sync automatically.
Q: What are the multi-robot docking modes? A: One-to-one (fixed pickup per robot), Free (nearest available), and Waiting (temporary dock until a pickup is free).
Q: Can the robot work with PuduBeeper or a POS system? A: Yes. Enable Robot API in Advanced Settings for PuduBeeper or third-party integration.
Q: What happens if dishes are taken from the wrong tray? A: If Tray Error Reminder is enabled, the robot gives a voice warning. Supports English and Chinese only. Does not work with goblets, glass items, or items shorter than 5 cm.
Safety
Q: Can children interact with the robot? A: No. The robot is commercial equipment, not a toy. Children should not touch, ride, push, or play with it.
Q: Can I put hot items or open flames on the trays? A: Hot plated food is fine. Open flames, stoves, candles, or flammable items are strictly prohibited.
Q: What is the emergency stop? A: Press the red switch on top to immediately halt the robot. Rotate clockwise to release, then tap the screen or press the lightning button to resume.
Maintenance
Q: How do I clean the sensors? A: Power off the robot. Wipe vision sensors, depth sensors, and Lidar with a clean, dry, lint-free cloth or lens cleanser. Never use water or chemicals.
Q: How often should I clean the robot? A: Trays, wheels, and sensors weekly. Full body monthly. Always power off before cleaning.
Q: How do I replace the battery? A: Power off, open the rear cover, turn key to OFF, swap battery packs, turn key to ON, close cover. See Page 6 for detailed steps.
Page 11: Service and Escalation
When to Contact Support
- The robot will not power on despite a charged battery and correct key switch position.
- The charger indicator shows no power across multiple outlets.
- The vision sensor fill light is not red (sensor may be faulty).
- Positioning fails repeatedly after verifying location, map, and sensor cleanliness.
- Motor or sensor error messages persist after rebooting and clearing obstructions.
- The screen remains blank when the light strip is on (robot is powered).
- The emergency stop switch will not release.
- Battery runtime has degraded to less than half the original performance.
- Software updates fail repeatedly despite adequate battery and network.
- Any physical damage to the robot, wheels, trays, or sensors requiring replacement parts.
Before You Call
Have the following information ready:
- Model number: BL100, BL101, BL102, or BLFD02
- Serial number: Located on the robot identification label
- Description of the issue: What the robot is doing (or not doing)
- Error messages: Exact wording of any on-screen error messages
- What you have already tried: Steps taken from this troubleshooting guide
- Operating environment: Venue type, floor type, temperature, any recent changes
Support Contact
- HUTECH Robotics Support: ai.hutechrobotics.com
- Manufacturer After-Sales: techservice@pudutech.com