HolaBot -- Support Manual
Hospitality delivery robot with calling and notification capabilities, four adjustable trays, gesture sensor, and voice control for restaurants, hotels, and service environments.
Page 1: Overview
What is the HolaBot?
HolaBot is a hospitality delivery robot built by HUTECH Robotics for restaurants, hotels, and commercial service environments. It combines autonomous delivery with a calling and notification system, allowing staff to summon the robot remotely and receive voice alerts when it arrives at a destination.
The robot features four adjustable trays with an ultra-large 120-litre volume, making it one of the highest-capacity models in the range. Each tray supports up to 15 kg on flat surfaces. HolaBot uses visual-laser fusion SLAM for positioning and navigation, and offers contactless interaction through an infrared gesture sensor and voice commands via a 6-microphone circular array.
HolaBot supports four operating modes -- Delivery, Collection, Cruise, and Direct -- plus five calling methods including watch, PuduLink app, pager, NFC, and beeper calling. The robot runs on Android with a 10.1-inch LCD screen and a dot matrix display that shows expressive facial animations to indicate status.
Models and Variants
| Model | Description |
|---|---|
| HL100 | Standard HolaBot |
| HLFR01 | HolaBot variant |
At a Glance
- Use case: Hospitality delivery, table collection, cruise, direct delivery, calling/notifications
- Trays: 4 levels, adjustable height, 15 kg capacity each (flat), 10 kg (obstacle crossing)
- Battery: 25.6 Ah, 10-24 hours runtime, 4.5 hours to charge
- Speed: 0.2-1.2 m/s adjustable
- Navigation: Visual-laser fusion SLAM
- Minimum passage width: 70 cm
- Screen: 10.1-inch LCD + dot matrix expression display
- Connectivity: Wi-Fi (2.4G/5G), Bluetooth, 3G, 4G LTE
- IP rating: Robot body IP20; Tray compartment IPX5
- Calling methods: Watch, PuduLink, Pager, NFC, Beeper
Page 2: Specifications
| Feature | Description |
|---|---|
| Product model | HL100, HLFR01 |
| Operating voltage | DC 23-29.4 V |
| Power input | AC 100-240 V, 50/60 Hz |
| Power output | 29.4 V / 8 A |
| Battery capacity | 25.6 Ah |
| Charging time | 4.5 hours |
| Battery life | 10-24 hours |
| Cruise speed | 0.2-1.2 m/s (adjustable) |
| Navigation | Laser and visual integrated SLAM positioning |
| Minimum travel width | 70 cm |
| Maximum surmountable height | 7 mm |
| Maximum climbing angle | 5 degrees |
| Tray dimensions | 390 mm x 360 mm, 120 L ultra-large volume |
| Number of trays | 4 (adjustable) |
| Height between trays | Top to bottom: 216 mm / 184 mm / 184 mm / 184 mm |
| Tray load | Flat surface: 15 kg/layer; Obstacle crossing (5 mm): 10 kg/layer |
| Machine material | ABS / aviation grade aluminium alloy |
| Robot weight | 55 kg |
| Robot dimensions | 542 mm x 534 mm x 1228 mm |
| Screen | 10.1-inch LCD screen |
| Operating system | Android |
| Microphone | 6-mic circular array kit |
| Speaker power | 2 x 10 W stereo speakers |
| Working environment | Temperature: 0-40 C; Humidity: 85% RH or less |
| Storage environment | Temperature: -40 to 65 C; Humidity: 85% RH or less |
| Working altitude | Below 2000 m |
| Surface requirement | Indoor, flat and smooth ground |
| IP rating | Robot: IP20; Tray compartment: IPX5 |
| Connectivity | Wi-Fi (2.4G/5G), Bluetooth, 3G, 4G LTE |
Sensor Details
| Sensor | Height from Bottom | Field of View |
|---|---|---|
| LiDAR | 0.21 m | 220 degrees |
| Upper RGBD (Astra mini) | 1 m | 58 degrees horizontal, 45 degrees vertical |
| Upper RGBD (HP60) | 1 m | 74 degrees horizontal, 59 degrees vertical |
| Lower RGBD (D430) | 0.12 m | 85 degrees horizontal, 58 degrees vertical |
| Lower RGBD (Dabai) | 0.12 m | 65 degrees horizontal, 45 degrees vertical |
Page 3: Product Components
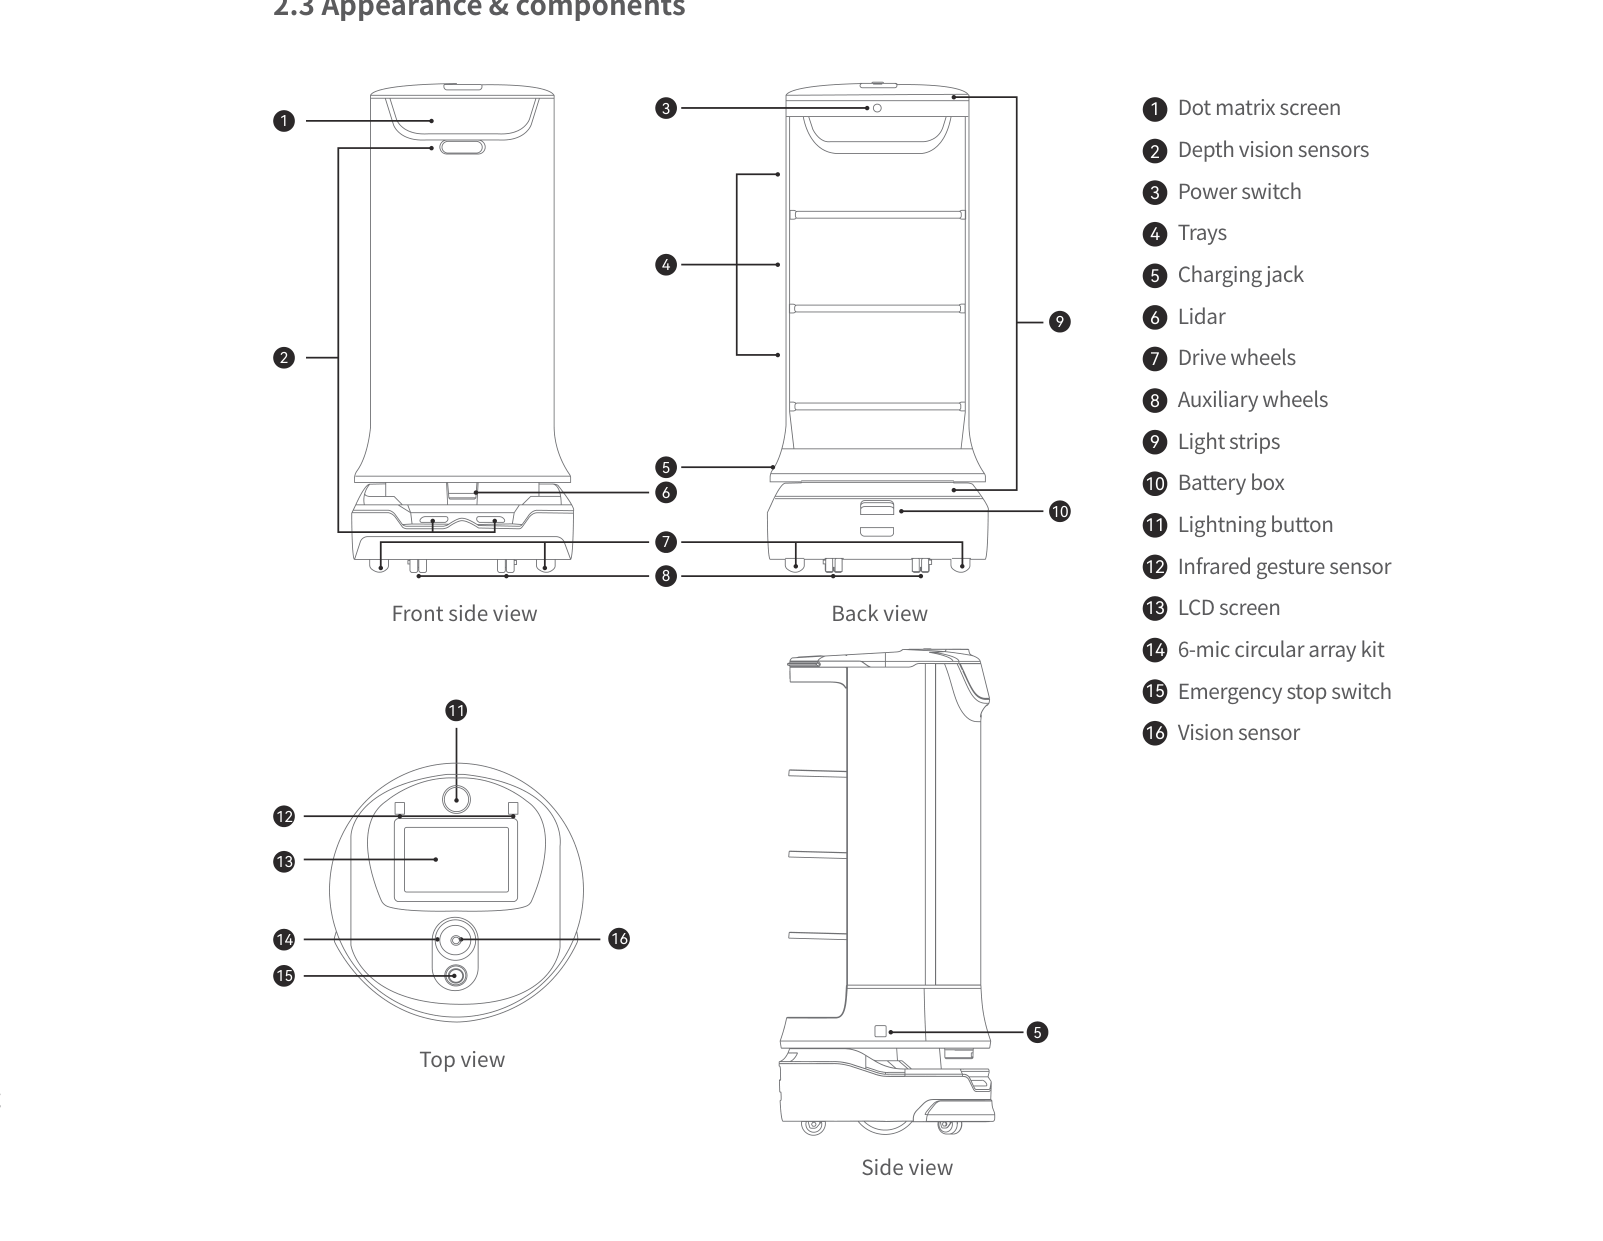
External Components
- LCD screen -- 10.1-inch touchscreen for task management, settings, and status display
- Dot matrix screen -- Expressive facial display showing robot status (eyes open = moving, blinking = arrived, sleepy = low battery)
- Trays (4 levels) -- Adjustable-height delivery surfaces, 390 mm x 360 mm each
- Light strips -- Visual status indicators around the robot body
- Lightning button -- Physical pause/resume button for quick control without touching the screen
- Power switch -- Press and hold to power on/off
- Battery box -- Houses the battery; back cover must be pushed into place for operation
- Charging jack -- Port for direct charger connection
- Emergency stop switch -- Red button; press to halt all movement immediately
Sensors and Navigation
- LiDAR -- Laser-based mapping and navigation sensor
- Depth vision sensors -- 3D depth perception for obstacle detection
- Vision sensor -- Camera for visual positioning
- Infrared gesture sensor -- Contactless hand gesture interaction
- 6-mic circular array kit -- Microphone array for voice commands and interaction
Ports and Interfaces
- Drive wheels -- Main locomotion wheels
- Auxiliary wheels -- Support and stability wheels
Page 4: Safety Instructions
Before You Start
- Read all safety instructions before operating the robot.
- Only trained staff should operate the HolaBot.
- Only trained personnel may disassemble or repair the robot.
- Keep the robot upright during transport. Never lift by the tray or box.
Electrical Safety
- Only use the original charger. Non-original chargers are prohibited.
- Charge when battery drops to 20%. Prolonged low-battery use impairs battery life.
- Verify power voltage matches the charger rating (AC 100-240 V).
- Ensure the charger fastener is fully engaged to prevent overheating.
Operating Safety
- Do not cover the top camera while the robot is working.
- Do not clean or maintain the robot while it is powered on.
- Do not place open flames or flammable/explosive items on the robot.
- Do not pick up or place food while the robot is moving.
- Do not move or transport the robot while it is working.
Environmental Requirements
- Operating temperature: 0-40 C
- Operating humidity: 85% RH or less
- Operating altitude: Below 2000 m
- Surface: Indoor, flat and smooth ground only
- The robot can cross obstacles up to 7 mm and climb inclines up to 5 degrees.
Warnings
- Do not use or charge in high-temperature, high-pressure, or explosion-risk environments.
- Do not use in humid environments or on surfaces with liquids or sticky substances.
- Do not use where wireless devices are prohibited.
- Dispose of the robot according to local recycling regulations.
Page 5: Basic Operation
Powering On
- Turn the key switch to the ON position.
- Ensure the battery back cover is pushed back into place.
- Press and hold the power switch for 1 second.
- The light strips and dot matrix screen flash, confirming power on.
- Wait 30-60 seconds for the Android system to fully boot.
Powering Off
- Press and hold the power switch for 3 seconds.
- The Power Off option appears on the screen.
- Tap Power Off.
- Light strips, dot matrix screen, and LCD screen turn off, confirming shutdown.
Pausing Operation
Two methods are available:
- Screen: Tap the LCD screen once to pause. Tap again to resume.
- Lightning button: Press the lightning button to pause. Press again to resume.
Emergency Stop
- Press the red emergency stop switch. The robot halts immediately.
- To resume, rotate the emergency stop switch clockwise to release.
- Tap the screen or press the lightning button to resume normal operation.
Moving the Robot Manually
- Power off the robot before moving it.
- Keep the robot upright at all times.
- Never lift by the tray or battery box.
- Never push or transport the robot while it is powered on and working.
Map Creation
HolaBot supports three mapping methods:
- Marker mapping -- Uses ceiling-mounted markers for visual positioning.
- Laser mapping -- Uses LiDAR to create an environment map.
- Marker + Laser fusion mapping -- Combines both methods for improved accuracy.
The mapping method is selected during the installation and deployment process by a technical engineer.
Important: Maps do not synchronise automatically. If changes are made (adding or removing table locations), the updated map must be manually synchronised via Map Settings.
Advanced Settings Access
To access Advanced Settings, tap on a blank area of the screen repeatedly. A password prompt will appear. Enter the administrator password.
Page 6: Charging and Battery
Charging Methods
Direct charger connection:
- Locate the charging jack on the robot.
- Insert the original charger plug.
- Ensure the charger fastener clicks firmly into place.
- A full charge takes approximately 4.5 hours.
- Do not use the robot during charging.
Note: The HolaBot can be charged even when the key switch is in the OFF position. Simply connect the charger and ensure the fastener clicks into place.
Battery Information
| Specification | Value |
|---|---|
| Battery capacity | 25.6 Ah |
| Operating voltage | DC 23-29.4 V |
| Charger output | 29.4 V / 8 A |
| Charging time | 4.5 hours (empty to full) |
| Battery life | 10-24 hours depending on usage |
Charging Indicators
- Light strips and dot matrix screen indicate charging status.
- The dot matrix screen shows sleepy/droopy eyes when battery is low.
- If no charging indication appears, check that the charger fastener is fully clicked in.
Battery Care Tips
- Charge when battery drops to 20%. Do not regularly run the battery flat.
- Heavier tray loads and higher speeds reduce battery life.
- Lower the speed setting if maximum speed is not needed.
- Schedule charging during off-peak hours.
- If battery runtime has dropped significantly despite proper habits, request battery replacement.
Low Battery Cruise Behaviour
- If the robot is on a cruise task and battery drops below 10%, it will cancel the task and return to the set location.
- If you start a cruise task when battery is already below 10%, the robot will show a low battery warning but will not cancel the task.
Page 7: Modes and Functions
Delivery Mode
What it does: Carries items (food, drinks, supplies) from a service point to designated locations. Staff or customers load trays at the origin and the robot navigates autonomously.
How to use: 1. Select Delivery Mode on the screen. 2. Load items onto the trays. 3. Assign destination locations. 4. Tap "Go" to start delivery. 5. The robot navigates to each destination. 6. The robot returns to the service point.
Settings: - Delivery in the order of trays: top to bottom (or distance-priority when disabled). - Single-pallet multi-delivery: a single tray can deliver to up to 20 locations. - Hide arrival locations: hides destinations on-screen during delivery. - Repeat previous task: repeats the last task after completion. - Auto-complete pick-up time: 5-600 seconds (default 30). - Arrival voice and music: configurable separately for delivery and return.
Best for: Restaurants, hotels, canteens, room service.
Collection Mode
What it does: Visits designated locations to collect used dishes, trays, or other items, then returns them to a clearing area.
How to use: 1. Select Collection Mode on the screen. 2. Set collection locations (up to 20 per task). 3. Tap "Go" to start. 4. The robot visits each location, collects items, and returns to the clearing area.
Settings: - Collection in the order of trays: top to bottom (or nearest-first when disabled). - Repeat previous task: retains previous task configuration.
Best for: Bussing tables in restaurants, clearing items in canteens.
Cruise Mode
What it does: The robot follows a predetermined route with optional stopping points for display, promotion, or continuous availability of items.
How to use: 1. Select Cruise Mode on the screen. 2. Configure the route with stopping points. 3. Set stay time at each point. 4. Start the cruise.
Best for: Promotions, exhibitions, buffet-style service.
Direct Mode
What it does: The robot goes to a single destination without following a multi-stop route. Useful for one-off, on-demand deliveries.
How to use: 1. Select Direct Mode on the screen. 2. Choose a single destination. 3. Tap "Go" to start. 4. The robot goes directly to the destination and returns.
Best for: On-demand single deliveries, ad-hoc requests.
Steady Mode
What it does: Limits the robot's maximum speed for smoother, more stable delivery of delicate items.
How to use: 1. Go to Speed Settings. 2. Enable Steady Mode. 3. The robot now moves at a reduced speed during delivery.
Best for: Soups, drinks, and other items that may spill during normal-speed delivery.
Calling and Notifications
What it does: Staff can summon the robot remotely. The robot provides voice notifications when it arrives.
Five calling methods: 1. 4G watch calling -- Call the robot using a 4G-enabled watch. 2. PuduLink app calling -- Call the robot from the PuduLink mobile app. 3. Pager calling -- Use a pager to call the robot. 4. NFC calling -- Tap an NFC tag to call the robot. 5. Beeper calling -- Use a PuduBeeper to call the robot.
The available methods depend on accessories purchased and network configuration.
Additional Features
Voice Control: The 6-microphone circular array enables hands-free voice commands. Ensure the microphone area is not covered and background noise is manageable.
Gesture Sensor: The infrared gesture sensor allows contactless interaction. Wave a hand near the sensor to dismiss the robot or confirm delivery receipt. Useful when staff or customers have their hands full.
Dot Matrix Expressions: The dot matrix screen displays facial expressions to indicate status: - Eyes open = moving - Blinking = arrived at destination - Sleepy/droopy eyes = low battery These expressions cannot be changed or disabled.
Lightning Button: A physical button on the robot for quick pause and resume without using the touchscreen.
Automatic Gate Crossing: HolaBot supports automatically crossing gates with compatible Bluetooth or sensor-based systems. Configured during installation.
LoRa Module: - HolaBots without two holes on the upper computer have an installed LoRa module. - Old LoRa module: for central control LoRa watch. - New LoRa module: for the pager.
Page 8: Maintenance and Servicing
Maintenance Schedule
| Part | Frequency | Method |
|---|---|---|
| Drive wheels | Weekly (powered off) | Wipe surface with a clean cloth; check for debris |
| Auxiliary wheels | Weekly (powered off) | Wipe surface with a clean cloth; check for debris |
| Trays | Weekly (powered off) | Wipe with a clean cloth. Scrub oil stains on silicone pads with water and dry immediately |
| Vision sensor | Weekly (powered off) | Clean with a cloth or lens cleanser |
| Depth vision sensors | Weekly (powered off) | Clean with a cloth or lens cleanser |
| LiDAR | Weekly (powered off) | Clean with a cloth or lens cleanser |
| Robot body | Monthly (powered off) | Wipe surface with a clean cloth |
Cleaning the Robot
- Always power off the robot before any cleaning or maintenance.
- Use a clean, dry cloth for body surfaces.
- Use lens cleaning products for sensors and cameras.
- For tray silicone pads with oil stains, scrub with water and dry thoroughly.
- If a sensor becomes splashed or contaminated during service, clean it immediately -- do not wait for the weekly schedule.
- Never use harsh chemicals or corrosive substances.
When to Replace Parts
- Wheels: If wheels are worn, damaged, or do not spin freely after cleaning, contact HUTECH for replacement.
- Battery: If runtime has dropped significantly despite proper charging habits, contact HUTECH for battery replacement.
- Charger: If the charger is faulty, replace with an original charger only. Contact HUTECH support.
- Light strips: If non-functional after a restart, the issue is likely hardware. Contact HUTECH support.
Page 9: Troubleshooting
Robot does not power on
What you see: No response when pressing power switch. Light strips do not flash. Screens remain dark.
Likely causes: Key switch not in ON position. Battery back cover not pushed back. Battery completely drained.
What to check: 1. Verify the key switch is turned to the ON position. 2. Confirm the battery back cover is properly pushed back into place. 3. Check if the robot has been charged recently. 4. Connect the charger and wait 10-15 minutes, then try again.
Solution: Turn key switch to ON. Push battery cover back. Charge the battery.
Escalate if: The robot does not power on after confirming key switch, battery cover, and adequate charge.
Robot does not charge
What you see: No charging indication. Battery level does not increase while connected to charger.
Likely causes: Charger fastener not fully engaged. Dirty charging jack. Faulty charger. Incorrect power supply voltage.
What to check: 1. Ensure the charger fastener is fully clicked into the charging jack. 2. Inspect the charging jack for dirt or debris and clean if necessary. 3. Verify the wall outlet is working. 4. Check that the supply voltage is within AC 100-240 V range. 5. Try a different original charger if available.
Solution: Reseat charger firmly until fastener clicks. Clean charging jack. Replace faulty charger with original only.
Escalate if: Charging fails after all checks.
Robot moves abnormally or loses navigation
What you see: Robot drifts off route. Robot stops mid-path. Robot appears confused about its location.
Likely causes: Top camera or sensors obstructed or dirty. Robot not started from correct startup location. Environment has changed since map creation.
What to check: 1. Pause the current task. 2. Check that nothing is covering the top camera or vision sensors. 3. Clean all sensors (vision sensor, depth sensors, LiDAR) with a cloth or lens cleanser. 4. Verify the robot was started from the designated startup location. 5. Check if furniture or obstacles have been moved since the map was created.
Solution: Clean sensors. Restart from correct startup location. Remap if the environment has changed significantly.
Escalate if: Navigation issues persist after sensor cleaning and map verification.
Robot stops and will not resume
What you see: Robot halts during a task. Tapping screen or pressing lightning button does not resume movement.
Likely causes: Emergency stop engaged. Sensor detecting persistent obstacle. Software freeze.
What to check: 1. Check if the emergency stop switch is pressed down. If so, rotate clockwise to release. 2. Tap the screen or press the lightning button to attempt resume. 3. Look for any objects near the sensors that might be detected as obstacles. 4. Clean the depth vision sensors and LiDAR. 5. If unresponsive, power off and restart the robot.
Solution: Release emergency stop. Clear obstacles from sensor field. Clean sensors. Restart if needed.
Escalate if: The robot frequently stops and will not resume.
Screen is unresponsive or blank
What you see: LCD screen does not respond to touch. Screen remains black. Dot matrix screen works but LCD does not.
Likely causes: Software crash. Robot not fully booted. Screen hardware failure.
What to check: 1. Confirm the robot is powered on (check light strips and dot matrix screen). 2. Wait 30-60 seconds for the Android system to finish booting. 3. Try pressing the lightning button to interact with the robot. 4. Power off completely and restart.
Solution: Allow full boot time. Restart the robot. Use the lightning button as an alternative control.
Escalate if: The LCD screen remains unresponsive after a full restart.
Emergency stop will not release
What you see: Emergency stop button appears stuck or does not pop back when rotated.
Likely causes: Button mechanism jammed. Physical damage to the switch.
What to check: 1. Rotate the emergency stop switch clockwise firmly but gently. 2. Check for any visible damage or debris around the switch. 3. Do not force the mechanism if it feels jammed.
Solution: Rotate clockwise to release. If stuck, do not force it.
Escalate if: The emergency stop switch cannot be released. The robot requires professional service. Do not attempt to disassemble.
Battery drains faster than expected
What you see: Runtime significantly shorter than 10-24 hour range. Frequent recharging needed.
Likely causes: Habitual low-battery operation. Heavy tray loads. High speed setting. Battery aging.
What to check: 1. Review charging habits: is the robot regularly run below 20% before charging? 2. Check if tray loads are within the rated 15 kg (flat) or 10 kg (obstacle crossing) limits. 3. Review speed settings and reduce if set to maximum. 4. Note the robot age and approximate number of charge cycles.
Solution: Charge before 20% consistently. Reduce tray loads. Lower speed. Request battery replacement if degraded.
Escalate if: Battery performance continues to decline despite proper charging practices.
Light strips not working
What you see: Light strips do not illuminate during operation. Light strips flash abnormally.
Likely causes: Software issue. Loose internal connection. LED hardware failure.
What to check: 1. Restart the robot and observe if light strips activate during boot. 2. Check if the light strip behaviour corresponds to a specific error state (refer to operation guide). 3. Note whether all strips are affected or only specific sections.
Solution: Restart the robot. If light strips do not activate at all after restart, the issue is likely hardware.
Escalate if: Light strips remain non-functional after restart.
Voice control or calling function not responding
What you see: Robot does not respond to voice commands. Calling notifications do not play. Microphone appears inactive.
Likely causes: Microphone array obstructed. High ambient noise. Software configuration issue.
What to check: 1. Ensure the 6-mic circular array area is not covered or blocked. 2. Test in a quieter environment to rule out ambient noise interference. 3. Verify that voice control and calling features are enabled in the robot settings. 4. Restart the robot.
Solution: Clear the microphone area. Reduce ambient noise. Enable features in settings. Restart.
Escalate if: Voice functions do not respond after clearing obstructions and restarting.
Robot makes grinding or unusual noises
What you see: Audible grinding, clicking, or squeaking during movement.
Likely causes: Debris in wheels. Worn wheels. Loose components.
What to check: 1. Power off the robot. 2. Inspect drive wheels and auxiliary wheels for debris, hair, or foreign objects. 3. Clean the wheels with a cloth. 4. Spin wheels by hand to check for resistance or abnormal sounds.
Solution: Remove debris. Clean wheels. If wheels are damaged, contact HUTECH for replacement.
Escalate if: Noise persists after cleaning.
Page 10: Frequently Asked Questions
Charging and Battery
How long does it take to fully charge the HolaBot? Approximately 4.5 hours from empty to full. Ensure the charger fastener clicks into place before leaving the robot to charge.
How long does the HolaBot battery last? Between 10 and 24 hours depending on speed settings, tray loads, delivery frequency, and environmental conditions.
What is the battery capacity? 25.6 Ah -- larger than some other models in the range. Operating voltage is DC 23-29.4 V.
When should I charge the HolaBot? When battery drops to 20%. Running at low battery damages the battery over time. Schedule charging during off-peak hours.
Can I use a non-original charger? No. Only the original charger should be used. Non-original chargers can damage the robot or cause safety hazards.
Can HolaBot be charged with the key switch in the OFF position? Yes. Simply connect the charger and ensure the fastener clicks into place.
Operation
How do I turn on the HolaBot? Turn the key switch to ON, ensure the battery back cover is pushed back, then press and hold the power switch for 1 second. The light strips and dot matrix screen flash.
How do I turn off the HolaBot? Press and hold the power switch for 3 seconds, then tap Power Off on screen.
How do I pause the robot? Two ways: tap the LCD screen once, or press the lightning button. Tap or press again to resume.
What is the lightning button? A physical button on the robot for quick pause and resume without touching the touchscreen.
What modes does HolaBot support? Four modes: Delivery, Collection, Cruise, and Direct. Plus calling and notification functions across all modes.
What is the minimum passage width? 70 cm -- narrower than some other models in the range, making HolaBot suitable for tighter spaces.
What calling methods does HolaBot support? Five methods: 4G watch, PuduLink app, Pager, NFC, and Beeper calling. Availability depends on accessories and network configuration.
What mapping methods does HolaBot support? Three methods: Marker mapping (ceiling markers), Laser mapping (LiDAR), and Marker + Laser fusion mapping (both combined).
What is Steady Mode? A reduced-speed mode for stable delivery of delicate items. Enable it in Speed Settings.
How many locations can Collection Mode handle? Up to 20 locations per collection task.
Does HolaBot synchronise maps automatically? No. Maps must be manually synchronised in Map Settings after changes are made.
Where are the Advanced Settings? Tap a blank area of the screen repeatedly. Enter the administrator password when prompted.
Does HolaBot support automatic gate crossing? Yes. Compatible with Bluetooth or sensor-based gate systems. Configured during installation.
Safety
How does the emergency stop work? Press the red emergency stop switch to halt immediately. Rotate clockwise to release, then tap screen or press lightning button to resume.
How much weight can each tray hold? Up to 15 kg per tray on flat surfaces. 10 kg per tray when crossing obstacles of 5 mm height.
What is the IP rating? Robot body is IP20 (no water protection). Tray compartment is IPX5 (protected against water jets), making it suitable for handling tray spills.
Maintenance
How do I clean the trays? Power off the robot. Wipe tray surfaces with a clean cloth weekly. For oil stains on silicone pads, scrub with water and dry thoroughly.
How do I clean the sensors? Power off the robot. Clean vision sensor, depth sensors, and LiDAR weekly with a cloth or lens cleanser. Clean immediately if contaminated during service.
Can I maintain the robot while it is on? No. Always power off before any cleaning or maintenance.
General
What surfaces can HolaBot operate on? Indoor flat and smooth ground only. It can cross obstacles up to 7 mm and climb inclines up to 5 degrees. Avoid wet, sticky, or uneven surfaces.
What is the gesture sensor used for? Contactless interaction. Wave a hand near the infrared sensor to dismiss the robot or confirm delivery receipt. Useful when hands are full.
What temperature range can HolaBot operate in? 0 to 40 degrees Celsius. Storage: -40 to 65 degrees Celsius. Humidity must be 85% RH or less.
What do the expressions on the dot matrix screen mean? Eyes open = moving. Blinking = arrived at destination. Sleepy/droopy eyes = low battery. These cannot be changed or disabled.
Are the trays adjustable? Yes. The four trays can be repositioned to different heights to accommodate various item sizes.
How do I contact HUTECH support? Email techservice@pudutech.com for technical support, warranty claims, or spare parts.
Page 11: Service and Escalation
When to Contact Support
- Robot does not power on after verifying key switch, battery cover, and charge.
- Charging fails after checking all connections and cleaning contacts.
- Navigation problems persist after cleaning sensors and verifying the map.
- Screen remains unresponsive after a full restart.
- Emergency stop switch is jammed or physically damaged.
- Battery runtime has dropped significantly despite proper charging habits.
- Light strips do not function after a restart.
- Voice control or calling functions do not respond after clearing obstructions and restarting.
- Wheels are worn or damaged.
- Unusual noises persist after wheel cleaning.
Before You Call
Gather the following information before contacting support:
- Robot model (HL100 or HLFR01)
- Serial number
- Description of the issue and when it started
- Steps you have already tried
- Software version (visible in Settings)
- Photos or videos of the issue, if applicable
Support Contact
- HUTECH Robotics: ai.hutechrobotics.com
- Manufacturer Support: techservice@pudutech.com