KettyBot Pro -- Support Manual
Upgraded KettyBot with 25 Ah battery, 11-hour runtime, collision sensor, pallet detection sensor, and 0.2 m/s minimum speed.
Page 1: Overview
What is the KettyBot Pro?
The KettyBot Pro is the upgraded version of the KettyBot delivery and reception robot. It shares the same physical frame, dual-screen design, and navigation system as the standard KettyBot, but adds a larger battery, additional safety sensors, and a lower minimum speed for more precise movement.
The Pro model carries dishes on two trays (up to 10 kg each), navigates using laser and visual SLAM positioning, and passes through gaps as narrow as 55 cm. Its 25 Ah battery provides up to 11 hours of no-load operation, a significant improvement over the standard model's 8+ hours. Two Pro-exclusive sensors -- a collision sensor for physical contact detection and a pallet detection sensor for automated tray monitoring -- add layers of safety and workflow automation.
Like the standard KettyBot, the Pro is designed for restaurants, hotels, supermarkets, and other indoor commercial venues. It handles food delivery, customer greeting and escorting, marketing display, voice interaction, dish collection, and cruise patrols across 9 functional modes.
Models and Variants
- Model numbers: KBFM11, PNT (Version: Pro)
- Upgrade from: Standard KettyBot
At a Glance
- Weight: 38 kg (83.78 lbs)
- Dimensions: 435 x 450 x 1120 mm (17.13 x 17.72 x 44.09 in)
- Battery: 25 Ah, up to 11 hours runtime (no-load), approximately 4 hours to charge
- Trays: 2 delivery trays + 1 dish-return box, 10 kg per tray (22.05 lbs)
- Speed: 0.2--1.2 m/s (adjustable) / 0.66--3.94 ft/s
- Navigation: Laser and visual integrated SLAM
- Minimum passage width: 55 cm (21.65 in)
- Screens: 10.1-inch LCD control + 18.5-inch advertising LCD
- Pro-exclusive sensors: Collision sensor, pallet detection sensor
- Connectivity: Wi-Fi (2.4G/5G), Bluetooth, 3G, 4G
- Operating system: Android
- Service life: 5 years
Key Differences from Standard KettyBot
| Feature | KettyBot | KettyBot Pro |
|---|---|---|
| Battery capacity | 20 Ah | 25 Ah |
| Runtime (no-load) | 8+ hours | 11 hours |
| Minimum speed | 0.5 m/s | 0.2 m/s |
| Collision sensor | No | Yes |
| Pallet detection sensor | No | Yes |
Page 2: Specifications
| Feature | Value |
|---|---|
| Operating Voltage | DC 25.6 V |
| Power Input | AC 100--240 V, 50/60 Hz |
| Power Output | 29.4 V / 8 A |
| Battery Capacity | 25 Ah |
| Charging Time | Approximately 4 hours |
| Charging Mode | Manual and auto charging |
| Battery Life | 11 hours (no-load operation) |
| Cruise Speed | 0.2--1.2 m/s (adjustable) / 0.66--3.94 ft/s |
| Navigation | Laser and visual integrated SLAM |
| Minimum Travel Width | 55 cm (21.65 in) |
| Max Surmountable Height | 5 mm (0.20 in) |
| Max Climbing Angle | 5 degrees |
| Tray Dimensions | 352 x 340 mm (13.86 x 13.39 in) |
| Number of Trays | 2 trays + 1 dish-return box |
| Height Between Trays (top to bottom) | 248 / 253 / 223 mm (9.76 / 9.96 / 8.78 in) |
| Tray Load Capacity | 10 kg per layer (22.05 lbs) |
| Material | ABS / aviation-grade aluminium alloy |
| Robot Weight | 38 kg (83.78 lbs) |
| Robot Dimensions | 435 x 450 x 1120 mm (17.13 x 17.72 x 44.09 in) |
| Screen Size | 10.1-inch LCD + 18.5-inch advertising LCD |
| Operating System | Android |
| Microphone | 6-mic circular array |
| Speaker Power | 2 x 10 W stereo |
| Service Life | 5 years |
| Working Temperature | 0 to 40 C (32 to 104 F) |
| Working Humidity | 85% RH or below |
| Storage Temperature | -40 to 65 C (-40 to 149 F) |
| Working Altitude | Below 2000 m (6561 ft) |
| Surface Requirement | Indoor, flat and smooth ground |
| IP Rating | IP20 |
| Connectivity | Wi-Fi (2.4G/5G), Bluetooth, 3G, 4G |
Page 3: Product Components
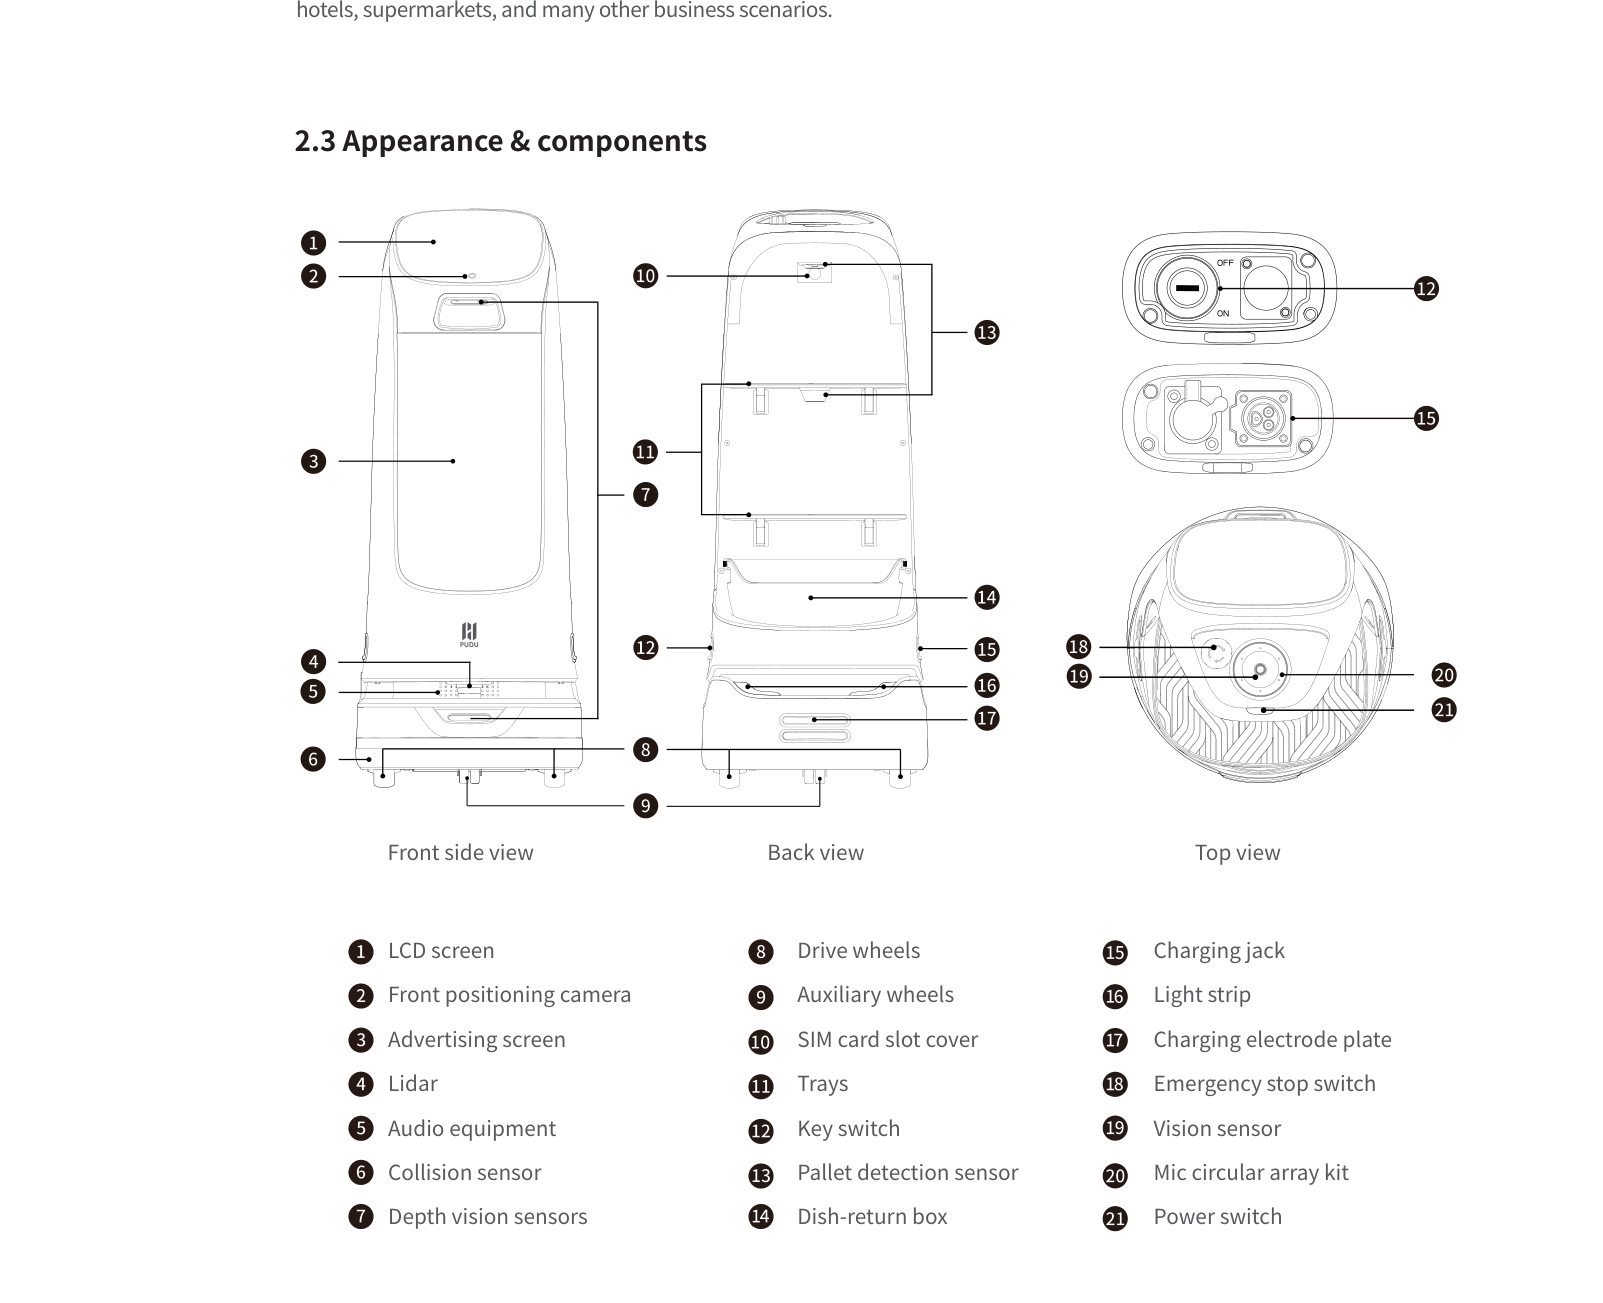
External Components
- LCD screen -- 10.1-inch touchscreen for controlling the robot, selecting modes, and viewing status
- Advertising screen -- 18.5-inch front-facing display for promotional content, menus, and branding
- Trays (x2) -- Two delivery trays, each supporting up to 10 kg (22.05 lbs)
- Dish-return box -- Lower compartment for collecting dirty dishes
- Light strip -- Bottom-mounted indicator light showing power and operating status
- Key switch -- Physical switch that enables/disables the robot's discharge port
- Power switch -- Press and hold to power on (1 second) or access power-off menu (3 seconds)
- Emergency stop switch -- Red button on the back; press to halt all movement immediately
Sensors and Navigation
- Lidar sensor -- Primary navigation sensor for mapping and obstacle detection
- Front positioning camera -- Used for localisation and face detection in Customer Attraction mode (does not collect face information)
- Depth vision sensors -- Detect obstacles at various depths for collision avoidance
- Vision sensor (top-mounted) -- Critical for navigation; also detects hand gestures for hands-free task completion
- Collision sensor (Pro-exclusive) -- Mounted on the front; detects physical contact and triggers an immediate stop to prevent injury or damage
- Pallet detection sensor (Pro-exclusive) -- Monitors trays for load changes; detects when items are placed on or removed from trays to automate delivery workflows
- Mic circular array -- Captures voice input from all directions for voice interaction
Audio
- Stereo speakers -- 2 x 10 W speakers for voice prompts, announcements, and audio playback
Ports and Interfaces
- Charging jack -- Located on the back of the robot; connects to the original charger
- Charging electrode plate -- On the bottom rear; aligns with the auto-charging dock contacts
- SIM card slot -- Behind a cover on the robot body; accepts a 3G/4G SIM card (requires hex key to access)
Drive System
- Drive wheels -- Powered wheels for movement
- Auxiliary wheels -- Support wheels for stability
Page 4: Safety Instructions
Before You Start
Read all safety instructions before operating the KettyBot Pro. Only trained personnel should operate, disassemble, or repair the robot. Keep this manual accessible to all staff who interact with the robot.
Electrical Safety
- Only use the original charger. Never use a third-party charger.
- Replace damaged chargers immediately -- contact HUTECH support for a replacement.
- Charge when the battery drops to 20%. Running at very low battery for extended periods damages battery life.
- Confirm the power voltage matches the charger label (AC 100--240 V input, 29.4 V / 8 A output) before connecting.
- Ensure the charging interface fastener is fully engaged (clicks into place) to prevent overheating.
Operating Safety
- Do not cover the top vision sensor while the robot is operating. This causes abnormal movement.
- Never clean or maintain the robot while it is powered on.
- Do not place open flames, candles, or flammable/explosive items on the trays.
- Do not pick up or place dishes while the robot is moving. Wait for it to stop. The pallet detection sensor may misread load changes while in motion.
- Do not push or move the robot while it is operating.
- Keep the robot upright during transport. Never lift by the tray or dish-return box.
- Only trained personnel may disassemble or repair the robot.
Environmental Requirements
- Indoor use only on flat, smooth ground.
- Operating temperature: 0 to 40 C (32 to 104 F).
- Humidity: 85% RH or below.
- Altitude: Below 2000 m (6561 ft).
- Do not use or charge in high-temperature, high-pressure, or hazardous areas.
- Do not use on wet surfaces or floors with liquids or sticky substances.
- Do not use in locations where wireless devices are prohibited.
Warnings
- Do not operate the robot on wet or sticky floors. The robot may lose traction or navigation accuracy.
- Do not obstruct the top camera during operation. This will cause the robot to move erratically and may result in collisions.
- The collision sensor is a safety backup, not a primary navigation tool. Do not rely on it to prevent all contact -- the robot should be operated in environments with clear paths.
- Dispose of the robot and accessories according to local WEEE regulations.
- Never run the battery to 0%. Charge promptly at 20% to preserve battery health.
Page 5: Basic Operation
Powering On
- Ensure the key switch is turned to the "ON" position.
- Move the robot to its startup location (near the wall or ceiling marker used during mapping).
- Press and hold the power switch for 1 second.
- The bottom light strip will illuminate, confirming power on.
- The control screen will start up and display the home interface.
Powering Off
- Press and hold the power switch for 3 seconds.
- A "Power Off" option appears on the screen.
- Tap "Power Off" to shut down.
- The light strip and screen will turn off.
Pausing Operation
- Tap the screen once during any task (delivery, cruise, escorting) to pause the robot immediately.
- Tap the screen again to resume the current task from where it paused.
Emergency Stop
To activate: - Press the red emergency stop switch on the back of the robot firmly. This cuts motor power and stops all movement instantly.
To release: - Rotate the emergency stop switch clockwise until it pops back out. - Follow the on-screen instructions to restart the task.
Moving the Robot Manually
- Only move the robot manually when it is powered off or paused.
- Do not push or drag the robot while it is actively performing a task.
- Keep the robot upright at all times. Never tilt or lift by the trays.
Hand Gesture Task Completion
After the robot arrives at a table, you can complete the task hands-free:
- Wave your hand 2--12 cm (0.79--4.72 in) above the top vision sensor.
- Wave more than twice.
- The robot detects the gesture and automatically starts the next task.
Alternatively, press the power switch briefly to trigger the next task.
Exiting Modes
- Cruise or Guiding mode: Swipe down with two fingers on the screen, then tap "Exit this mode."
- Delivery mode: Tap the screen to pause, then use the on-screen controls to exit.
Map Creation
An activation code from the manufacturer technical support is required before creating a map.
- Contact HUTECH technical support to obtain an activation code.
- Choose either a wall marker or ceiling marker (do not use both at the same time).
- Apply the marker at the desired startup location. Wall markers must not be on reflective surfaces (glass, ceramic tiles). Ceiling markers must not be on highly reflective ceilings.
- Power on the robot at the marker location.
- Navigate to Settings > Map Settings > Edit Map and enter the activation code.
- Tap New Map, select positioning type (Wall or Ceiling), then tap Next.
- Move the robot along the desired route. The robot records the path. Travel in the middle of the path and cover the route at least twice for accuracy.
- Stay behind the robot during mapping to avoid blocking the Lidar.
- Return the robot to the start point before tapping Finish Mapping.
- Select the functions the robot should support (customer attraction, guiding, etc.).
- Set up function locations:
- Pickup Location: Where the robot picks up food. Multiple locations supported.
- Greeting Location: For customer attraction or greeting. No obstacles within 1.2 m in front.
- Table Numbers: Can be grouped. Required for delivery and guiding.
- Cruise Route: Required for Cruise mode. Multiple routes supported.
- Dish-Return Location: Where collected dishes are returned. Multiple supported.
- Temporary Stop Point: For multi-robot scenarios. Must be more than 1 m from the pickup location.
- Charging Pile: Position the robot 0.4--1.2 m in front of the pile, facing it.
- Optionally set virtual walls and two-way paths for aisles wider than 1.6 m.
- Tap Finish to upload the map to the Cloud Platform.
SIM Card Installation
- Power off the robot.
- Locate the SIM card slot cover on the robot body.
- Remove the cover using a hex key.
- Insert the SIM card into the slot.
- Reinstall the cover.
- Power on the robot and enable Cellular Network in Settings > Network Settings.
Note: Wi-Fi is prioritised when both cellular and Wi-Fi are available. The robot automatically switches to cellular if Wi-Fi signal is weak. Operations such as switching languages, importing music, and downloading ads require Wi-Fi and cannot be done on cellular alone.
Page 6: Charging and Battery
Charging Methods
Method 1: Direct Charger
- Locate the charging jack on the back of the robot.
- Connect the original charger.
- Ensure the fastener clicks fully into place.
- A full charge takes approximately 4 hours from empty (despite the larger 25 Ah battery).
- Disconnect the charger once fully charged.
You can charge the robot even when the key switch is in the OFF position. The charging circuit is independent of the key switch.
Method 2: Charging Pile (Auto-Dock)
- Ensure the charging pile was configured during map creation (Settings > Map Settings).
- The robot navigates to the charging pile automatically when the battery is low.
- The charging electrode plate on the bottom rear aligns with the dock contacts.
- Ensure the path to the dock is always clear of obstacles.
- Tap "Charge Now" on the home screen to send the robot to the pile immediately.
The charging pile is an optional accessory purchased separately. Without deep charging enabled, the robot stops in front of the pile when fully charged. In multi-robot setups, use Settings > Map Settings > Select Charging Pile to match specific robots to specific piles.
Battery Information
- Capacity: 25 Ah (upgraded from 20 Ah on standard KettyBot)
- Runtime: Up to 11 hours no-load operation; 8--10 hours under typical restaurant conditions
- Charging time: Approximately 4 hours
- Battery lifespan: Typically 2--3 years with proper care
Actual runtime depends on payload weight, travel distance, speed settings, and advertising screen usage. Carrying full trays at higher speeds reduces runtime.
Low Battery Behaviour (Below 10%)
The robot's response depends on its current mode:
- Cruise mode: Goes to charging pile if configured; otherwise returns to the return point.
- Dish-Return mode: Goes to the dish-return point first, then to the charging pile if available; otherwise stays in place.
- Other modes: Completes the current task, then goes to the charging pile or return point.
- Home screen: Stays in place and displays a low battery popup.
- No pile or return point available: The robot stops after a countdown.
Charging Indicators
- The bottom light strip illuminates when the robot is powered on.
- Battery percentage is displayed on the control screen.
- Low battery warnings appear on screen at 20% and below 10%.
Battery Care Tips
- Charge promptly when the battery reaches 20%. Do not let it drain to 0%.
- Only use the original charger. Third-party chargers can damage the battery or charging circuit.
- Avoid operating in temperatures outside 0--40 C (32--104 F).
- If storing the robot for an extended period, charge the battery periodically to prevent deep discharge.
- Running at lower speeds and lighter loads extends battery life per charge.
Page 7: Modes and Functions
The KettyBot Pro supports the same 9 functional modes as the standard KettyBot, with enhancements from the Pro-exclusive sensors and lower minimum speed. Configure which modes to display in Settings > Home Functions.
Food Delivery (General Delivery)
What it does: Carries dishes on up to two trays and delivers them to programmed table locations. The pallet detection sensor (Pro-exclusive) confirms when items have been placed or removed, automating the delivery workflow.
How to use it: 1. Place dishes on the trays at the pickup location (max 10 kg per tray). 2. The pallet detection sensor registers the load and can automatically begin the delivery route. 3. Select the destination table number(s) on the screen (if not auto-triggered). 4. The robot navigates to each table and waits for dishes to be removed. 5. The pallet detection sensor detects the empty tray and the robot proceeds to the next task. 6. The robot returns to the kitchen area after delivery.
Best for: Restaurants with table service.
Delivery
What it does: Delivers items autonomously, optimised for non-restaurant scenarios.
How to use it: Same workflow as Food Delivery, with pallet detection automation.
Best for: Hotels, retail stores, offices.
Greeting and Escorting (Guiding)
What it does: Welcomes customers at the entrance and guides them to their assigned table. The lower minimum speed of 0.2 m/s allows for a more natural walking pace when escorting guests.
How to use it: 1. Select Guiding mode on the home screen. 2. Choose the destination table. 3. The robot greets the customer and leads them at a comfortable pace. 4. To exit, swipe down with two fingers and tap "Exit this mode."
Best for: Restaurant entrances, hotel lobbies.
Cruise Mode
What it does: Patrols a predefined route through the venue at adjustable speed (0.2--1.2 m/s) for marketing or monitoring purposes.
How to use it: 1. Ensure at least one cruise route was set during map creation. 2. Select Cruise mode from the home screen. 3. The robot follows the predefined route continuously. 4. To exit, swipe down with two fingers and tap "Exit this mode."
Interaction during cruise: When enabled in settings, if a customer is detected by the front camera or taps the screen, the Customer Attraction interface appears.
Best for: Continuous promotion, ambient marketing, venue monitoring.
Customer Attraction Mode
What it does: The robot travels to a designated location and plays speech to attract passers-by. When someone approaches, the robot changes its speech. Customers can interact, view offers, and follow the robot into the store.
How to use it: 1. Ensure a greeting location was set during map creation. 2. Enable Customer Attraction in Settings > Home Functions. 3. Select the mode from the home screen. 4. The robot navigates to the attraction location and begins playing speech. 5. Its motor is locked at the attraction location.
Important: The front camera detects faces but does not collect or store face information.
Best for: Storefronts, mall entrances, trade shows.
Dish-Return Mode
What it does: Collects dirty dishes from specified tables and delivers them to the dish-return location. The pallet detection sensor helps confirm when items are loaded onto the trays.
How to use it: 1. Select Dish-Return mode from the home screen. 2. Choose the table numbers for the robot to visit. 3. The robot travels to each table and waits (configurable duration) while staff load dirty dishes. 4. After visiting the set number of tables, it returns to the dish-return location.
Features: - Cyclic dish-return: Automatic repetition without reselecting tables. - Configurable stay time per table. - Number of Stays: Returns to the dish-return point after collecting from a set number of tables. - Custom voice announcements for arrival, departure, and dish-return location arrival. - Pallet detection sensor confirms tray load status.
Best for: Busy restaurants during peak service.
Advertising Mode
What it does: Displays promotional content on the 18.5-inch advertising screen while the robot is roaming or stationed.
How to use it: 1. Upload content via the PuduLink app (mobile) or Merchant Management Platform (PC web portal). 2. Supports up to 10 screen ads, 300 MB storage limit. 3. Image display duration: up to 60 seconds. Video plays at its own length. 4. Different ad content can be configured for different cruise stop points.
Best for: Promoting specials, new menu items, or events.
Birthday Mode
What it does: A delivery mode with birthday-specific voice and display features.
Best for: Birthday celebrations in restaurants.
Table Services
What it does: Provides table-side service interactions.
Best for: Enhanced table-side customer experience.
Collision Detection (Pro-Exclusive)
The collision sensor on the front of the robot detects physical contact and triggers an immediate stop. If the robot makes unexpected contact with a person, furniture, or other obstacle, the sensor halts it to prevent injury or damage. This is an additional safety layer beyond the depth vision sensors and lidar. The robot displays a message on screen and can be resumed via the interface once the obstacle is cleared.
Additional Features
- Smooth Mode: Available in Delivery and Birthday modes. Reduces speed for carrying soup or liquids. Tap the Smooth Mode icon to enable.
- Voice Command (Chinese only): In Delivery, Escorting, and Birthday modes, a voice command icon can be enabled. Say "go to XXX" to set a destination automatically.
- Product Navigation (Escorting Mode): Customers can search for a product name and the robot guides them to its location. Multi-floor support with popup prompts.
- Bluetooth Speaker: Enable Bluetooth in Settings to pair with an external speaker for enhanced audio.
- Work Plan Scheduling: Create scheduled tasks on the Business Management Platform. The robot automatically executes assigned modes at predetermined times.
- Advertising Screen Settings: Volume and brightness configured separately in Settings > Ad Screen Settings. Content uploaded via the Business Management Platform.
Page 8: Maintenance and Servicing
Maintenance Schedule
| What | How Often | How | Robot Status |
|---|---|---|---|
| Trays | Weekly | Wipe surfaces with a clean cloth | Power off |
| Drive wheels | Weekly | Wipe surfaces with a clean cloth | Power off |
| Auxiliary wheels | Weekly | Wipe surfaces with a clean cloth | Power off |
| Vision sensor (top) | Weekly | Clean with a clean cloth or lens cleanser | Power off |
| Front positioning camera | Weekly | Clean with a clean cloth or lens cleanser | Power off |
| Depth vision sensors | Weekly | Clean with a clean cloth or lens cleanser | Power off |
| Lidar sensor | Weekly | Clean with a clean cloth or lens cleanser | Power off |
| Collision sensor | Weekly | Wipe with a clean cloth, check for physical damage | Power off |
| Pallet detection sensor | Weekly | Clean with a clean cloth or lens cleanser | Power off |
| Robot body | Monthly | Wipe with a clean cloth | Power off |
Cleaning the Robot
- Power off the robot completely before any cleaning. Press and hold the power switch for 3 seconds, tap "Power Off," and wait for the light strip and screen to go dark.
- Use a soft, dry cloth for general surfaces.
- Use a dedicated lens cleanser or clean microfibre cloth for all sensors and cameras.
- Pay particular attention to the collision sensor and pallet detection sensor -- food debris around these sensors can cause false triggers or missed detections.
- If a sensor becomes contaminated during operation (e.g., food splatter), address it immediately. Blocked sensors cause navigation and detection problems.
- Never use water, solvents, or abrasive cleaners on the robot.
When to Replace Parts
- Battery: Typical lifespan is 2--3 years. Replace if runtime drops below half the original capacity.
- Charger: Replace immediately if the cable or plug shows visible damage. Only use original chargers.
- Sensor lenses: Replace if scratched or cracked. Contact HUTECH support for replacement parts.
- Collision sensor housing: Replace if physically dented or damaged, which can cause false triggers.
- Emergency stop switch: Replace if the button mechanism is physically damaged and cannot be released.
Charging Pile Maintenance
- Install on a flat, dry floor with its back against a wall.
- Keep flammable items away from the charging pile.
- Maintain clear space in front of and on both sides of the pile when in use.
- Do not place reflective or transparent items near the charging pile.
- Clean the dock contacts with a dry cloth regularly.
- In multi-robot setups, assign specific robots to specific piles via Settings > Map Settings > Select Charging Pile.
Page 9: Troubleshooting
If you cannot resolve an issue using this guide, contact HUTECH Robotics support at ai.hutechrobotics.com or manufacturer after-sales at techservice@pudutech.com.
Robot does not power on
What you see: Pressing the power switch for 1 second produces no response. Light strip does not illuminate. Screen stays dark.
Likely causes: - Key switch is in the OFF position - Battery is completely depleted - Emergency stop is engaged - Power switch hardware fault
What to check: 1. Verify the key switch is turned to the "ON" position. 2. Check that the emergency stop switch is not pressed in. If it is, rotate it clockwise to release. 3. Connect the original charger and wait 15 minutes, then attempt power on again. 4. Inspect the power switch for physical damage.
Solution: Turn the key switch to ON. Release the emergency stop. Charge the battery. If none work, the power switch or battery may need replacement.
Escalate if: The robot does not respond after confirming the key switch is ON, the emergency stop is released, and the battery has been charged for at least 30 minutes.
Robot does not charge or charges very slowly
What you see: Battery percentage does not increase when plugged in. Charger feels unusually hot or cold. Charging takes significantly longer than 4 hours.
Likely causes: - Charging fastener not fully engaged - Damaged charger cable - Incorrect power voltage - Dirty charging contacts - Battery at end of life
What to check: 1. Confirm the charger fastener clicks fully into place at the charging jack. 2. Check that the wall outlet provides AC 100--240 V and is working (test with another device). 3. Inspect the charger cable and plug for visible damage. 4. Clean the charging jack and the charging electrode plate with a dry cloth. 5. Try a known-good original charger if available.
Solution: Reseat the charger connector firmly. Replace the charger if damaged. Clean the contacts. If using auto-dock charging, ensure the electrode plate and dock contacts are clean and aligned.
Escalate if: The battery still does not charge with a confirmed working charger and clean contacts.
Robot moves erratically or drifts off route
What you see: Robot deviates from its mapped path, bumps into obstacles it should avoid, or stops frequently without cause.
Likely causes: - Top camera or vision sensor obstructed or dirty - Lidar sensor dirty or blocked - Map has changed (furniture moved) - Lighting conditions changed significantly - Floor surface is wet or reflective - Collision sensor triggering false positives
What to check: 1. Check if anything is covering or obstructing the top vision sensor or front camera. 2. Power off and clean all sensors (vision sensor, front positioning camera, depth vision sensors, lidar, collision sensor) with a cloth or lens cleanser. 3. Verify the physical environment matches the stored map (no major furniture changes). 4. Check the floor for wet patches, spills, or highly reflective surfaces. 5. Restart the robot at the startup marker location.
Solution: Clean sensors. Update the map if the environment has changed. Dry the floor. Restart from the marker location to re-establish position. If the collision sensor is triggering falsely, clean it and check for physical damage.
Escalate if: The robot continues to navigate erratically after sensor cleaning, map update, and restart.
Lidar or sensors appear to malfunction
What you see: Robot stops and displays sensor-related error messages. Robot cannot detect obstacles. Navigation fails even in a clear environment.
Likely causes: - Sensors are dirty or scratched - Sensor is physically damaged - Strong direct sunlight or reflections interfering with lidar - Software needs restart
What to check: 1. Power off and inspect the lidar, depth vision sensors, and collision sensor for visible dirt, scratches, or damage. 2. Clean all sensors with a clean cloth or lens cleanser. 3. Check if the robot is near large glass panels or highly reflective surfaces. 4. Restart the robot and test in a different area of the venue.
Solution: Clean or reposition the robot away from reflective surfaces. Restart the robot. If a sensor lens is scratched or cracked, it needs professional replacement.
Escalate if: Errors persist after cleaning and restarting, or if a sensor is visibly damaged.
Pallet detection sensor not responding
What you see: Robot does not detect when items are placed on or removed from trays. Delivery workflow does not trigger automatically. No load change registered on screen.
Likely causes: - Sensor is dirty or blocked - Sensor is miscalibrated - Software glitch - Sensor hardware failure
What to check: 1. Power off and clean the pallet detection sensor with a clean cloth or lens cleanser. 2. Check for food debris or residue around the sensor area on the tray. 3. Restart the robot and test by placing a known weight on the tray. 4. Check the robot settings to confirm pallet detection is enabled.
Solution: Clean the sensor. Remove debris. Restart the robot. Verify settings. A software restart usually resolves intermittent issues.
Escalate if: The sensor does not respond after cleaning, restart, and settings verification.
Collision sensor triggers false stops
What you see: Robot stops frequently claiming a collision occurred when nothing touched it. Robot cannot complete delivery routes due to repeated false collision events.
Likely causes: - Sensor is dirty or has residue on it - Sensor is damaged or misaligned - Hanging decorations or tablecloths brushing the sensor - Environmental vibrations
What to check: 1. Power off and inspect the collision sensor for dirt, food residue, or physical damage. 2. Clean the sensor with a clean dry cloth. 3. Check the robot's path for items that may lightly brush against the front (tablecloths, hanging decorations, chair backs). 4. Restart the robot and test on a clear path.
Solution: Clean the sensor. Rearrange the environment to prevent light objects from touching the front of the robot. If the sensor housing is physically damaged or dented, it may need professional repair.
Escalate if: False collision triggers continue after cleaning and environmental adjustments.
Screen is unresponsive or displays incorrectly
What you see: The 10.1-inch LCD does not respond to touch. Screen shows artefacts, flickering, or remains blank after power on. Advertising screen does not display content.
Likely causes: - Software crash - Screen hardware fault - Loose internal cable - Screen damaged by impact
What to check: 1. Attempt a full power cycle: hold the power switch for 3 seconds, tap Power Off, wait 30 seconds, then power on again. 2. Check if only one screen (control or advertising) is affected, or both. 3. Look for visible cracks or damage on the screen surface. 4. If the control screen works but the advertising screen does not, check the content/media settings in the robot's management interface.
Solution: A power cycle resolves most software-related screen issues. If the advertising screen has no content loaded, upload media through the management interface.
Escalate if: The screen remains unresponsive or shows visual artefacts after a power cycle with no visible damage.
Emergency stop does not release
What you see: The emergency stop button remains pressed and the robot will not resume operation after the button is rotated.
Likely causes: - Button is stuck due to debris or impact damage - Internal switch mechanism is faulty
What to check: 1. Firmly rotate the emergency stop switch clockwise. It should pop back out. 2. Check for debris, food residue, or sticky substance around the button. 3. Clean around the button with a dry cloth. 4. Attempt to rotate again with slightly more force.
Solution: Clean the area around the button and rotate clockwise. If it pops out, follow on-screen instructions to resume.
Escalate if: The button physically cannot be released, or the robot does not resume after the button is released.
Battery life has noticeably decreased
What you see: Robot runs for significantly fewer hours than the rated 11 hours (no-load). Battery percentage drops quickly. Robot returns to charger more frequently.
Likely causes: - Battery degradation from age or repeated deep discharges - Consistently running at high speed with heavy loads - Environmental temperature extremes - Battery fault
What to check: 1. Check how long the robot has been in service (battery lifespan is typically 2--3 years). 2. Review operating habits -- has the battery regularly been run below 20% before charging? 3. Check the operating environment temperature (should be 0--40 C / 32--104 F). 4. Reduce cruise speed and tray load to test if runtime improves.
Solution: Charge promptly at 20% to preserve battery health. Avoid operating in extreme temperatures. Reduce speed and load if possible.
Escalate if: The battery provides less than half the original runtime and the robot is within its service life.
Robot cannot find or connect to Wi-Fi
What you see: Robot does not appear on the network. Remote management is unavailable. Robot shows Wi-Fi disconnected status.
Likely causes: - Incorrect Wi-Fi credentials - Router too far away or signal too weak - 5 GHz band not supported by local router - Interference from other devices
What to check: 1. Verify the Wi-Fi network name and password are correct in the robot settings. 2. Check that the router is broadcasting on a compatible band (2.4 GHz or 5 GHz). 3. Move the robot closer to the router to test signal strength. 4. Restart the router and the robot. 5. If using 4G as backup, check that the SIM card is properly inserted and has an active data plan.
Solution: Re-enter Wi-Fi credentials. Move the router closer or add a Wi-Fi extender. Switch frequency band. Use a SIM card for 4G as a fallback.
Escalate if: The robot cannot connect to any Wi-Fi network and the SIM card also does not work.
Robot fails to create a map
What you see: Map creation process does not start or fails to complete. Robot cannot localise at the startup marker.
Likely causes: - No activation code entered - Wall marker placed on a reflective surface (glass, ceramic tiles) - Ceiling marker on a highly reflective ceiling - Camera or sensors dirty - Poor lighting conditions
What to check: 1. Confirm the activation code has been obtained from the manufacturer support and entered correctly. 2. Check wall marker placement -- must not be on glass, mirrors, or ceramic tiles. 3. If using a ceiling marker, ensure the ceiling is not highly reflective. 4. Verify only one marker type (wall or ceiling) is being used, not both. 5. Clean the top camera and front positioning camera. 6. Ensure the area is adequately lit.
Solution: Relocate the marker to a non-reflective surface. Clean cameras. Improve lighting. Re-enter the activation code and restart the mapping process.
Escalate if: Mapping fails despite correct marker placement, clean cameras, and adequate lighting.
Robot stops unexpectedly during delivery
What you see: Robot halts mid-route without any screen tap or emergency stop activation. May or may not show an error message.
Likely causes: - Obstacle detected that the robot cannot navigate around - Battery critically low - Sensor error - Collision sensor triggered - Pallet detection sensor detected an unexpected load change - Network disconnection triggering a safety stop - Software crash
What to check: 1. Check the screen for any error messages or warnings (including collision or pallet alerts). 2. Verify the battery level -- if below 20%, charge immediately. 3. Look for obstacles in the robot's path (chair legs, bags on the floor, clear objects). 4. Check if items shifted on the tray, potentially triggering the pallet detection sensor. 5. Check if any sensors are dirty or blocked. 6. Try tapping the screen to resume the task. 7. If unresponsive, perform a full power cycle.
Solution: Remove obstacles from the path. Secure items on the tray. Charge the battery. Clean sensors. Restart if a software issue is suspected.
Escalate if: The robot stops repeatedly in the same area despite clear paths and clean sensors.
Customer Attraction mode not available after map creation
What you see: Customer Attraction mode does not appear on the main interface after creating a new map.
Likely causes: - No greeting point was added during map creation - The mode is disabled in Home Functions settings
What to check: 1. Go to Settings > Home Functions and verify Customer Attraction is enabled. 2. If enabled but still not visible, check the map settings for greeting locations. 3. Navigate to Settings > Map Settings > Edit Map and verify at least one greeting point has been added.
Solution: Add a greeting point to the map if missing. Greeting locations double as customer attraction locations. Enable the mode in Home Functions.
Escalate if: Greeting points are correctly set but the mode still does not appear.
Auto-charging pile not working correctly
What you see: Robot does not navigate to the charging pile when battery is low. Robot cannot align with the pile. Charging does not start after docking.
Likely causes: - Charging pile location not set during mapping - Path to charging pile blocked - Charging contacts dirty - Charging pile not properly installed - Reflective or transparent items near the pile
What to check: 1. Verify the charging pile location was set during mapping (Settings > Map Settings). 2. Ensure the path to the charging pile is clear of obstacles. 3. Clean the charging electrode plate on the robot and the dock contacts with a dry cloth. 4. Check installation: flat, dry floor with back against a wall. 5. Ensure no reflective or transparent items near the charging pile. 6. Verify clear space in front of and on both sides of the pile.
Solution: Set the charging pile location in the map if missing. Clear the path. Clean contacts. Reposition the pile if installed incorrectly. In multi-robot scenarios, use Settings > Map Settings > Select Charging Pile to match robots to piles.
Escalate if: The robot still cannot dock or charge after verifying all placement and cleanliness requirements.
Cellular network (4G) not working
What you see: Robot does not connect to the cellular network after inserting a SIM card. No 4G signal symbol on the top bar.
Likely causes: - SIM card not properly inserted - Cellular network not enabled in settings - SIM card not activated or has no data plan - Robot version may not support 4G
What to check: 1. Power off the robot. Remove the SIM card slot cover with a hex key. 2. Verify the SIM card is properly inserted and the cover is reinstalled. 3. Power on and go to Settings > Network Settings. Confirm Cellular Network is turned on. 4. Check if a 4G signal symbol appears on the top bar. 5. Verify the SIM card has an active data plan.
Solution: Reseat the SIM card. Enable cellular network in settings. Activate the SIM card data plan. Note: language switching, music import, and ad downloads require Wi-Fi and cannot run on cellular alone.
Escalate if: The SIM card is properly inserted, cellular is enabled, and the data plan is active, but no connection is established.
Page 10: Frequently Asked Questions
Getting Started
How do I power on and off the KettyBot Pro? Hold the power switch for 1 second to turn on, 3 seconds to access the power-off option. First ensure the key switch is in the "ON" position and the robot is near its startup marker. The bottom light strip illuminates when powered on. To power off, hold the switch for 3 seconds and tap "Power Off" on screen.
What environments is the KettyBot Pro designed for? Indoor flat-floor environments such as restaurants, hotels, and supermarkets. Operates between 0--40 C (32--104 F), humidity at or below 85%. Cannot handle wet or sticky floors, outdoor terrain, or altitudes above 2000 m (6561 ft). Surmounts bumps up to 5 mm and ramps up to 5 degrees.
What is the difference between KettyBot and KettyBot Pro? The Pro has a larger battery (25 Ah vs 20 Ah), longer runtime (11 hours vs 8+), lower minimum speed (0.2 m/s vs 0.5 m/s), and two additional sensors (collision sensor and pallet detection sensor). All other specifications -- dimensions, weight, tray capacity, screens, and navigation -- are the same.
How do I create a map for the KettyBot Pro? Contact HUTECH support for an activation code, apply a wall or ceiling marker, then follow the on-screen mapping wizard. The robot maps directly on its own screen. Wall markers must not be on reflective surfaces. Ceiling markers must not be on highly reflective ceilings. Use only one marker type at a time.
Charging
How long does it take to fully charge the KettyBot Pro? Approximately 4 hours from empty to full, despite the larger 25 Ah battery. Use only the original charger with the fastener fully engaged.
How long does the battery last on a full charge? Up to 11 hours under no-load conditions; 8--10 hours under typical restaurant conditions with loaded trays. Runtime depends on payload, speed, travel distance, and screen usage.
When should I charge the KettyBot Pro? Charge when the battery drops to 20%. Running at very low battery degrades the battery over time. If auto-charging is configured, the robot docks automatically.
Can I use a third-party charger? No. Only use the original charger. Third-party chargers may damage the charging circuit or battery. Contact HUTECH at techservice@pudutech.com for replacements.
Does the KettyBot Pro support automatic charging? Yes. When auto-charging is enabled and a dock is installed, the robot navigates to the dock when battery is low and resumes tasks once charged. Keep the path clear. In multi-robot setups, assign specific piles via Settings > Map Settings.
Can the robot be charged when the key switch is OFF? Yes. The key switch controls the discharge port only. The charging circuit is independent, so you can charge even with the key switch off.
What happens when the battery drops below 10% in different modes? Behaviour varies: in Cruise mode, it goes to the charging pile or return point; in Dish-Return mode, it goes to the dish-return point first, then the pile; in other modes, it completes the current task first. On the home screen, it stays in place with a low battery popup. If neither pile nor return point is available, the robot stops after a countdown.
Operation
What is the minimum speed of the KettyBot Pro? 0.2 m/s (0.66 ft/s), compared to 0.5 m/s on the standard model. The lower speed is useful for escorting guests at a comfortable pace or navigating tight spaces carefully. Adjustable up to 1.2 m/s via settings.
What does the pallet detection sensor do? It detects when items are placed on or removed from the trays. When dishes are loaded, the sensor registers the load, allowing automatic delivery start. When dishes are removed at the destination, the sensor detects the empty tray and the robot proceeds to its next task. This reduces manual screen interaction.
How do I pause the KettyBot Pro during a task? Tap the screen once to pause, tap again to resume. Works during delivery, cruise, and escorting.
What is the emergency stop and how do I use it? Press the red button on the back to halt all movement instantly. Rotate clockwise to release. Follow on-screen instructions to restart the task.
How much weight can each tray hold? Up to 10 kg (22.05 lbs) per tray. Distribute weight evenly. Overloading may affect navigation and trigger pallet detection sensor warnings.
How does hand gesture task completion work? Wave your hand 2--12 cm (0.79--4.72 in) above the top vision sensor more than twice. The robot detects the gesture and starts the next task automatically. Alternatively, press the power switch briefly.
What is Customer Attraction mode? The robot goes to a designated location and plays speech to attract passers-by. It changes speech as people approach, lets them view offers, and can guide them into the store. The front camera detects faces but does not collect face information. The motor is locked at the attraction location.
What is Dish-Return mode? The robot visits designated tables, waits while staff load dirty dishes, then returns to the dish-return location. Supports cyclic operation, configurable stay time, and custom voice announcements. The pallet detection sensor confirms when items are loaded.
Can I schedule work plans for the robot in advance? Yes. Create work plans on the Business Management Platform. The robot executes assigned tasks at scheduled times automatically.
How do I manage advertising content? Upload via PuduLink app (mobile) or Merchant Management Platform (PC). Supports up to 10 ads, 300 MB storage. Image display up to 60 seconds. Different content can be set for different cruise stop points.
Safety
What is the collision sensor and how does it work? It is a Pro-exclusive sensor mounted on the front. If the robot makes unexpected physical contact with a person, furniture, or obstacle, the sensor triggers an immediate halt. The robot displays a message on screen and can be resumed once the obstacle is cleared. This is an additional layer beyond lidar and depth vision sensors.
Can I place hot items or candles on the trays? No. Open flames and flammable items are strictly prohibited. Use heat-resistant containers for warm dishes only.
Is it safe to pick up dishes while the robot is moving? No. Wait for the robot to stop completely. The pallet detection sensor may also misread load changes while in motion.
What should I do if the top camera is accidentally covered? Tap the screen to pause. Remove the obstruction. Push the robot back onto its route, then tap to resume.
Maintenance
How do I clean the sensors? Power off the robot. Wipe all sensors weekly with a clean cloth or lens cleanser, including the collision sensor and pallet detection sensor. Address contamination immediately during operation.
Can I clean the robot while it is running? No. Always power off completely before any cleaning or maintenance.
Connectivity
Can I install a SIM card? Yes, there is a SIM card slot for 3G/4G connectivity behind a cover on the robot body. Wi-Fi (2.4 GHz and 5 GHz) and Bluetooth are also supported.
Can the KettyBot Pro connect to a Bluetooth speaker? Yes. Enable Bluetooth in Settings to pair with an external speaker for enhanced audio in noisy environments.
Who do I contact for after-sales support? Contact HUTECH after-sales at techservice@pudutech.com. Free warranty service is available within the warranty period. Repairs outside warranty are at standard pricing.
Page 11: Service and Escalation
When to Contact Support
- The robot does not power on after checking the key switch, emergency stop, and charging
- The battery does not charge with a confirmed working charger and clean contacts
- Sensors show persistent errors after cleaning and restarting
- The pallet detection sensor does not respond after cleaning, restart, and settings check
- The collision sensor triggers false stops despite cleaning and environmental adjustments
- A screen remains unresponsive after a full power cycle
- The emergency stop button cannot be physically released
- The battery provides less than half its original runtime
- The robot cannot connect to any network (Wi-Fi or 4G)
- Map creation fails despite correct marker placement, clean cameras, and adequate lighting
- The robot stops repeatedly in the same area with clear paths and clean sensors
- Any visible physical damage to sensors, screens, or the emergency stop mechanism
Before You Call
Have the following information ready:
- Robot model and version (KBFM11, PNT Pro)
- Serial number (located on the robot body)
- Description of the problem with any on-screen error messages
- Steps already taken to troubleshoot
- How long the robot has been in service
- Operating environment (temperature, floor type, venue type)
- Whether the issue involves Pro-exclusive sensors (collision or pallet detection)
Support Contact
- HUTECH Robotics: ai.hutechrobotics.com
- Manufacturer Support: techservice@pudutech.com