CC1 Pro -- Support Manual
Upgraded autonomous cleaning robot with expanded dustbin, spot cleaning mode, and lithium iron phosphate battery for small and medium-sized indoor environments.
Page 1: Overview
What is the CC1 Pro?
The CC1 Pro is an upgraded version of the CC1 autonomous cleaning robot, designed for small and medium-sized indoor environments that demand more capacity and flexibility. It combines sweeping, scrubbing, carpet vacuuming, and dust mopping with support for auto-filling, auto-draining, and auto-charging via the optional docking station.
The CC1 Pro shares the same physical dimensions and core cleaning capabilities as the standard CC1 but introduces several key upgrades: an expandable dustbin option (from 2.5 L to 6 L), a spot cleaning mode rated at 1,500--3,000 sq m/h for rapid targeted cleaning, a lithium iron phosphate (LiFePO4) battery with longer cycle life and better thermal stability, and explicit pH guidelines for cleaning solutions.
Typical deployment environments include office buildings, hotels, retail stores, shopping centres, airports, and other indoor commercial spaces requiring routine cleaning on hard floors or low-pile carpet.
CC1 Pro vs CC1 -- Key Differences
| Feature | CC1 | CC1 Pro |
|---|---|---|
| Model | CCBC01 | CCBC02 |
| Battery Type | Lithium | Lithium iron phosphate (LiFePO4) |
| Dustbin Capacity | 2.5 L | 2.5 L (default) / 6 L (expanded) |
| Spot Cleaning Mode | Not available | 1,500--3,000 sq m/h |
| Cleaning Solution pH | Non-foaming neutral | pH 6--8, non-foaming, defoaming agent permitted |
| Stairway Safety Guidance | General | Explicit recommendation for rails/barriers |
All other specifications, dimensions, cleaning modes, and operating procedures are identical.
At a Glance
| Detail | Value |
|---|---|
| Model | CCBC02 |
| Cleaning Functions | Scrubbing, sweeping, vacuuming, dust mopping, spot cleaning |
| Battery Life | 4--9 hours (mode dependent) |
| Cleaning Coverage | 700--1,000 sq m/h (cover); 1,500--3,000 sq m/h (spot) |
| Solution Tank | 15 L |
| Recovery Tank | 15 L |
| Dustbin | 2.5 L (default) / 6 L (expanded) |
| Weight | 75 kg |
| Navigation | LiDAR + Visual SLAM |
| Floor Types | Hard floors and short-pile carpet |
Page 2: Specifications
| Feature | Value |
|---|---|
| Model | CCBC02 |
| Operating Voltage | DC 23 V -- 29.2 V |
| Battery Type | Lithium iron phosphate (LiFePO4) |
| Power Adapter Input | AC 100 V -- 240 V, 50/60 Hz |
| Power Adapter Output | Max 29.2 V, 15 A |
| Battery Capacity | 50 Ah |
| Charging Time | Less than 3 hours |
| Battery Life -- Scrubbing | Approximately 5 hours |
| Battery Life -- Sweeping + Vacuuming + Mopping | Approximately 5 hours |
| Battery Life -- Carpet Vacuuming | Approximately 4 hours |
| Battery Life -- Silent Mopping | Approximately 9 hours |
| Weight | 75 kg (165.35 lbs) |
| Dimensions (L x W x H) | 629 x 552 x 695 mm |
| Screen | 10.1-inch LCD |
| Navigation | Integrated LiDAR and visual SLAM |
| Speed Range | 0.2 -- 1.2 m/s (adjustable) |
| Working Noise | Less than 70 dB |
| Min Path Clearance | 70 cm (75 cm preferred) |
| Max Surmountable Height | 20 mm (pass-through); 8 mm (while cleaning) |
| Max Surmountable Gap | 35 mm |
| Max Climbing Angle | 8 degrees (non-cleaning); 3 degrees (while cleaning) |
| Cleaning Width (with side brush) | 500 mm |
| Cover Cleaning Efficiency | 700 -- 1,000 sq m/h |
| Spot Cleaning Efficiency | 1,500 -- 3,000 sq m/h |
| Dustbin Capacity | 2.5 L (default) / 6 L (expanded) |
| Solution Tank | 15 L (3.96 gal) |
| Recovery Tank | 15 L (3.96 gal) |
| OS | Android |
| Connectivity | 4G, Wi-Fi, Bluetooth, LoRa (optional) |
| Mobile App | Supported |
| Operation Mode | Manual / Auto |
| Auto Charging and Water | Supported (with docking station) |
| Working Temperature | 1 to 40 C |
| Storage Temperature | -20 to 60 C |
| Humidity | 85% RH or less |
| Working Altitude | Below 2,000 m |
| Floor Types | Terrazzo, marble, tiles, epoxy resin, sandstone, artificial stone, short-pile carpet |
| IP Rating | IPX4 |
| Enclosure Material | PC + ABS |
Page 3: Product Components
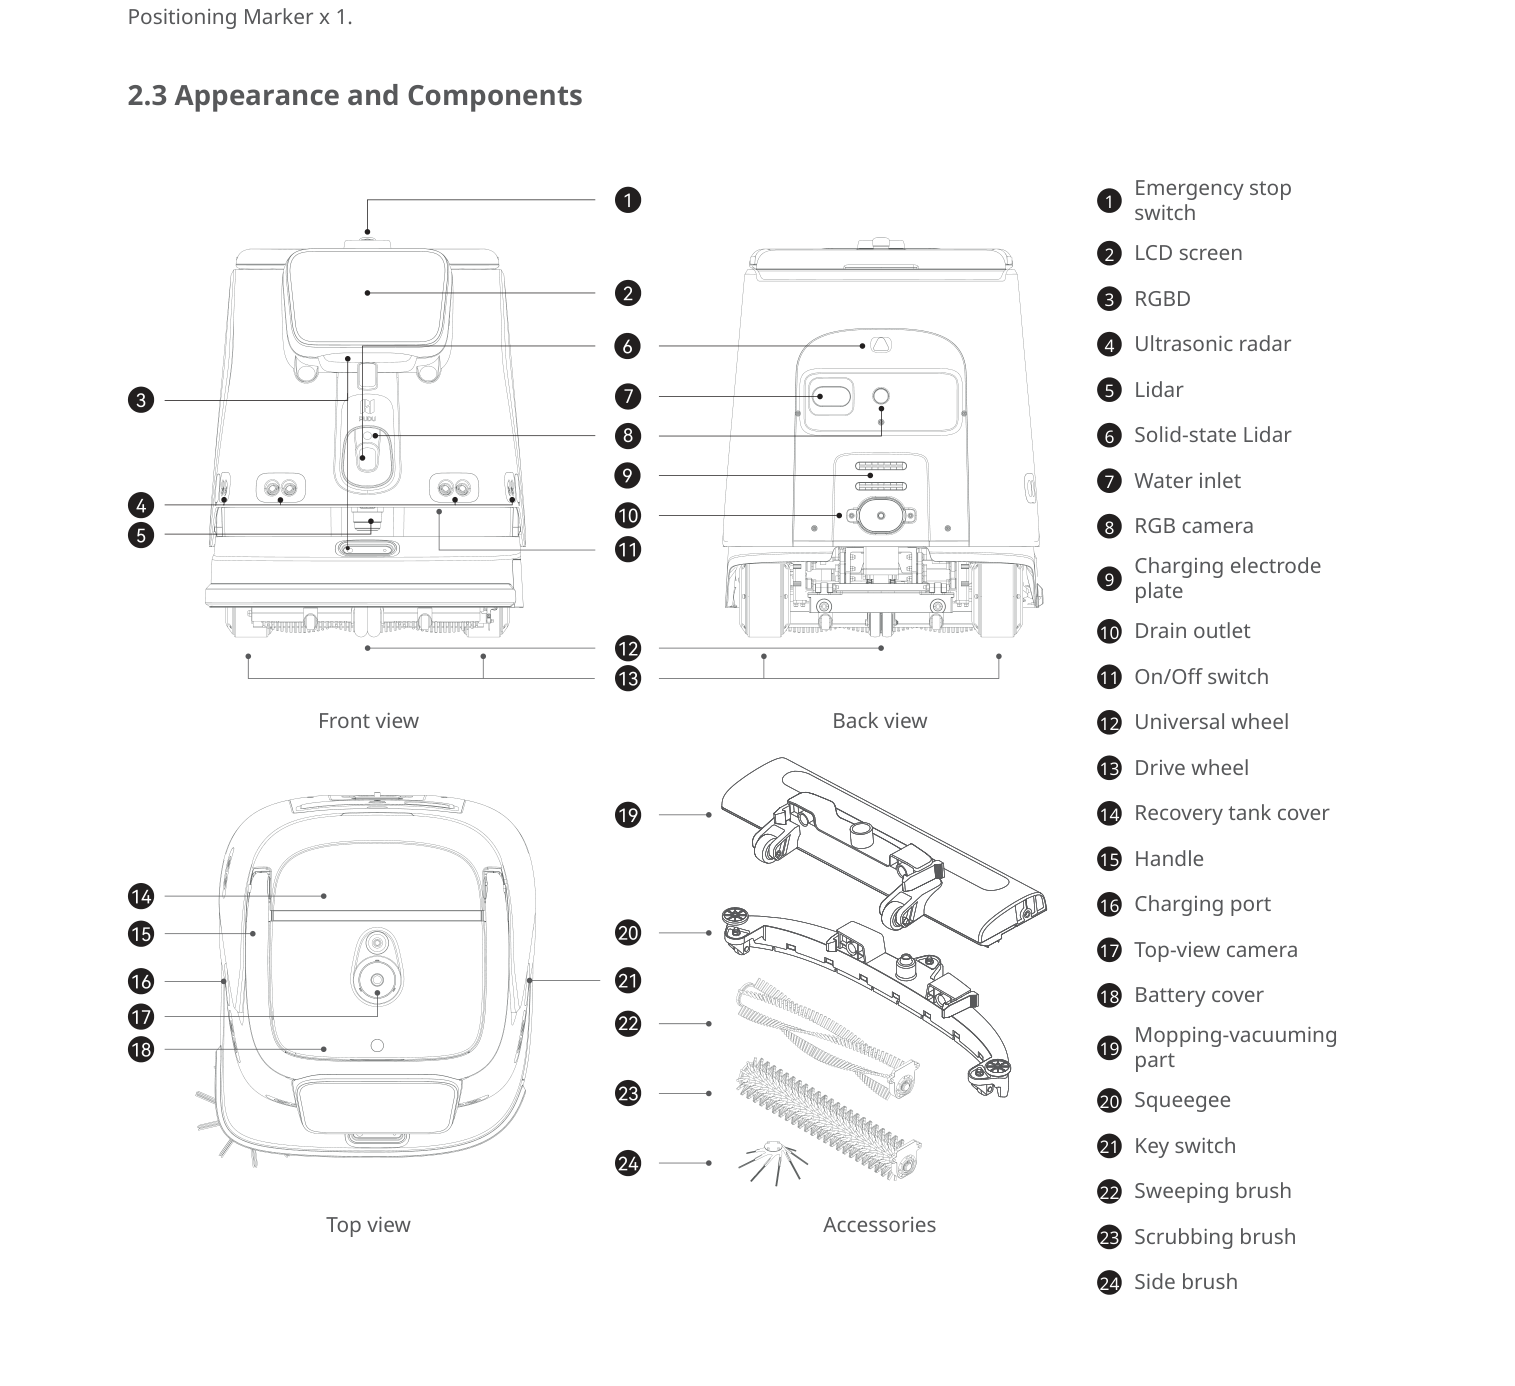
External Components
- Emergency stop switch
- LCD screen (10.1-inch)
- Handle (connected to screen, raises/lowers)
- Key switch
- On/Off switch
- Charging port
- Water inlet
- Drain outlet
- Recovery tank cover
- Battery cover
Sensors and Navigation
- LiDAR
- Solid-state LiDAR
- RGBD sensor
- RGB camera
- Top-view camera
- Ultrasonic radar
The CC1 Pro uses integrated LiDAR and visual SLAM for autonomous navigation. Place the robot below or in front of the visual positioning marker before starting an automatic task.
Cleaning Components
- Scrubbing brush -- used in Scrubbing mode
- Sweeping brush -- used in Sweeping, Carpet Vacuuming, and Silent Mopping modes
- Side brush -- used in all modes except Scrubbing
- Squeegee -- collects dirty water during scrubbing
- Mopping-vacuuming part -- used in Sweeping and Silent Mopping modes
- Dustbin (2.5 L default / 6 L expanded) -- collects dry debris during sweeping and vacuuming. Both sizes fit the same recovery tank slot.
- Washing filter -- placed in recovery tank during scrubbing
- Solution tank (15 L) -- holds clean water and detergent
- Recovery tank (15 L) -- collects dirty water
- Water filter chamber -- inside recovery tank; requires regular cleaning
Ports and Interfaces
- Charging electrode plate -- for docking station connection
- Universal wheel
- Drive wheel
Page 4: Safety Instructions
Before You Start
- Read the full manual before operating the CC1 Pro.
- Only trained personnel should operate this machine.
- The CC1 Pro is for indoor use only.
- Clear all cables, loose wires, and floor obstacles from the cleaning area before starting.
Electrical Safety
- Use only the original charger. Replace damaged chargers immediately.
- Fully charge to 100% before first use.
- Keep the battery above 10% during regular use. Below 2%, the battery enters protection mode and the robot cannot operate.
- Turn the key switch off during extended periods of non-use.
- Fully charge the battery before using the robot again after prolonged storage.
Operating Safety
- Indoor use only, on flat surfaces.
- Do not pull or push backward while powered on.
- Do not block sensors.
- Pause the robot on screen before adjusting settings.
- Do not clean or maintain the robot while it is powered on.
- Maximum recommended speed: 1.2 m/s.
- Empty water tanks before transporting; never tip the machine.
Water and Chemical Safety
- Use non-foaming, neutral detergents with a pH value of 6 to 8.
- Defoaming agents can be added if needed.
- Do not use strong acids, strong alkalis, or detergents containing active surfactant agents.
- Always follow the detergent manufacturer's dilution instructions.
- Empty both tanks before transport.
Environmental Requirements
- Operating temperature: 1 to 40 C.
- Storage temperature: -20 to 60 C.
- Humidity: 85% RH or less.
- Working altitude: below 2,000 m.
- Do not use in fire or explosion risk areas.
- Not suitable for heavily greasy floors.
- Clear cables and floor obstacles before use.
- Max protrusion while cleaning: 8 mm; while passing through: 20 mm.
- Do not clean on slopes greater than 3 degrees.
Warnings
- Stairway and slope safety: Install rails or protective barriers at the edge of stairs, the entrance of downward slopes, and any location where the robot could fall. The robot's obstacle avoidance has blind spots, and a fall from a stairway could cause significant damage and potential injury.
- Do not operate the robot near unprotected drops or edges.
Page 5: Basic Operation
Powering On
- Turn the key switch to the on position.
- Press and hold the power button for approximately 3 seconds.
- The blue LED strip activates, confirming the robot is on.
- The 10.1-inch LCD screen displays the home screen.
Powering Off
- Press and hold the power button for 6 seconds until the screen goes off.
- For extended storage, turn the key switch to the off position.
Pausing Operation
- Tap the screen to pause; tap again to resume.
Emergency Stop
- Press the emergency stop switch firmly.
- To release, rotate the switch clockwise.
- Follow on-screen instructions to resume.
Moving the Robot Manually
- Raise the handle.
- Push the robot from behind.
- Do not pull or push backward while powered on.
- Lower the handle during automated operation.
Handle Operation
The handle is attached to the screen. Raise it when pushing the robot or using the touchscreen. Lower it during automated operation. Failure to lower the handle may prevent automatic tasks from starting.
Page 6: Charging and Battery
Charging Methods
- Manual charging -- Connect the original charger to the charging port.
- Docking station -- The robot docks automatically for hands-free charging, water filling, and water draining.
Docking Station
The optional docking station provides: - Auto-charging - Auto water filling (solution tank) - Auto water draining (recovery tank)
Without the docking station, charging is manual via the charging port, and water tanks must be filled and drained by hand.
Placement: Ensure at least 1 metre of clear space in front. Keep electrode plates clean on both robot and station.
Battery Information
| Detail | Value |
|---|---|
| Type | Lithium iron phosphate (LiFePO4) |
| Capacity | 50 Ah |
| Operating Voltage | DC 23 V -- 29.2 V |
| Charging Time | Less than 3 hours |
| Scrubbing Runtime | Approximately 5 hours |
| Sweeping + Vacuuming + Mopping Runtime | Approximately 5 hours |
| Carpet Vacuuming Runtime | Approximately 4 hours |
| Silent Mopping Runtime | Approximately 9 hours |
CC1 Pro battery advantage: The lithium iron phosphate chemistry provides longer cycle life and better thermal stability compared to the standard lithium-ion battery in the CC1.
Charging Indicators
- Blue LED strip activates on power-on.
- Battery level displayed on LCD screen.
- Below 10%: low battery warning.
- Below 2%: protection mode -- robot cannot operate until recharged.
Battery Care Tips
- Fully charge before first use.
- Keep above 10% during normal operation.
- Turn key switch off during extended storage.
- Fully charge before using after prolonged storage.
Page 7: Cleaning Modes and Functions
Scrubbing Mode
Purpose: Floor scrubbing for hard surfaces.
Setup: 1. Install the scrubbing brush and squeegee. 2. Remove the side brush. 3. Place the washing filter in the recovery tank. 4. Fill the solution tank with water and approved detergent (pH 6--8).
Coverage: 700--1,000 sq m/h.
Best for: Terrazzo, marble, tiles, epoxy resin, sandstone, artificial stone.
Sweeping Mode
Purpose: Combined sweeping, vacuuming, and dust mopping for hard floors.
Setup: 1. Install the side brush, sweeping brush, and mopping-vacuuming part. 2. Place the vacuum dustbin in the recovery tank. 3. Recovery tank must be empty.
Best for: Daily maintenance of hard floors with light dust and dry debris.
Carpet Vacuuming Mode
Purpose: Sweeping and vacuuming for low-pile carpets.
Setup: 1. Install the side brush, sweeping brush, and carpet sweeper. 2. Vacuum dustbin must be in the recovery tank. 3. Recovery tank must be empty.
Best for: Low-pile commercial carpet. Not designed for thick, high-pile, or shag carpets.
Silent Mopping Mode
Purpose: Low-noise cleaning with the blower turned off.
Setup: 1. Install the side brush, sweeping brush, and mopping-vacuuming part.
Runtime: Approximately 9 hours -- the longest battery life of any mode.
Best for: Hotels, offices, shopping centres during business hours and other noise-sensitive environments.
Spot Cleaning Mode (CC1 Pro Exclusive)
Purpose: High-speed targeted cleaning for quick passes over specific areas.
Coverage: 1,500 -- 3,000 sq m/h -- significantly faster than standard cover cleaning.
Best for: Quick maintenance between full cleaning cycles. Ideal for high-traffic zones that need attention without a full cleaning pass.
Working Modes
Manual: Push the robot with the handle raised. Select mode on screen.
Automatic: Position near the visual marker. Select task on screen. Lower the handle.
Additional Features
- Auto-return: Returns to docking station when battery is low, water is low, or recovery tank is full.
- Scheduled tasks: Configure cleaning at specific times.
- App control: Remote monitoring via 4G, Wi-Fi, and Bluetooth.
Page 8: Water System and Cleaning Solution
Clean Water Tank (Solution Tank)
- Capacity: 15 litres (3.96 gallons)
- Purpose: Holds clean water and detergent for scrubbing mode.
- Maintenance: Empty remaining solution after each scrubbing session. Rinse if needed.
Dirty Water Tank (Recovery Tank)
- Capacity: 15 litres (3.96 gallons)
- Purpose: Collects dirty water via the squeegee and vacuum system.
- Maintenance: Flush with clean water every 2--3 days. Drain completely. Clean the water filter chamber.
Filling and Draining
Manual: Fill the solution tank directly. Drain via the drain outlet.
Automatic (with docking station): Auto-fill and auto-drain are handled at the station.
Always empty both tanks before transporting the robot.
Cleaning Solution
- Use non-foaming, neutral detergents with pH 6 to 8.
- Defoaming agents can be added if the detergent produces some foam.
- Strong acids, strong alkalis, and detergents containing active surfactant agents are prohibited.
- These substances may damage the machine or floor surfaces.
- Always follow the detergent manufacturer's dilution instructions.
Water Usage Information
The CC1 Pro uses the same water system as the CC1. Both tanks hold 15 litres each. The solution tank supplies water during scrubbing, while the recovery tank collects dirty water.
Page 9: Maintenance and Servicing
Maintenance Schedule
| Component | Frequency | Method |
|---|---|---|
| Scrubbing brush | Before each use | Inspect for wear; replace if severely worn |
| Sweeping brush | Before each use | Inspect for wear; replace if severely worn |
| Side brush | Before each use | Check for damage, tangling, or wear |
| Squeegee | Before each use | Check for wear, deformation, or debris buildup |
| Solution tank | After each scrubbing session | Empty remaining solution; rinse if needed |
| Recovery tank | Every 2--3 days | Flush with clean water, then drain dirty water |
| Dustbin | Every 2--3 days | Empty contents; wash with clean water if needed, then dry |
| Water filter chamber | Every 2--3 days | Rinse with clean water to remove dirt |
| Drive wheels and auxiliary wheels | Weekly | Wipe surfaces with a clean cloth |
| Vision sensors and LiDAR | Weekly | Clean with a soft cloth or lens cleanser |
| Charging electrode plates | Monthly | Wipe with a dry cloth to ensure good contact |
Replacing Consumables
Brushes: 1. Power off the robot via the key switch. 2. Remove the worn brush assembly from the underside. 3. Install a new brush, ensuring it seats properly. 4. The CC1 Pro ships with 2 scrubbing brushes and 2 sweeping brushes. 5. Always use genuine replacement parts.
Squeegee: 1. Remove the squeegee and inspect rubber strips for wear. 2. Replace if worn, deformed, or torn. 3. Reinstall securely.
Dustbin (standard or expanded): 1. Remove from the recovery tank slot. 2. Empty contents and wash with clean water if needed. 3. Dry completely before reinstalling. 4. Both the 2.5 L and 6 L dustbins fit the same slot.
Cleaning the Robot
- Wipe the body with a clean cloth.
- Clean all sensors weekly with a soft cloth or lens cleanser.
- Do not use water pressure cleaners or immerse the robot.
Docking Station Maintenance
- Clean electrode plates on both robot and station monthly.
- Maintain clear space (at least 1 metre) in front of the station.
- Verify station position matches the map.
When to Replace Parts
| Sign | Action |
|---|---|
| Brush bristles flattened, missing, or severely worn | Replace brush assembly |
| Squeegee rubber worn, deformed, or leaving streaks | Replace squeegee |
| Cleaning quality degrades despite clean components | Inspect and replace all consumables as needed |
Page 10: Troubleshooting
Robot will not power on
What you see: No response when pressing the power button. Screen stays dark, no LED activity.
Likely causes: Key switch in off position; battery fully depleted (below 2%); battery not recharged after prolonged storage.
What to check: 1. Verify the key switch is turned to the on position. 2. Press and hold the power button for at least 3 seconds. 3. Check for any LED strip activity at the bottom of the robot. 4. If no response, connect the original charger and wait at least 30 minutes before retrying.
Solution: Turn the key switch on and retry. Charge the battery. If stored for a long time, fully charge before use. Replace a damaged charger with an original charger only.
Escalate if: The robot does not respond after confirming key switch is on and battery is charged.
Robot does not charge
What you see: Battery level does not increase when connected to charger or docking station.
Likely causes: Non-original charger; dirty charging electrode plates; power outlet not working; battery at end of life.
What to check: 1. Confirm you are using the original charger. 2. Test the power outlet with another device. 3. Inspect and clean the charging port and electrode plates with a dry cloth. 4. If using the docking station, verify alignment between robot and station plates.
Solution: Replace damaged or non-original charger. Clean contacts and retry. Ensure proper docking alignment.
Escalate if: Battery does not charge after verifying charger, outlet, and clean contacts. The battery may need replacement.
Robot unable to clean
What you see: Robot moves but floor remains dirty. No scrubbing, sweeping, or vacuuming action.
Likely causes: Wrong brushes for selected mode; dustbin full; brushes severely worn; incorrect mode selected.
What to check: 1. Confirm the correct attachments for the selected cleaning mode. 2. Remove and check the dustbin; empty if full. 3. Inspect brushes for severe wear. 4. Verify the correct mode on the touchscreen.
Solution: Install the correct brush configuration. Empty and clean the dustbin. Replace worn brushes.
Escalate if: Cleaning still fails after correct attachments are confirmed and dustbin is clear. The brush motor or suction motor may be faulty.
Water not dispensing during scrubbing
What you see: Floor remains dry during scrubbing mode.
Likely causes: Solution tank empty; tank not properly seated; water line blockage; wrong mode selected.
What to check: 1. Check the solution tank water level; refill if empty. 2. Remove and reseat the solution tank. 3. Inspect water lines for blockages or kinks. 4. Verify the scrubbing mode is selected.
Solution: Refill with water and approved detergent (pH 6--8, non-foaming). Clear any blockage. Reseat the tank until it clicks.
Escalate if: Water does not dispense with a full, properly seated tank and clear lines. The water pump may be faulty.
Unable to drain dirty water
What you see: Recovery tank does not empty during auto-drain or manual drain.
Likely causes: Drain pipe blocked; recovery tank not properly positioned; docking station drain hose disconnected.
What to check: 1. Inspect the drain outlet for visible blockages. 2. Remove debris from the drain pipe. 3. Verify the recovery tank is correctly installed. 4. Check the docking station drain connection.
Solution: Clear blockages and rinse the recovery tank. Reseat the tank with cover secure. Manually empty if auto-drain is unavailable.
Escalate if: Drain remains blocked after thorough cleaning. Internal plumbing may need servicing.
Poor cleaning quality or streaks on floor
What you see: Visible wet streaks, dirty lines, or inconsistent cleaning after scrubbing.
Likely causes: Squeegee worn, deformed, or dirty; recovery tank full or filter clogged; brush worn; incorrect detergent (too foamy).
What to check: 1. Remove and inspect the squeegee for wear or debris. 2. Check recovery tank fill level and empty if needed. 3. Clean the water filter chamber. 4. Inspect the scrubbing brush for wear. 5. Verify the detergent is non-foaming with pH 6--8.
Solution: Clean or replace the squeegee. Empty recovery tank and clean filter. Replace worn brushes. Switch to a non-foaming neutral detergent.
Escalate if: Streaks persist after all components are clean and correctly installed.
Navigation or positioning failure
What you see: Robot veers off course, cannot find its position, or displays location errors.
Likely causes: Dirty sensors; positioning marker missing or moved; robot not started near marker; significant environment changes.
What to check: 1. Clean all sensors (LiDAR, cameras, RGBD) with a soft cloth. 2. Verify the positioning marker is in its correct location and undamaged. 3. Confirm the robot was placed near the marker before starting. 4. Check whether the environment layout has changed.
Solution: Clean sensors and restart. Reposition near the marker. Remap if significant changes occurred.
Escalate if: Navigation fails consistently after sensor cleaning and proper positioning.
Robot stops unexpectedly mid-task
What you see: Robot halts during cleaning without completing the route.
Likely causes: Low battery (below 10%); immovable obstacle; emergency stop pressed; sensor blockage.
What to check: 1. Check battery level on screen. 2. Look for obstacles. 3. Verify emergency stop is released (rotate clockwise). 4. Check sensors are clean and unblocked. 5. Review error messages on screen.
Solution: Charge if low. Clear obstacles. Release emergency stop. Clean sensors.
Escalate if: Robot stops repeatedly with adequate battery and no visible obstructions.
Excessive foam in recovery tank
What you see: Foam overflowing from recovery tank. Suction may be reduced.
Likely causes: Using a foaming detergent; detergent concentration too high; no defoaming agent added.
What to check: 1. Check which detergent is being used and verify its pH (must be 6--8). 2. Verify it is a non-foaming or low-foaming formula. 3. Check the dilution ratio against the manufacturer's instructions.
Solution: Switch to a non-foaming, neutral detergent with pH 6--8. Add a defoaming agent. Reduce concentration. Empty and clean the recovery tank before resuming.
Escalate if: Usually resolved by correcting the detergent. No escalation needed unless issue persists with approved detergent.
Robot cannot dock with station
What you see: Robot approaches docking station but fails to connect.
Likely causes: Dirty electrode plates; obstacle near station; station moved from mapped position; station has no power.
What to check: 1. Clean charging electrode plates on both robot and station. 2. Verify station has power. 3. Ensure clear space (at least 1 metre) in front. 4. Check if station was moved since mapping.
Solution: Clean plates and retry. Clear the area. Return station to mapped position or update the map.
Escalate if: Docking consistently fails after cleaning contacts and clearing the area.
Unusual noise during operation
What you see: Grinding, rattling, or unusually loud sounds beyond normal 70 dB.
Likely causes: Foreign object in brush or wheels; brush not properly seated; loose squeegee or components; wheel debris.
What to check: 1. Power off via the key switch. 2. Inspect underside for foreign objects in brushes and wheels. 3. Verify all brushes are properly installed. 4. Check squeegee attachment is secure. 5. Inspect drive and universal wheels for debris.
Solution: Remove foreign objects. Reseat brushes and squeegee. Clean wheel surfaces.
Escalate if: Noise persists after clearing all obstructions.
Water leaking from the robot
What you see: Puddles forming under or around the robot.
Likely causes: Recovery tank cover not sealed; solution tank not properly seated; damaged seals; squeegee vacuum hose loose.
What to check: 1. Verify recovery tank cover is fully closed. 2. Check solution tank is properly installed. 3. Inspect seals and gaskets for damage. 4. Ensure squeegee vacuum connection is tight.
Solution: Reseat tank covers and solution tank. Replace damaged seals. Tighten all connections.
Escalate if: Leaking continues after verifying all connections and seals.
Page 11: Frequently Asked Questions
Getting Started
What is different between the CC1 and the CC1 Pro? The CC1 Pro adds an expandable dustbin (up to 6 L), spot cleaning mode (1,500--3,000 sq m/h), lithium iron phosphate battery, specific pH guidelines for detergents (pH 6--8), and additional safety guidance about installing rail barriers near stairs and slopes.
What floors can the CC1 Pro clean? Terrazzo, marble, tiles, epoxy resin, sandstone, artificial stone, and short-pile carpets. Avoid heavily greasy surfaces. Floor must be flat with slope no greater than 3 degrees during cleaning.
Can the CC1 Pro clean carpets? Yes, low-pile carpets only, using Carpet Vacuuming mode. Not designed for thick, high-pile, or shag carpets.
How noisy is the CC1 Pro? Less than 70 dB in standard operation. Silent Mopping mode is significantly quieter with the blower off.
Charging
How long does the CC1 Pro take to charge? Less than 3 hours from empty to full.
What battery type does the CC1 Pro use? Lithium iron phosphate (LiFePO4), 50 Ah capacity. This provides longer cycle life and better thermal stability than standard lithium-ion.
Does the CC1 Pro support automatic charging and water management? Yes, when paired with the optional docking station for auto-charging, auto water filling, and auto water draining.
Cleaning Operations
How large is the dustbin on the CC1 Pro? 2.5 L by default, expandable to 6 L. The larger dustbin reduces emptying frequency during extended cleaning sessions. Both sizes fit the same recovery tank slot.
What is the spot cleaning mode? A high-speed cleaning pass covering 1,500 to 3,000 square metres per hour -- significantly faster than the standard 700--1,000 sq m/h. Useful for quick passes over specific zones between full cleaning cycles.
Water and Solution
What cleaning solutions are approved for the CC1 Pro? Non-foaming, neutral detergents with pH 6 to 8. Defoaming agents may be added. Strong acids, strong alkalis, and detergents with active surfactant agents are prohibited.
How much water does the CC1 Pro hold? 15 litres in the solution tank and 15 litres in the recovery tank.
Safety
What safety precautions should I take near stairs? Install rails or barriers at stairway edges and downward slopes. The robot's obstacle avoidance has blind spots, and a fall could cause significant damage and potential injury.
How do I properly store the CC1 Pro for an extended period? Empty both tanks. Turn the key switch off. Store within -20 to 60 C and below 85% RH. Fully charge the battery before using the robot again after storage.
Maintenance
How do I clean the recovery tank? Flush with clean water every 2--3 days. Drain completely. Rinse the water filter chamber to remove accumulated dirt.
When should I replace the brushes? When visibly worn or when cleaning quality noticeably degrades. Inspect before each use. The CC1 Pro ships with 2 scrubbing brushes and 2 sweeping brushes. Use genuine replacement parts.
Page 12: Service and Escalation
When to Contact Support
- Robot does not power on after confirming key switch, battery, and charger are all functioning.
- Battery does not charge with a working original charger and clean contacts.
- Navigation fails consistently after sensor cleaning and proper positioning.
- Cleaning functions fail despite correct attachments and empty dustbin.
- Water pump does not dispense water with a full, properly seated tank.
- Drain system remains blocked after thorough cleaning.
- Suction remains poor after emptying and cleaning all filters and dustbin.
- Water leaking persists after reseating all tanks and checking seals.
- Unusual noise continues after removing all foreign objects and reseating components.
- Docking consistently fails after cleaning contacts and clearing the area.
Before You Call
- Robot model and serial number (CCBC02).
- Description of the issue and when it started.
- Steps already taken to troubleshoot.
- Photos or videos of the issue if possible.
- Current battery level and any error messages on screen.
Support Contact
- HUTECH Robotics: ai.hutechrobotics.com
- Manufacturer Support: techservice@pudutech.com