MT1 -- Support Manual
AI-powered autonomous sweeping robot for large-scale indoor environments, designed for dry debris collection in warehouses, factories, airports, and transport stations.
Page 1: Overview
What is the MT1?
The MT1 is a professional autonomous sweeping robot designed for large-scale indoor environments. It focuses on sweeping and collecting dry floor debris -- paper shreds, plastic film, dust, and other loose material -- from hard surfaces in warehouses, factories, home improvement centres, airports, and transport stations.
The MT1 uses a combination of two side brushes and one main sweeping brush to collect debris into a large 35-litre dustbin. It navigates autonomously using integrated LiDAR and visual SLAM, following pre-mapped routes and returning to its charging station automatically when battery is low or a task is complete.
Unlike the CC1 range, the MT1 is a dedicated dry sweeper. It does not mop, scrub, or use water. For environments that need both sweeping and wet cleaning, the MT1 can be paired with a CC1 or CC1 Pro for a complete cleaning solution.
Models and Variants
The MT1 family includes three variants:
| Variant | Description |
|---|---|
| MT1 (MTBC01) | Base sweeper -- dry debris collection |
| MT1 Vac | Adds vacuum suction for finer dust and smaller particles |
| MT1 Max | Enhanced capacity/performance for larger or more demanding environments |
All variants share the same core platform, navigation system, physical design, operating procedures, maintenance practices, and safety rules. This manual covers the base MT1 model (MTBC01).
At a Glance
| Detail | Value |
|---|---|
| Model | MTBC01 |
| Cleaning Function | Dry sweeping and debris collection |
| Battery Life | 4--8 hours |
| Cleaning Width | Approximately 70 cm (with side brushes) |
| Dustbin Capacity | 35 L |
| Weight | Approximately 65 kg |
| Navigation | LiDAR + Visual SLAM |
| Floor Types | Polished concrete, epoxy resin, rubber, brick, ceramic tiles |
Page 2: Specifications
| Feature | Value |
|---|---|
| Model | MTBC01 |
| Operating Voltage | DC 23 V -- 29.2 V |
| Power Input | AC 100 V -- 240 V, 50/60 Hz |
| Power Output | Max 29.2 V, 20 A |
| Battery Capacity | 45 Ah |
| Charging Time | Approximately 3 hours |
| Runtime | 4 to 8 hours |
| Cleaning Capabilities | Paper shreds, plastic film, light debris |
| Weight | Approximately 65 kg (143 lbs) |
| Dimensions (L x W x H) | 84 x 60 x 49 cm |
| Screen | 10.1-inch LCD (detachable) |
| Navigation | Integrated LiDAR and visual SLAM |
| Speed Range | 0.2 -- 1.2 m/s (adjustable) |
| Working Noise | Less than 75 dB |
| Min Travel Width | 75 cm (85 cm preferred) |
| Max Surmountable Height | 20 mm |
| Max Climbing Angle | 8 degrees |
| Max Surmountable Gap | 30 mm |
| Cleaning Width (with side brushes) | Approximately 70 cm |
| Dustbin Capacity | 35 L |
| OS | Android |
| Connectivity | 4G, Wi-Fi, Bluetooth, LoRa or 2.4 GHz (optional) |
| Mobile App | Supported |
| Operation Mode | Manual / Auto |
| Auto Charging | Supported (with MT1 charging station) |
| Working Temperature | 0 to 40 C |
| Storage Temperature | -20 to 70 C |
| Working Humidity | 90% RH or less |
| Storage Humidity | 90% RH or less |
| Working Altitude | Below 2,000 m |
| Floor Types | Polished concrete, epoxy resin, rubber, regular brick, ceramic tiles |
| IP Rating | IPX3 |
| Enclosure Material | PC + ABS |
Page 3: Product Components
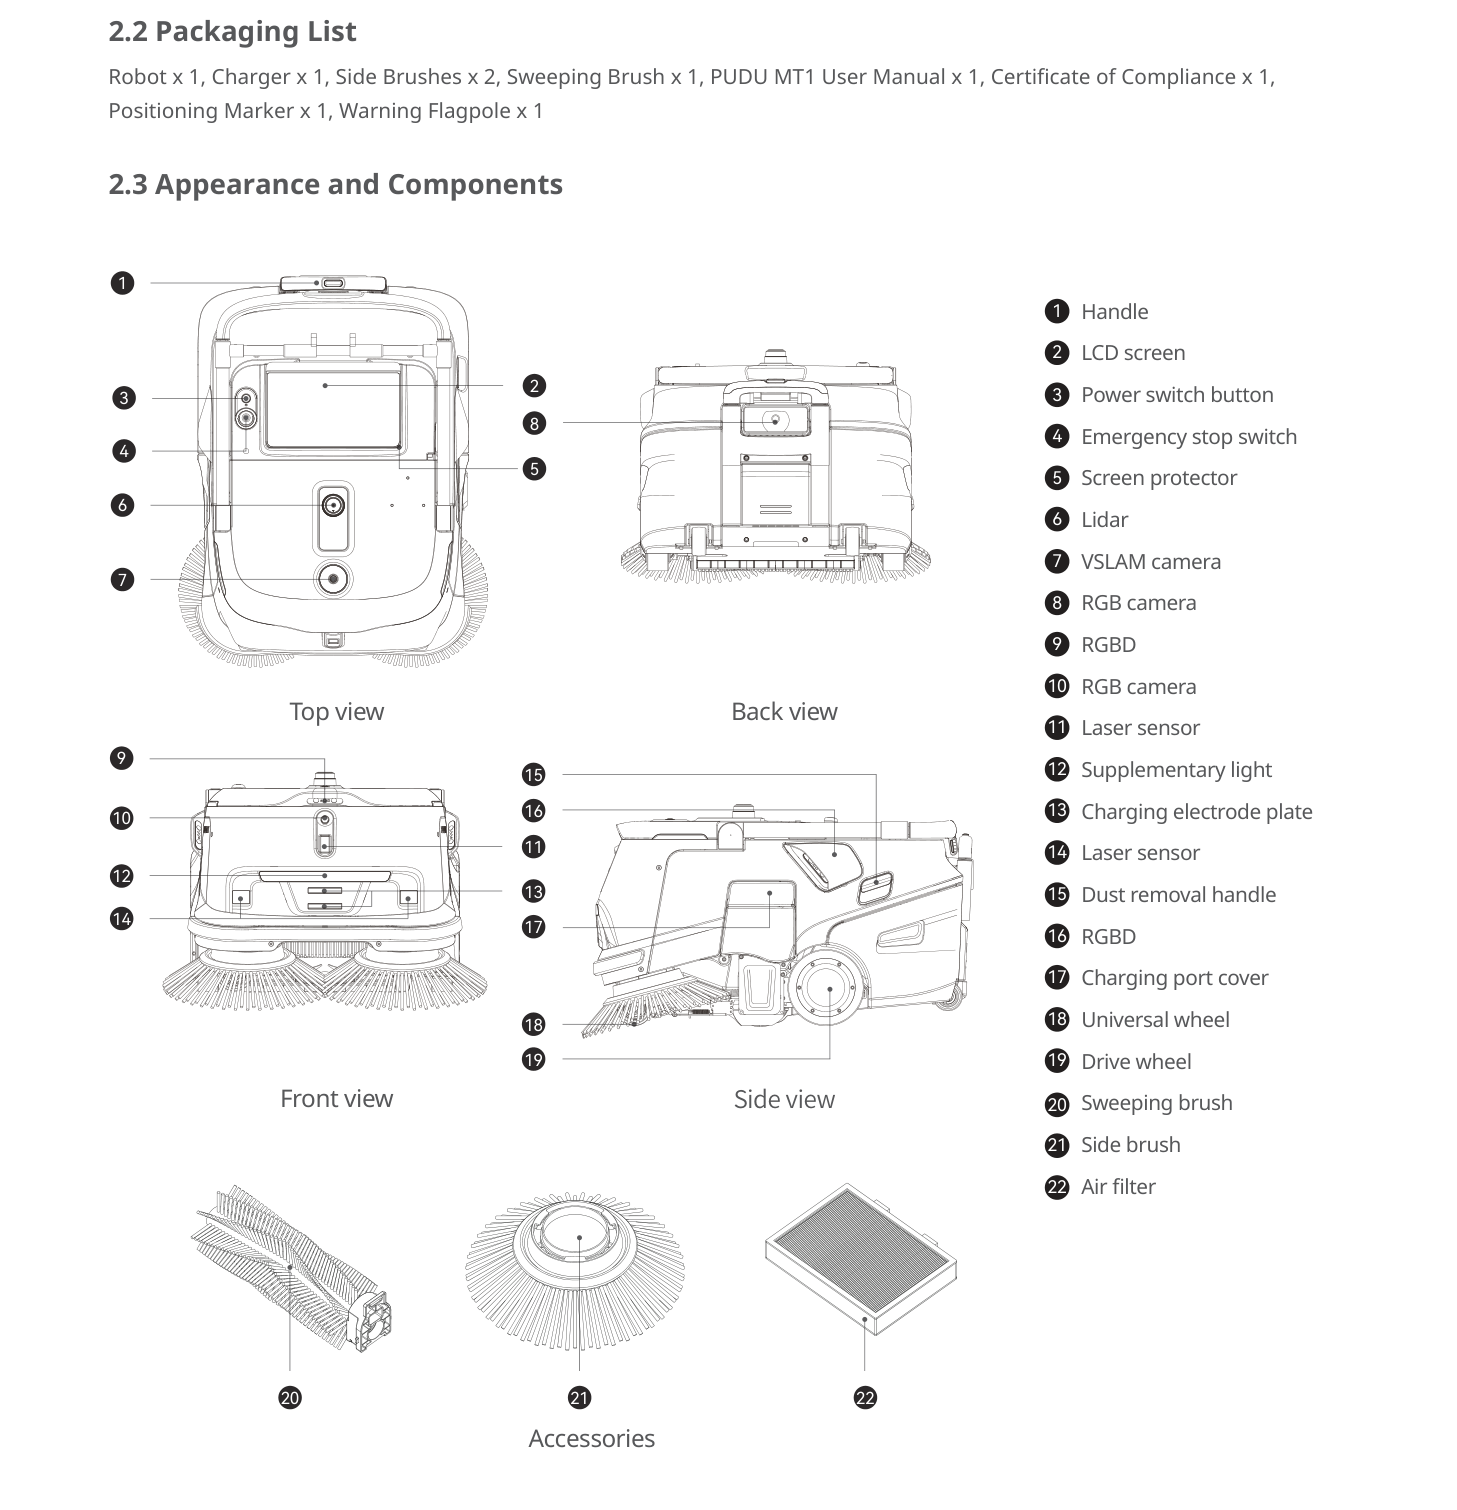
External Components
- Handle (raises/lowers)
- LCD screen (10.1-inch, detachable -- can be held or attached to handle)
- Screen protector (flip-open cover)
- Power switch button
- Emergency stop switch
- Charging port cover
- Dust removal handle (on side of robot body)
- Supplementary light
Sensors and Navigation
- LiDAR
- VSLAM camera
- RGB camera (front)
- RGB camera (rear)
- RGBD sensor (front)
- RGBD sensor (rear)
- Laser sensor (front)
- Laser sensor (rear)
The MT1 uses integrated LiDAR and visual SLAM for autonomous navigation. A supplementary light assists navigation in low-light conditions. Before starting an automatic task, position the robot below or in front of the visual positioning marker.
Cleaning Components
- Sweeping brush (main roller brush) -- the primary debris collection brush
- Side brushes (x2) -- sweep debris inward toward the main brush
- Dustbin (35 L) -- large-capacity bin for dry debris
- Air filter -- filters exhaust air; maintained via the dust removal handle
Note: The MT1 is a dry sweeper. There are no water tanks, squeegees, or scrubbing components.
Ports and Interfaces
- Charging electrode plate -- for charging station connection
- Universal wheel
- Drive wheel
Page 4: Safety Instructions
Before You Start
- Read the full manual before operating the MT1.
- Only trained personnel should operate this machine.
- The MT1 is designed for indoor use only on flat surfaces.
- Clear all cables, loose wires, and floor obstacles from the cleaning area before starting.
- Install cable covers or trunking in areas where the robot operates if cables cannot be removed.
Electrical Safety
- Use only the original charger. Replace if damaged.
- Fully charge to 100% before first use.
- Keep the battery above 10% during regular use. Below 2%, protection mode activates and the robot stops.
- Turn the power key switch off during extended non-use periods.
- Fully charge before using again after prolonged storage.
Operating Safety
- Indoor use only, on flat surfaces. Not for outdoor, rugged, or unpaved ground.
- Do not pull the robot while it is working; pause via the screen first before pushing.
- Do not push backward when powered on.
- Do not block sensors.
- Do not adjust settings while the robot is moving.
- Do not clean or maintain while powered on.
- Maximum recommended speed: 1.2 m/s.
- Empty the dustbin before transporting; never tilt the robot during transport.
Environmental Requirements
- Operating temperature: 0 to 40 C.
- Storage temperature: -20 to 70 C.
- Humidity: 90% RH or less.
- Working altitude: below 2,000 m.
- Do not use in fire or explosion hazard areas.
- Not suitable for heavily greasy or wet surfaces.
- Min travel width: 75 cm (85 cm preferred for long passages).
- Max protrusion height: 20 mm.
- Do not clean on slopes greater than 3 degrees.
Warnings
- Install rails or barriers at stairway edges and downward slopes where the robot could fall.
- The MT1 weighs approximately 65 kg. If it needs to be carried over stairs or obstacles, use multiple people.
- Always clear cables from the floor before starting. The robot can catch and drag cables, potentially damaging both the robot and the cables.
Page 5: Basic Operation
Powering On
- Press and hold the power button for approximately 12 seconds.
- The bottom LED light strip turns blue.
- The 10.1-inch LCD screen activates.
Important: The MT1 requires a longer press than other robots. A 3-second or 6-second press will not work. Hold for the full 12 seconds.
Powering Off
- Press and hold the power button for approximately 10 to 12 seconds.
- Wait until the screen goes off completely.
Pausing Operation
- Tap the screen to pause; tap again to resume.
Emergency Stop
- Press the emergency stop switch firmly to halt all movement immediately.
- Rotate the switch clockwise to release.
- Follow the on-screen instructions to resume.
Moving the Robot Manually
- Raise the handle.
- Push the robot from behind.
- Do not pull or push backward while powered on.
- Lower the handle when the robot is idle or performing automatic tasks.
- For vehicle transport, empty the dustbin first, keep the robot upright, and secure it. Do not tilt.
Handle and Screen
The MT1 handle and screen are designed to be detachable:
- The screen can be detached from the robot body and operated handheld.
- It can also be reattached to the handle.
- A screen protector flips open for direct interaction while the screen is mounted.
- This provides flexibility for controlling the robot from a distance or when the mounted screen is hard to reach.
Navigation and Positioning
Before starting an automatic task: 1. Power on the robot. 2. Place the robot below or in front of the visual positioning marker. 3. The robot uses this marker to establish its starting location. 4. If the robot is not near the marker when started, it may fail to determine its position and the task will not begin.
Page 6: Charging and Battery
Charging Methods
- Manual charging -- Open the charging port cover and connect the original charger directly.
- Charging station -- The robot docks automatically with the dedicated MT1 charging station.
Charging Station
The MT1 charging station provides automatic charging. The robot returns to the station when battery is low or after completing a task.
Charging Station Specifications:
| Feature | Value |
|---|---|
| Dimensions (L x W x H) | 32 x 24.15 x 60 cm |
| Input Voltage | AC 90--264 V, 50--60 Hz |
| Output Voltage | Max 29.2 V, 20 A |
| Working Temperature | 0 to 40 C |
| Storage Temperature | -20 to 70 C |
| Humidity | 0 to 90% RH |
| Communication | Bluetooth (2400--2483.5 MHz, 10 dBm or less) |
| Installation | Back against wall, fixed in place |
| Compatible Model | MTBC01 only |
Placement Requirements: - Place on flat ground with back against a flat wall. - Fix to the wall or ground through lateral connection components. - Maintain at least 2 m of open, unobstructed space in front and 1.5 m on each side. - No reflective or transparent surfaces (mirrors, glass) nearby. - No flammable materials nearby.
Charging Station Installation: - Install the MT1 battery charger inside the station compartment with the heat dissipation hole of the power adapter facing downward. - Use the MT1 battery charger's power cord for external power connection. - Identification stickers can be placed on both sides to mark the station's position.
Charging Station Safety: - Indoor use only at normal temperature (not above 40 C). - Use only the original power cord. - Do not move the station during use. - Do not store or operate in direct sunlight. - If smoke or burnt smell occurs, disconnect power immediately and contact HUTECH.
Battery Information
| Detail | Value |
|---|---|
| Capacity | 45 Ah |
| Operating Voltage | DC 23 V -- 29.2 V |
| Charging Time | Approximately 3 hours |
| Runtime | 4 to 8 hours (depending on gear setting) |
Charging Indicators
Robot LED strip: Blue when powered on.
Charging Station indicator lights:
| Light | Meaning |
|---|---|
| Steady blue | Normal standby (not connected to robot) |
| Flashing green | Connecting with robot |
| Steady green | Connection successful, charging in progress |
| Red | Fault occurred |
If the red light appears: Separate the robot from the station. Wait for the light to turn blue. Retry docking. If the red light persists, contact technical support.
Battery Care Tips
- Fully charge before first use.
- Keep above 10% during normal use; charge promptly when low.
- Turn the key switch off during extended storage.
- Fully charge before using after prolonged storage.
- Runtime depends on speed setting, floor conditions, and debris load.
Charging Station Maintenance
- Wipe with a soft, clean cloth if dirty or dusty.
- In case of cracks, deformation, or inability to charge, disconnect power and contact after-sales service.
- Clean electrode plates on both robot and station monthly with a dry cloth.
Page 7: Cleaning Modes and Functions
Sweeping Operation
The MT1 is a dedicated sweeping robot. It uses two side brushes to sweep debris inward toward the main sweeping brush (roller brush), which collects debris into the 35-litre dustbin.
Designed for: Environments with significant loose debris such as paper, plastic film, dust, and light materials on hard paved floors.
Cleaning width: Approximately 70 cm with both side brushes installed.
Working Modes
Manual: Raise the handle and push the robot along the desired path. Control speed and direction manually.
Automatic: Position the robot near the visual positioning marker. Select the task on screen and start. The robot follows the pre-mapped route autonomously. Lower the handle before the task begins.
Speed Settings
The MT1 speed range is 0.2 to 1.2 m/s (adjustable). Higher speeds cover more area but may reduce debris pickup on heavily soiled floors. Lower speeds improve collection quality. Runtime varies from 4 to 8 hours depending on the gear setting.
Additional Features
Autonomous Charging: The robot returns to the MT1 charging station automatically when battery is low or after completing a task.
Dust Removal Handle: Located on the side of the robot body. Repeatedly pulling this handle dislodges dust from the air filter without removing it. This is a quick maintenance step for use between full filter cleanings.
Detachable Screen: The 10.1-inch LCD screen can be operated handheld or attached to the handle, providing flexible control options.
App Control: The MT1 supports mobile app connectivity via 4G, Wi-Fi, and Bluetooth for remote monitoring and task management.
Page 8: Dustbin and Air Filter
Note: The MT1 is a dry sweeper and does not have a water system. This section covers the dustbin and air filter -- the primary consumable systems for dry sweeping.
Dustbin
- Capacity: 35 litres -- significantly larger than the CC1's 2.5 L bin, designed for large-area sweeping with heavy debris loads.
- Contents: Paper shreds, plastic film, dust, and light dry debris.
- Location: Accessible from the rear or side of the robot body.
Emptying the dustbin: 1. Power off the robot. 2. Remove the dustbin from the robot. 3. Empty all garbage. 4. If needed, wash with clean water. 5. Dry completely before reinstalling.
Air Filter
The MT1 uses an air filter to clean the exhaust airflow and prevent dust from being blown back into the environment.
Quick maintenance (dust removal handle): 1. Locate the dust removal handle on the side of the robot body. 2. Repeatedly pull the handle in and out. 3. This creates airflow that dislodges dust from the filter. 4. Perform this every 2 weeks, or more often in dusty environments.
Full filter cleaning: 1. If the handle method is not sufficient, remove the air filter for thorough inspection and cleaning. 2. Rinse if needed and dry completely before reinstalling. 3. Replace the filter if it is damaged or permanently clogged.
Page 9: Maintenance and Servicing
Maintenance Schedule
| Component | Frequency | Method |
|---|---|---|
| Side brushes | Before each use | Inspect for tangling, wear, or damage; replace if worn |
| Sweeping brush (main) | Before each use | Inspect for wear or debris caught in bristles; replace if severely worn |
| Air filter (dust removal handle) | Every 2 weeks | Repeatedly pull the dust removal handle on the side of the robot body |
| Dustbin | Every 2 weeks | Empty all garbage; wash with clean water if needed, dry completely before reinstalling |
| Drive wheels and auxiliary wheels | Weekly | Wipe surfaces with a clean cloth |
| Vision sensors and LiDAR | Weekly | Clean with a soft, dry cloth or lens cleanser |
| Charging electrode plates | Monthly | Wipe with a dry cloth to ensure good electrical contact |
Replacing Consumables
Side brushes: 1. Power off the robot. 2. Inspect both side brushes for wear, flattening, or missing bristles. 3. Check for string, wire, or debris tangled around the brush shaft. 4. Remove worn brushes and install genuine replacements. 5. Clear cables from the floor before cleaning to prevent future tangling.
Sweeping brush (main roller): 1. Power off the robot. 2. Access the sweeping brush from the underside. 3. Remove debris caught in bristles. 4. If bristles are severely worn, replace with a new brush assembly. 5. Always use genuine parts.
Air filter: 1. Use the dust removal handle first for quick maintenance. 2. If performance does not improve, remove the air filter for full cleaning. 3. Replace the filter if damaged or permanently clogged.
Cleaning the Robot
- Wipe the robot body with a clean, dry cloth.
- Clean all sensors weekly with a soft cloth or lens cleanser.
- Do not use water pressure cleaners on the robot body.
Charging Station Maintenance
- Wipe the station with a soft, clean cloth if dirty or dusty.
- Clean electrode plates on both robot and station monthly.
- Maintain at least 2 m of clear space in front and 1.5 m on each side.
- Do not move the station from its installed position.
- If cracks, deformation, or charging failure occur, disconnect power and contact support.
When to Replace Parts
| Sign | Action |
|---|---|
| Side brush bristles worn, flattened, or missing | Replace side brush |
| Main brush bristles severely worn or matted with debris | Replace sweeping brush assembly |
| Air filter damaged or permanently clogged | Replace air filter |
| Reduced debris pickup despite clean brushes and empty dustbin | Check air filter; inspect brush motors |
| Dusty exhaust from the robot | Clean or replace air filter |
Page 10: Troubleshooting
Robot will not power on
What you see: Pressing and holding the power button for 12 seconds produces no response. No LED activity, screen stays off.
Likely causes: Battery fully depleted (below 2%); battery not charged after prolonged storage; power button not held long enough.
What to check: 1. Press and hold the power button for a full 12 seconds. The MT1 requires a longer press than other models. 2. Look for the bottom LED light strip turning blue. 3. If no response, connect the original charger and charge for at least 30 minutes before retrying. 4. If stored for a long time, fully charge the battery before attempting to power on.
Solution: Ensure you hold the power button for the full 12 seconds. Charge the battery and retry.
Escalate if: Robot does not power on after a full charge and correct power button procedure.
Robot does not charge
What you see: Battery level does not increase when connected to charger or charging station. No charging indicators.
Likely causes: Non-original charger; dirty charging contacts or electrode plates; power outlet not working; charging port cover obstructing connection.
What to check: 1. Confirm the original charger is being used. 2. Test the power outlet with another device. 3. Open the charging port cover and check for obstructions. 4. Inspect charging electrode plates (robot and station) for dirt. 5. Clean contacts with a dry cloth.
Solution: Use only the original charger. Clean charging contacts and electrode plates. Remove any obstruction from the charging port.
Escalate if: Battery does not charge with confirmed working charger and clean contacts. The battery may need replacement.
Robot unable to collect garbage
What you see: Robot moves along the cleaning path but debris is left behind. Dustbin remains empty despite visible floor debris.
Likely causes: Dustbin full; sweeping brush severely worn; side brushes missing, damaged, or worn; wrong speed setting.
What to check: 1. Remove the dustbin and check the fill level. Empty if full. 2. Inspect the sweeping brush for wear, tangling, or damage. 3. Check both side brushes for proper installation and wear. 4. Verify the speed setting is appropriate.
Solution: Empty the dustbin (wash with clean water if needed, dry before reinstalling). Replace worn brushes. Reinstall any missing side brushes.
Escalate if: Robot still fails to collect debris after confirming dustbin is empty and brushes are in good condition. The brush motor may be faulty.
Air filter clogged or reduced suction
What you see: Noticeably reduced debris pickup. Dusty exhaust from the robot.
Likely causes: Air filter not cleaned regularly; extremely dusty environment; dust removal handle not used frequently enough.
What to check: 1. Locate the dust removal handle on the side of the robot body. 2. Repeatedly pull the handle in and out to dislodge dust from the filter. 3. If performance does not improve, remove the air filter for thorough inspection.
Solution: Use the dust removal handle every 2 weeks or more often in dusty environments. Remove and clean the filter if the handle method is insufficient. Replace if damaged or permanently clogged.
Escalate if: Airflow remains poor after filter cleaning or replacement. The fan motor may need inspection.
Navigation or positioning failure
What you see: Robot cannot determine its position, veers off course, or displays navigation errors.
Likely causes: Dirty sensors; positioning marker missing, moved, or damaged; robot not started near marker; significant environment changes; supplementary light not working in dark environments.
What to check: 1. Clean all sensors (LiDAR, VSLAM camera, RGB cameras, RGBD sensors) with a soft dry cloth or lens cleanser. 2. Verify the positioning marker is in its correct location and undamaged. 3. Confirm the robot was placed near the marker before starting. 4. Check if the environment layout has changed significantly. 5. Verify the supplementary light is functioning if operating in low-light conditions.
Solution: Clean all sensors and retry. Reposition near the marker. Remap if significant changes occurred.
Escalate if: Navigation fails consistently after sensor cleaning and proper positioning.
Robot stops unexpectedly during task
What you see: Robot halts mid-cleaning without completing the route.
Likely causes: Low battery (below 10%); obstacle the robot cannot navigate around; emergency stop pressed; sensor blockage; path too narrow (below 75 cm).
What to check: 1. Check battery level on screen. 2. Look for obstacles in the path. 3. Verify emergency stop is released (rotate clockwise). 4. Check that no sensors are blocked or covered. 5. Verify the passage width is at least 75 cm.
Solution: Charge if low. Clear obstacles. Release emergency stop. Clean sensors. Widen narrow passages or adjust the route.
Escalate if: Robot stops repeatedly with adequate battery and no visible obstructions.
Side brush not sweeping effectively
What you see: Debris at the edges of the cleaning path is not being swept inward. Floor edges remain dirty.
Likely causes: Bristles worn or flattened; brush not properly installed; tangled with string or wire.
What to check: 1. Power off the robot. 2. Inspect both side brushes for wear, flattening, or missing bristles. 3. Check for string, wire, or debris tangled around the brush shaft. 4. Verify brushes are securely mounted.
Solution: Remove tangles and reinstall. Replace worn side brushes with genuine parts. Clear cables from the floor before cleaning.
Escalate if: Side brush issues are typically resolved by cleaning or replacement. Escalate only if the brush shaft or motor seems damaged.
Robot cannot dock with charging station
What you see: Robot approaches the station but fails to connect, or repeatedly attempts and backs away.
Likely causes: Dirty electrode plates; obstacle near station; station moved from mapped position; station not powered.
What to check: 1. Clean charging electrode plates on both robot and station with a dry cloth. 2. Verify the station has power. 3. Ensure clear space in front of the station (at least 2 m recommended). 4. Check if the station was moved since the environment was mapped.
Solution: Clean electrode plates and retry. Clear the area. Return the station to its mapped position or update the map.
Escalate if: Docking fails after cleaning contacts and clearing the area.
Screen detached or not responding
What you see: Screen is blank, unresponsive, or has disconnected from the robot body.
Likely causes: Screen not properly reattached after handheld use; screen cable or connector loose; software freeze.
What to check: 1. If detached, reattach the screen to the robot body or handle, ensuring the connection is secure. 2. Check that the screen protector is not pressing on the screen in a way that interferes with touch. 3. Power cycle: hold the power button for 12 seconds to turn off, then 12 seconds to turn on.
Solution: Securely reattach the screen. Power cycle the robot.
Escalate if: Screen remains unresponsive after power cycle and confirmed physical connection.
Unusual noise during operation
What you see: Grinding, scraping, or rattling sounds beyond the normal 75 dB level.
Likely causes: Foreign object in sweeping brush or side brushes; brush not properly seated; loose components; wheels obstructed.
What to check: 1. Power off the robot. 2. Inspect the underside for foreign objects in all brushes and wheels. 3. Verify the sweeping brush and side brushes are properly installed. 4. Check drive and universal wheels for debris.
Solution: Remove foreign objects. Reseat all brushes firmly. Clean wheel surfaces.
Escalate if: Noise continues after clearing all obstructions. Internal motor or gearbox issues may exist.
Robot drags or gets tangled in cables
What you see: Robot catches on floor cables and drags them.
Likely causes: Cables not cleared from the floor; cable management not in place.
What to check: 1. Stop the robot immediately if entanglement is observed. 2. Power off and carefully free the robot. 3. Inspect the underside for damage. 4. Check cables for damage.
Solution: Always clear cables and loose wires before starting. Install cable covers or trunking. Adjust the route to avoid cable areas.
Escalate if: Usually preventable. Escalate only if the robot sustained damage.
Battery degrades over time
What you see: Runtime noticeably shorter than the rated 4--8 hours despite full charge. Battery percentage drops rapidly.
Likely causes: Battery aging; left depleted for extended periods; not charged after prolonged storage; consistently operating at high speed.
What to check: 1. Fully charge and time the actual runtime. 2. Compare to the rated 4--8 hour range for current gear setting. 3. Check battery age and usage history. 4. Verify charger output (29.2 V, 20 A).
Solution: Keep above 10% at all times. Fully charge before use after storage. Perform several full charge/discharge cycles to recalibrate. Replace if significantly degraded.
Escalate if: A new or relatively new battery provides significantly less runtime than rated.
Charging station shows red light
What you see: The charging station indicator turns red.
Likely causes: A fault has occurred during the charging connection.
What to check: 1. Separate the robot from the charging station. 2. Wait for the station indicator to return to steady blue. 3. Retry docking.
Solution: Separate, wait for blue, and retry. Clean electrode plates if needed.
Escalate if: The red light persists after separation and retry.
Page 11: Frequently Asked Questions
Getting Started
What is the difference between MT1, MT1 Vac, and MT1 Max? MT1 is the base sweeper for dry debris. MT1 Vac adds vacuum suction for finer dust. MT1 Max offers enhanced capacity for larger environments. All share the same platform, navigation, and operating procedures.
What surfaces can the MT1 clean? Polished concrete, epoxy resin, rubber flooring, regular brick, and ceramic tiles. Not suitable for heavily greasy surfaces, surfaces with standing water, carpet, or unpaved ground.
Does the MT1 mop or scrub? No. The MT1 is a dedicated dry sweeper. It does not have a water tank or scrubbing capability. For wet cleaning, use a CC1 or CC1 Pro.
How wide is the MT1's cleaning path? Approximately 70 cm with both side brushes installed.
Can I detach the screen from the MT1? Yes. The 10.1-inch LCD screen is detachable and can be operated handheld or attached to the handle.
How heavy is the MT1? Approximately 65 kg (143 lbs). Use multiple people if it needs to be carried over stairs or obstacles.
What is the MT1's noise level? Less than 75 dB during operation. For noise-sensitive areas, schedule cleaning during off-peak hours.
Charging
How long does the MT1 run on a single charge? Between 4 and 8 hours depending on the gear setting and environment.
How long does the MT1 take to charge? Approximately 3 hours using the original charger (29.2 V, 20 A).
Does the MT1 support automatic charging? Yes, when used with the dedicated MT1 charging station. The robot returns automatically when battery is low or after completing a task.
What is the MT1 power-on hold time? Hold the power button for approximately 12 seconds to power on or off. This is longer than other models in the range.
What do the charging station indicator lights mean? Steady blue: standby. Flashing green: connecting. Steady green: charging. Red: fault (separate robot, wait for blue, retry).
What are the charging station placement requirements? Flat ground, back against wall, fixed in place, at least 2 m clearance in front and 1.5 m on each side. No reflective/transparent surfaces or flammable materials nearby.
Cleaning Operations
How large is the dustbin? 35 litres -- significantly larger than the CC1's 2.5 L, designed for large-area sweeping with heavy debris loads.
How do I use the dust removal handle? Repeatedly pull the handle on the side of the robot body in and out to dislodge dust from the air filter. Do this every 2 weeks or more often in dusty environments.
How do I position the MT1 before starting an automatic task? Place it below or in front of the visual positioning marker before pressing start. The robot uses this marker to establish its location.
Safety
What should I do before transporting the MT1? Empty the dustbin and keep the robot upright. Do not tilt during transport. Secure upright for vehicle transport.
What are the temperature limits? Operating: 0 to 40 C. Storage: -20 to 70 C. Humidity: up to 90% RH.
Maintenance
How often should I empty the dustbin? Every 2 weeks at minimum, or more frequently in high-debris environments. Wash with clean water if needed and dry completely before reinstalling.
How do I maintain the air filter? Use the dust removal handle every 2 weeks. For full cleaning, remove the filter and rinse. Replace if damaged or permanently clogged.
When should I replace the brushes? When bristles are worn, flattened, or missing. Inspect before each use. Replace with genuine parts.
Page 12: Service and Escalation
When to Contact Support
- Robot does not power on after a full charge and correct 12-second power button procedure.
- Battery does not charge with a working original charger and clean contacts.
- Navigation fails consistently after sensor cleaning and proper positioning.
- Robot fails to collect debris despite empty dustbin and good brushes.
- Airflow remains poor after air filter cleaning or replacement.
- Docking fails after cleaning contacts and clearing the area.
- Charging station shows persistent red light after separation and retry.
- Screen remains unresponsive after power cycle and confirmed physical connection.
- Unusual noise persists after clearing all foreign objects.
- Robot sustained damage from cable entanglement.
- Battery provides significantly less runtime than rated despite being new or relatively new.
Before You Call
- Robot model and serial number (MTBC01).
- Description of the issue and when it started.
- Steps already taken to troubleshoot.
- Photos or videos of the issue if possible.
- Current battery level and any error messages on screen.
- Charging station indicator light colour (if relevant).
Support Contact
- HUTECH Robotics: ai.hutechrobotics.com
- Manufacturer Support: techservice@pudutech.com