BellaBot Pro -- Support Manual
An upgraded indoor delivery robot with an 18.5-inch advertising screen, tray visual detection, and on-device mapping, designed for restaurants, hotels, and hospitality venues.
Page 1: Overview
What is the BellaBot Pro?
BellaBot Pro is an advanced autonomous indoor delivery robot designed for the hospitality industry. It builds on the standard BellaBot with several significant upgrades: a large 18.5-inch front-facing advertising screen for promotions and branding, tray visual detection sensors for smarter task completion, on-device map creation without needing a computer, and Recycle Mode for collecting used tableware.
The robot navigates using dual navigation (laser SLAM + visual SLAM), carries up to four trays of dishes simultaneously, and plans optimal delivery routes across multiple tables. It features a 10.1-inch LCD face screen with a cat-like personality, AI voice interaction, a floor projector light for pedestrian awareness, and a rear dot matrix screen for custom scrolling messages.
BellaBot Pro supports five operating modes -- Delivery, Cruise, Recycle, Birthday, and Guide -- plus advertising screen content display during all operations. It requires a narrower minimum aisle width of 65 cm compared to the standard BellaBot's 70 cm, making it suitable for tighter venue layouts.
Models and Variants
| Model | Description |
|---|---|
| BLFD13 | BellaBot Pro |
At a Glance
- Weight: 55 kg
- Dimensions: 570 x 550 x 1290 mm
- Battery life: 11 hours (unloaded)
- Charging time: 4.5 hours
- Trays: 4 layers, 10 kg per tray (spec); 14 kg per tray / 35 kg total (manufacturer FAQ)
- Speed: 0.2--1.2 m/s (adjustable)
- Navigation: Laser SLAM + Visual SLAM
- Minimum aisle width: 65 cm (adjustable up to 85 cm)
- Screens: 10.1-inch LCD (face) + 18.5-inch LCD (advertising)
- Connectivity: Wi-Fi (2.4G / 5G), Bluetooth, 3G, 4G LTE
- Charging: Manual charger only (no charging pile / auto-dock)
Page 2: Specifications
| Feature | Value |
|---|---|
| Operating voltage | DC 23--29.4 V |
| Power input | AC 100--240 V, 50/60 Hz |
| Power output | 29.4 V / 8 A |
| Battery capacity | 25.6 Ah |
| Charging time | 4.5 hours |
| Battery life | 11 hours (unloaded) |
| Cruise speed | 0.2--1.2 m/s (adjustable) |
| Navigation | Laser SLAM + Visual SLAM |
| Min. travel width | 65 cm (adjustable to 75--85 cm) |
| Max. surmountable height | 10 mm |
| Max. climbing angle | 5 degrees |
| Tray dimensions | 410 mm x 500 mm |
| Number of trays | 4 |
| Height between trays (top to bottom) | 230 / 200 / 200 / 180 mm (adjustable) |
| Tray load | 10 kg per layer (spec); 14 kg per layer / 35 kg total (manufacturer FAQ) |
| Machine material | ABS / aviation-grade aluminium alloy |
| Robot weight | 55 kg |
| Robot dimensions | 570 x 550 x 1290 mm |
| Screen size | 10.1-inch LCD (face) + 18.5-inch LCD (advertising) |
| Operating system | Android |
| Microphone | 6-mic circular array |
| Speaker power | 2 x 10 W stereo |
| Working temperature | 0 to 40 C |
| Working humidity | 85% RH or less |
| Storage temperature | -20 to 65 C |
| Working altitude | Below 2000 m |
| Surface requirement | Indoor, flat and smooth ground |
| IP rating | IP20 |
| Connectivity | Wi-Fi (2.4G / 5G), Bluetooth, 3G, 4G LTE |
Page 3: Product Components
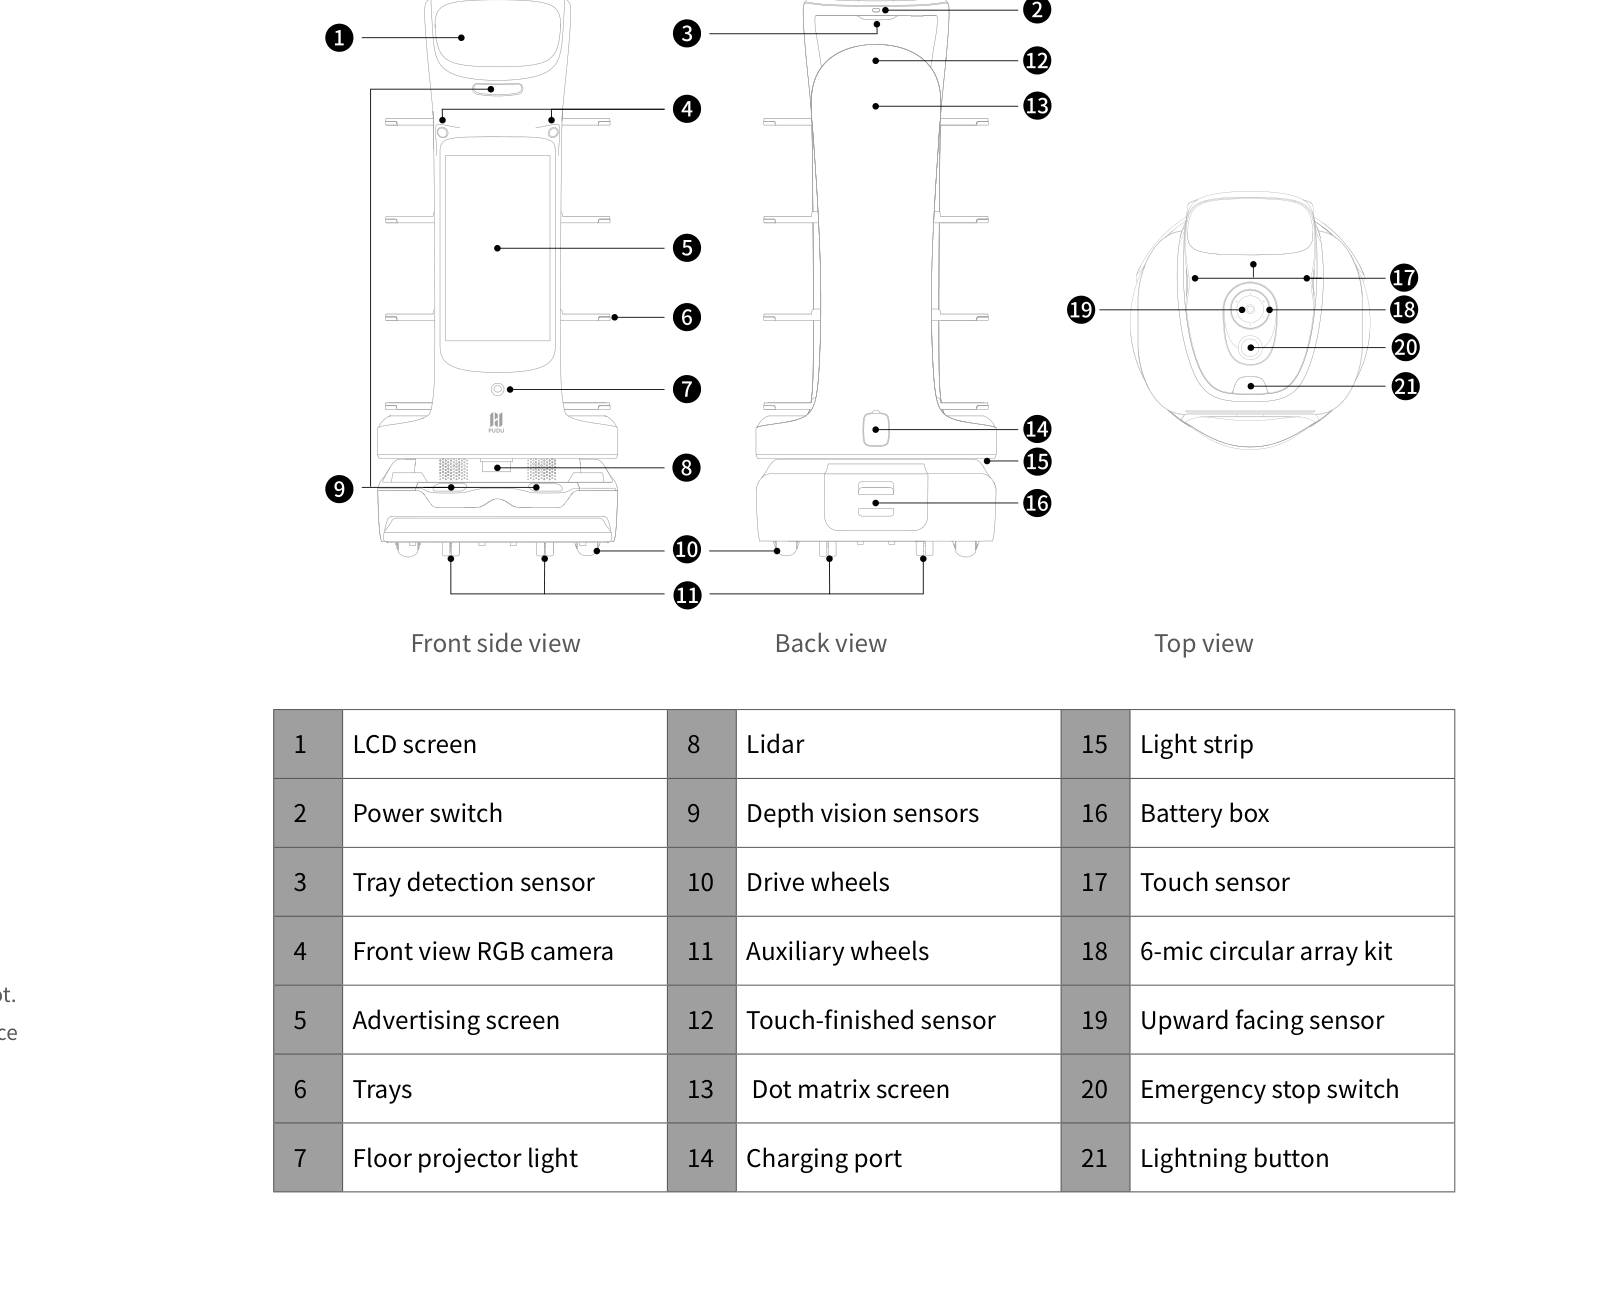
External Components
Top Section
- Touch sensor (head area) -- Detects touch input on the robot's head, triggering emotional expressions and voice responses.
- LCD screen (face) -- 10.1-inch display showing the animated cat face, task status, and interactive prompts.
- Upward facing sensor -- Camera for visual SLAM positioning via ceiling markers.
- 6-mic circular array kit -- Six-microphone array for voice recognition and AI voice interaction.
- Emergency stop switch -- Red switch on top. Press to immediately halt all movement.
- Lightning button -- Quick pause/resume button.
Front Section
- Advertising screen -- 18.5-inch LCD for displaying promotions, menus, or branded content during operation.
- Front view RGB camera -- Forward-facing camera for visual recognition.
- Depth vision sensors -- Cameras for obstacle detection and depth perception.
Mid Section
- Trays (4 layers) -- Four removable trays for carrying dishes. Adjustable spacing: 230 / 200 / 200 / 180 mm (top to bottom).
- Tray detection sensor -- Sensors on each tray for automatic dish detection and smart task completion.
- Touch-finished sensor -- Sensor for touch-to-complete functionality at delivery destinations.
Lower Section
- Lidar sensor -- Laser scanner for SLAM navigation and mapping.
- Light strip -- LED strip around the base indicating robot status by colour.
- Floor projector light -- Projects a flashing pattern on the ground when the robot turns or moves, alerting pedestrians.
Rear
- Dot matrix screen -- Rear-facing display showing custom scrolling text (up to 50 characters).
- Charging port -- Port for the original charger.
- Battery box -- Rear compartment housing the battery pack.
- Power switch -- Press and hold for 1 second to power on, 3 seconds to shut down.
Underside
- Drive wheels -- Motorised wheels for movement.
- Auxiliary wheels -- Support wheels for balance and stability.
Sensors and Navigation
- Lidar sensor -- Laser-based scanner for mapping and autonomous navigation (laser SLAM).
- Upward facing sensor -- Camera for visual SLAM positioning using ceiling markers.
- Depth vision sensors -- Forward-facing cameras for real-time obstacle detection and avoidance.
- Front view RGB camera -- Visual recognition camera on the front of the robot.
- Tray detection sensors -- Sensors on each tray layer for automatic detection of placed or removed items.
- Touch-finished sensor -- Enables touch-to-complete at delivery destinations (tail touch).
- Touch sensor (head) -- Capacitive sensor for interactive touch responses.
- 6-mic circular array -- Picks up voice commands for AI interaction.
- Bumper / collision bar -- Contact sensor for collision detection.
Ports and Interfaces
- Charging port -- Located at the rear. Accepts the original charger connector with locking fastener.
- SIM card slot -- Supports 4G LTE SIM cards for cellular connectivity.
Page 4: Safety Instructions
Before You Start
- Charge the battery fully before first use (approximately 4.5 hours).
- Verify that all sensors are clean and unobstructed.
- Ensure the venue floor is flat, smooth, dry, and free of obstacles.
- Position the robot under a ceiling marker for initial startup.
Electrical Safety
- Use only the original rechargeable battery and charger.
- Verify that the mains voltage matches the charger rating (AC 100--240 V, 50/60 Hz) before connecting.
- Ensure the charging connector fastener is fully engaged to prevent overheating.
- Charge promptly when the battery drops to 20%. Prolonged low-battery use damages battery life.
- Do not charge in high-temperature, high-pressure, or explosive environments.
- The BellaBot Pro does not support charging pile (auto-dock) charging. Manual charger only.
Operating Safety
- Do not cover the top camera while the robot is operating.
- Do not clean or maintain the robot while it is powered on.
- Do not place open flames, stoves, or flammable/explosive items on the robot.
- Do not load or unload dishes while the robot is in motion.
- Do not move or transport the robot while it is working.
- Only trained personnel may disassemble or repair the robot.
- Keep the robot upright during transport. Never lift by the trays or the box.
- Children must not play with the robot.
- Do not clean the robot with strong acid or alkaline detergent.
Environmental Requirements
- Temperature: 0 to 40 C operating; -20 to 65 C storage.
- Humidity: 85% RH or less.
- Altitude: Below 2000 m.
- Floor: Indoor, flat and smooth ground only. Maximum bump height 10 mm, maximum incline 5 degrees.
- Do not use on wet surfaces or surfaces covered with liquids.
- Do not use where wireless devices are prohibited.
Warnings
- Explosion risk: Do not expose the battery to fire, extreme heat, or physical damage. Use only the original battery.
- Overheating risk: Always ensure the charger connector fastener is fully clicked into place. A loose connection can cause overheating.
- Chemical damage: Never use strong acid or alkaline detergents on any part of the robot.
- Disposal: Dispose of the robot, battery, and accessories according to local regulations. Do not place batteries in general waste.
Page 5: Basic Operation
Powering On
- Move the robot to its designated startup location (under a positioning marker).
- Press and hold the power switch for 1 second.
- The bottom light strip will illuminate, confirming the robot is on.
- The Pudu App will start automatically. If it does not, tap the "Desktop" icon on the Android system desktop.
- For first-time use, you can create maps directly on the robot without needing a computer.
Powering Off
- Ensure the robot has completed all active tasks and is stationary.
- Press and hold the power switch for 3 seconds.
- The screen and light strip will turn off, confirming shutdown.
Pausing Operation
- Tap the screen once, or press the lightning button, to pause the robot mid-task.
- The robot will stop in place immediately.
- To resume, tap the screen again or press the lightning button.
- Auto-resume after pause is configurable (5--600 seconds, default 10).
- Motion Protection: When enabled in Advanced Settings, touching the screen does not pause the robot during movement. Only the emergency stop button can pause it.
Emergency Stop
- In any emergency, press the red emergency stop switch on top of the robot firmly.
- The robot will halt all movement instantly.
- To resume after the emergency is resolved:
- Rotate the emergency stop switch clockwise to release it.
- Tap the screen or press the lightning button to restart operation.
Motor lock options: In Settings > Password and Security > Motor Lock, you can: - Lock motor during emergency stop (prevents sliding on slopes when e-stopped). - Lock motor when idle (prevents the robot from being pushed accidentally).
Moving the Robot Manually
- Power off the robot completely before moving it.
- Keep the robot upright at all times.
- Grip the robot body securely. Never lift by the trays or the battery box.
- Move to the desired location and place on a flat, smooth surface before powering on.
Returning to the App Home Screen
If the robot displays a lost or error state and you cannot navigate back: - Place two fingers on the screen and hold for 10 seconds. - This returns you to the App homepage.
On-Device Map Creation
BellaBot Pro supports creating venue maps directly on the robot: 1. Power on the robot for the first time. 2. Place the positioning marker in an appropriate location. 3. Initialise the robot at that location. 4. Follow the step-by-step map creation process in the Operation Guide. 5. No computer is required.
Page 6: Charging and Battery
Charging Methods
Method 1: Direct Charger (Only Method)
- Power off the robot.
- Connect the original charger to a mains outlet (AC 100--240 V).
- Insert the charging connector into the charging port at the rear of the robot.
- Ensure the fastener is fully clicked into place.
- Charging takes approximately 4.5 hours from empty to full.
Important: The BellaBot Pro does not support charging pile or auto-dock charging. It must be charged manually using the original charger.
Battery Information
- Battery capacity: 25.6 Ah
- Expected battery life: 11 hours unloaded. Actual runtime depends on payload, task frequency, and environment.
- When to charge: Charge promptly when the battery drops to 20% or lower.
- Charging time: Approximately 4.5 hours from empty to full. Partial charges take proportionally less time.
Auto-Return for Charging
You can configure the robot to automatically return to a charging point when battery is low: 1. Go to Settings > Robot Functions > Function Settings > Charging Settings. 2. Set the Low Battery Auto Return threshold (5--50%, default 5%). 3. When battery drops below this level, the robot returns to the configured charging point. 4. Enable Increase Charging Speed to put the robot into sleep mode during charging for faster charge times.
Battery Care Tips
- Charge before the battery drops below 20%.
- Do not leave the battery fully drained for extended periods.
- Store the robot in a temperature range of -20 to 65 C when not in use.
- Operate only within 0 to 40 C.
- Use only the original charger and battery.
- Schedule charging during off-peak hours so the robot is ready for busy periods.
Page 7: Modes and Functions
Delivery Mode
What it does: Delivers dishes to multiple tables simultaneously using optimal route planning.
How to use it: 1. Place dishes on the trays at the pickup position. 2. Enter the table number(s) for each tray on the screen. 3. Tap Start. The robot plans the fastest route and delivers to each table. 4. Customers or staff remove dishes. The robot auto-completes via tray detection or touch, then moves to the next table. 5. Once all deliveries are done, the robot returns to the pickup position.
Best for: Standard meal service in restaurants.
Additional options: - Smooth Mode: Limits speed to 0.5 m/s for dishes with soup or liquid. - Tail touch completion: When the robot arrives, touching the tail (back) completes the delivery task. The dot matrix screen displays a prompt.
Cruise Mode
What it does: The robot circulates along a preset path carrying self-service items, recommending them to customers by voice.
How to use it: 1. Load drinks, desserts, napkins, or other items onto the trays. 2. Select Cruise Mode and choose the preset path. 3. The robot follows the route, announcing items as it passes.
Best for: Self-service drinks rounds, dessert promotion, snack distribution.
Recycle Mode
What it does: Collects used tableware from tables and returns it to a designated drop-off point.
How to use it: 1. Select Recycle on the homepage. 2. Select the target points where items to be collected are located, then tap Start. 3. The robot travels to each destination. At each stop, load recyclable items onto the trays. 4. After loading, tap Next Task to proceed to the next destination. 5. If transfer points are set on the map, tap Go to Transfer Point to drop off items. If not, tap Return to go back to the docking point.
Best for: Clearing tables during busy periods, reducing manual bussing.
Additional options: - Smooth Mode is available in Recycle Mode (limits speed to 0.5 m/s). - Retention time at each collection point is configurable (up to 1600 seconds).
Birthday Mode
What it does: Delivers birthday cakes or gifts with customisable background music.
How to use it: 1. Place the cake or gift on a tray. 2. Select Birthday Mode and choose the destination table. 3. Select background music (default or custom imported music). 4. The robot delivers while playing the chosen music.
Best for: Birthday celebrations in restaurants.
Guide Mode
What it does: Greets customers at the entrance and escorts them to their assigned table, then returns automatically.
How to use it: 1. Select Guide Mode at the greeting position. 2. Choose the destination table. 3. The robot greets the customer and navigates to the table. 4. Once complete, the robot returns to the greeting position.
Best for: Customer greeting and seating.
Advertising Screen
What it does: Displays promotional content, menus, or branding on the 18.5-inch front screen during all operations.
How to configure: 1. Upload advertising materials (images and videos) via the Pudu Business Management Platform (web) or PuduLink app (mobile). 2. Configure ad types: large screen regular ads, large screen scene ads, and small screen ads. 3. Ads can be copied to associated stores. 4. Robots automatically download and play new ads when connected to the internet.
Ad types supported: Large screen regular ads, large screen scene ads, small screen ads.
Additional Features
Smooth Mode - Limits speed to 0.5 m/s across all modes (delivery, cruise, recycle, birthday). - Three states: not enabled (tap to enable for one task), single delivery (one task only), long-term (stays enabled). - Tap the icon to cycle through states, or long-press for 1 second for long-term.
Tail Touch Completion - When the robot arrives at a delivery destination, the rear dot matrix screen shows a prompt. - Touch the tail (back) area to complete the current task. - The dot matrix screen displays a completion indicator, the robot plays a voice message, then proceeds to the next task.
Call Function - Enable in Settings > Robot Functions > Function Settings. - Call types: PuduLink call, 4G watch call, button call, local microservice, open platform calls. - When called, the robot waits for a countdown (1--180 seconds, default 10) before heading to the call point. - After arriving, it waits for interaction (10--600 seconds, default 10), then returns. - The robot can be called even during guiding or cruising tasks.
Wave Gesture Recognition - When idle (no working tasks), waving at the robot triggers an interactive response. - Can be toggled in Settings > Robot Functions > Interaction Settings > Gesture Control.
Light Strip Status Colours - Red: Abnormal / error condition - Blue: Actively delivering - Purple: Birthday mode or interactive mode - White: Returning to docking point - Yellow: Paused
Floor Projector Light - Projects a flashing pattern on the ground when the robot turns or moves forward. - Alerts pedestrians to the robot's presence and direction. - Can be enabled/disabled in settings.
Dot Matrix Screen - Custom scrolling text (up to 50 characters) on the rear screen. - Separate text for each mode: Cruise Text, Welcome Text, Guide Text, Return Text.
Emoji and Expression Packs - Two default expression packs included. - Additional custom packs configurable on the cloud platform. - When expressions display during operation, the destination is not shown on screen. - Toggle in Settings > Robot Functions > Interaction Settings > Emoji Animation.
Light Brightness and Effects - Global brightness adjustable from level 1--10 (default 5). - Colourful Ambient Light: Chassis light strip colours in birthday mode (can enable for other modes). - Tray Ambient Light: Corresponding tray light turns on at delivery arrival to indicate which tray. - Floor Projection Light: Flashing pattern on ground during turns and forward movement.
Speed Settings - Adjustable in Settings > Speed Settings. - Full range: 0.2--1.2 m/s (0.66--3.94 ft/s), default 0.7 m/s. - Recommended delivery speed: below 0.9 m/s. - Recommended cruise speed: 0.2--0.6 m/s.
Passability Width - Default 65 cm. Can be increased to 75--85 cm in Settings > Robot Functions > Function Settings > Run Settings > Passability Settings. - Increase when carrying items that extend beyond tray edges.
Run Settings (Advanced) - Pause auto-resume time: 5--600 seconds (default 10). - Motion Protection: When enabled, screen touch does not pause the robot. Only the emergency stop button works. - Replan path when blocked: Pauses for a configurable time (10--600 seconds, default 30) then plans a new route. Blocked path is locked (30--600 seconds, default 180).
Multi-Robot Scheduling - Requirements: all robots must share the same map, same communication channel, and ESP32 enabled. - Waiting Mode: Robots wait until the pickup point is free. - Fast Mode: Robots autonomously dispatch without waiting.
Multi-Robot Docking Modes - One-to-one: Fixed pickup location per robot. - Free Docking: Nearest available pickup by priority. - Waiting: Temporary dock until a pickup is free.
4G SIM Connectivity - SIM card slot supports 4G LTE. - When both Wi-Fi and mobile network are enabled, Wi-Fi is prioritised. - If the robot detects weak Wi-Fi, it automatically switches to mobile network.
Password and Security - Management password can be set for cancelling tasks, exiting modes, and entering settings. - Set by entering the password twice. Original password required to change. - If forgotten, contact HUTECH technical support for an administrator password.
Music Import 1. Connect robot and phone to the same Wi-Fi. 2. Scan the QR code in Settings > Music. 3. Up to 20 songs can be stored. 4. Supported formats: mp3, wav, flac, aac, pcm, wma, ape. 5. Long-press a song to delete it.
Configuration Copy Tool - Copy configuration and resources to other BellaBot Pro robots, or receive from others. - Found in Advanced Settings under "Configuration and resource copying tool".
Page 8: Maintenance and Servicing
Maintenance Schedule
| What to Check | How Often | How to Do It | Robot Must Be |
|---|---|---|---|
| Drive wheels and auxiliary wheels | Weekly | Remove tangled hair, string, and stuck debris. | Powered off |
| Trays (surface) | Weekly | Wipe with a clean, dry cloth. | Powered off |
| Vision sensor and upward facing sensor | Weekly | Clean with a clean cloth or specialised lens cleanser. Address contamination immediately. | Powered off |
| Depth vision sensors | Weekly | Clean with a clean cloth or specialised lens cleanser. | Powered off |
| Lidar sensor | Weekly | Clean with a clean cloth or specialised lens cleanser. | Powered off |
| Tray detection sensors | Weekly | Clean with a clean cloth or lens cleanser. | Powered off |
| Robot body | Monthly | Wipe the entire surface with a clean, dry cloth. | Powered off |
Cleaning the Robot
- Always power off the robot before cleaning.
- Use only a clean, dry, lint-free cloth for all surfaces.
- For sensors, use a specialised lens cleanser if a dry cloth is insufficient.
- Never use water, strong acid, or alkaline detergent on any part of the robot.
- If oil or food splatter gets on sensors, clean immediately -- dirty sensors cause navigation and detection failures.
- For tangled wheels, carefully remove hair and debris by hand. Lay the robot on its side on a protective mat if needed.
When to Replace Parts
- Wheels: If drive or auxiliary wheels show significant wear, cracking, or persistent vibration after cleaning.
- Sensors: If a sensor consistently gives incorrect readings after thorough cleaning.
- Battery: If runtime has dropped below 6 hours under normal conditions, the battery pack likely needs replacing.
- Trays: If trays are warped, cracked, or no longer seat securely.
- Bumper / collision bar: If the bumper is physically damaged or misaligned, causing false collision alerts.
Page 9: Troubleshooting
If you cannot resolve an issue using this guide, contact HUTECH Robotics support.
Robot Will Not Power On
What you see: Robot does not respond when power button is pressed. No light strip, no screen activity.
Likely causes: - Battery fully drained - Battery not seated correctly - Battery box cover not properly closed
What to check: 1. Connect the charger and wait a few minutes. If the charger indicator activates, the battery was drained. 2. If the charger indicator does not activate, try a different outlet. 3. Open the rear battery cover and verify the battery pack is fully inserted. 4. Ensure the rear cover is properly fitted and latched. 5. Press and hold the power switch for at least 1 second.
Solution: Charge the battery if drained. Reseat the battery if loose. Ensure the cover is properly closed.
Escalate if: The battery shows charge but the robot still does not power on after reseating and checking all connections.
Robot Will Not Charge
What you see: Charger is plugged in but the robot does not charge. Charger indicator is off.
Likely causes: - Charger connector not fully engaged - Battery not properly installed - Damaged charger - Mains outlet issue
What to check: 1. Confirm the charger connector fastener is fully clicked into the charging port. 2. Open the rear cover and check the battery is correctly seated. 3. Check the charger indicator light. If it is off, the charger may be faulty. 4. Try a different mains outlet.
Solution: Reseat the connector. Reseat the battery. Replace the charger if the indicator shows no power.
Escalate if: The charger indicator remains off across multiple outlets, or the battery does not accept charge.
Note: The BellaBot Pro does not support charging pile / auto-dock. It must be charged with the manual charger.
Robot Not Moving or Stuck
What you see: Robot halts unexpectedly, moves slowly, takes unusual routes, or avoids open paths.
Likely causes: - Obstacles in the path - Dirty depth vision sensors or Lidar - Aisle narrower than 65 cm - Reflective surfaces near the route (mirrors, glass, polished metal)
What to check: 1. Clear any physical obstacles from the robot's path. 2. Inspect and clean the depth vision sensors and Lidar. 3. Measure the aisle width -- minimum 65 cm required. 4. Check for mirrors or reflective surfaces at sensor height. Apply matte stickers if needed.
Solution: Remove obstacles. Clean sensors. Ensure adequate aisle width. Mitigate reflections.
Escalate if: Navigation problems persist after environmental and sensor checks.
Robot Lost or Navigation Failure
What you see: Robot fails to initialise its position or displays a positioning/location error.
Likely causes: - Robot not positioned at the correct startup location (under the marker) - Wrong map selected - Environment has changed significantly since mapping - Upward facing sensor or vision sensor is dirty
What to check: 1. Confirm the robot is directly below the positioning marker. 2. Verify the correct map is selected on the robot. 3. Check the upward facing sensor and vision sensors for dirt or obstruction. Clean if needed. 4. Reboot the robot at the startup location.
Solution: Reposition under the marker. Select the correct map. Clean all sensors. Reboot.
Escalate if: Positioning fails after verifying location, map, and sensor cleanliness.
Tip: If stuck on an error screen, place two fingers on the screen and hold for 10 seconds to return to the App homepage.
Emergency Stop Will Not Release
What you see: Robot completely stops. Does not respond to screen taps or lightning button.
Likely causes: - Emergency stop switch was pressed accidentally
What to check: 1. Locate the emergency stop switch on top of the robot. 2. Check if it is depressed (engaged). 3. Rotate the switch clockwise to release. 4. Tap the screen or press the lightning button to resume.
Solution: Release the emergency stop by rotating clockwise. Resume via screen or lightning button.
Escalate if: The switch will not release or the robot does not resume after release.
Screen Not Responding (Main LCD)
What you see: The 10.1-inch face screen does not display anything or does not respond to touch.
Likely causes: - Robot is powered off - Software crash - Screen hardware failure
What to check: 1. Check if the bottom light strip is on. If not, the robot may be off -- try powering on. 2. Force a shutdown by holding the power switch for 3 seconds, then restart. 3. Verify battery charge level.
Solution: Reboot the robot. Ensure the battery is charged.
Escalate if: The light strip is on (robot is powered) but the screen remains blank or unresponsive after a reboot.
Advertising Screen Not Displaying Content
What you see: The 18.5-inch front screen is blank or not showing expected promotional content.
Likely causes: - Content not configured in the management interface - Software issue - Screen hardware fault
What to check: 1. Verify that advertising content has been uploaded and configured through the Business Management Platform or PuduLink app. 2. Reboot the robot to refresh the display. 3. Check if the main 10.1-inch face screen is working -- if it is, the issue is isolated to the advertising screen.
Solution: Upload or reconfigure content. Reboot the robot.
Escalate if: The main screen works but the advertising screen remains blank after reboot and content verification.
Sensor Blocked or Dirty
What you see: Robot stops frequently, navigates poorly, or tray/object detection does not work.
Likely causes: - Oil, food splatter, or dirt on vision sensors, depth sensors, Lidar, or tray detection sensors
What to check: 1. Power off the robot. 2. Inspect the upward facing sensor, depth vision sensors, Lidar, and tray detection sensors for contamination. 3. Clean with a clean, lint-free cloth or specialised lens cleanser.
Solution: Clean all affected sensors.
Escalate if: Sensors still behave erratically after thorough cleaning.
Tray Detection Not Working Properly
What you see: Robot does not detect when dishes are placed or removed. Tasks complete prematurely or do not auto-complete.
Likely causes: - Tray detection sensors dirty - Trays not seated correctly - Items placed outside the sensor detection zone
What to check: 1. Power off and clean the tray detection sensors with a clean cloth or lens cleanser. 2. Remove and reseat each tray to ensure proper alignment. 3. Test by placing items centrally on the tray and checking if detection triggers.
Solution: Clean sensors. Reseat trays. Ensure items are within the detection area.
Escalate if: Sensors remain unreliable after cleaning and reseating.
Unusual Noises During Operation
What you see: Grinding, clicking, or rattling sounds during movement.
Likely causes: - Debris tangled in drive or auxiliary wheels - Loose tray or component - Motor issue
What to check: 1. Power off the robot. 2. Inspect drive wheels and auxiliary wheels for tangled hair, string, or debris. 3. Check that all trays are securely seated and nothing is loose.
Solution: Remove debris from wheels. Reseat loose components.
Escalate if: Unusual noises persist after clearing debris and securing components.
Battery Draining Too Quickly
What you see: Runtime significantly shorter than the rated 11 hours.
Likely causes: - Heavy continuous payloads (the 11-hour rating is for unloaded operation) - Constant operation without rest periods - Battery degradation from repeated deep discharge - Operating outside the recommended temperature range
What to check: 1. Review typical daily workload -- heavy loads and constant motion reduce battery life significantly. 2. Check if the robot is regularly drained below 20% before charging. 3. Confirm the operating temperature is within 0--40 C. 4. Compare current runtime to the robot's performance when new.
Solution: Schedule rest periods. Charge before 20%. Stay within the operating temperature range. Configure auto-return for charging at a higher threshold.
Escalate if: Battery life has dropped below 6 hours under normal conditions, suggesting battery pack replacement is needed.
Floor Projector Light Not Working
What you see: The floor projection light is not visible during operation.
Likely causes: - Feature not enabled in settings - Bright ambient lighting washing out the projection - Hardware fault
What to check: 1. Check settings to confirm the floor projector light is enabled. 2. Test in a dimmer area -- bright environments can make the projection invisible. 3. Reboot the robot and test again.
Solution: Enable the feature in settings. Test in lower ambient light.
Escalate if: The projector light does not activate after enabling and rebooting.
Bumper / Collision Bar Triggering Abnormally
What you see: Robot stops frequently due to collision alerts when nothing has contacted it. Unable to complete routes.
Likely causes: - Collision bar sensor dirty or damaged - Sensor misaligned after impact - Hardware fault
What to check: 1. Power off and inspect the bumper/collision bar for dirt, food debris, or physical damage. 2. Clean the area with a clean dry cloth. 3. Check if the bumper housing is dented or misaligned. 4. Restart the robot and test on a clear path.
Solution: Clean the bumper area. As a temporary workaround, enable "Bumper signal temporarily off" in Advanced Settings to continue operating while awaiting repair. Warning: this disables collision detection entirely and should only be used temporarily.
Escalate if: The bumper sensor requires replacement or recalibration. Contact HUTECH support for spare parts.
Robot Self-Inspection Fails After Map Creation
What you see: The robot reports a self-inspection failure when switching from the mapping tool to the App.
Likely causes: - No topological route has been added to the map
What to check: 1. Open the mapping tool and verify that at least one topological route (path between points) has been created. 2. Ensure all required points (pickup location, table numbers, etc.) are connected by routes.
Solution: Add a topological route in the mapping tool, then switch back to the App.
Escalate if: The self-inspection continues to fail after adding routes.
Robot Cannot Connect to Wi-Fi
What you see: Robot cannot join the Wi-Fi network or loses connection frequently.
Likely causes: - Incorrect Wi-Fi credentials - Weak signal at the robot's operating area - Incompatible Wi-Fi band - Network congestion
What to check: 1. Verify the Wi-Fi network name and password are correct. 2. Test signal strength at the robot's location -- supports both 2.4 GHz and 5 GHz. 3. Try a different Wi-Fi band if available. 4. Move the robot closer to the router for initial setup.
Solution: Re-enter credentials. Improve signal coverage. Switch bands.
Escalate if: Connection fails despite correct credentials and strong signal.
Note: If the robot has a 4G SIM card and Wi-Fi is weak, it will automatically switch to the mobile network.
Software Update Failure
What you see: Update does not download or the robot does not restart after download completes.
Likely causes: - Battery level below 20% - Unstable network connection - Robot manually turned off during update
What to check: 1. Confirm the battery is above 20% before starting the update. 2. Ensure the robot is connected to a stable Wi-Fi network. 3. Navigate to Settings > System Update and try again. 4. Do not manually turn off the robot during the update process.
Solution: Charge above 20%. Use a stable Wi-Fi connection. Allow the update to complete without interruption.
Escalate if: The update fails repeatedly despite adequate battery and network.
Page 10: Frequently Asked Questions
Getting Started
Q: How do I turn the robot on? A: Press and hold the power switch for 1 second. Position the robot at its startup location (under a ceiling marker) first.
Q: How do I turn the robot off? A: Press and hold the power switch for 3 seconds.
Q: Does the App start automatically? A: Yes. If it does not, tap the "Desktop" icon on the Android desktop to launch it.
Q: How do I create a new map? A: BellaBot Pro supports on-device map creation. After first power-on, follow the step-by-step process in the Operation Guide. No computer is required.
Q: What is different between BellaBot and BellaBot Pro? A: BellaBot Pro adds a large 18.5-inch advertising screen, tray visual detection sensors, on-device mapping, Recycle Mode, a floor projector light, a dot matrix screen, and a narrower minimum aisle width (65 cm vs 70 cm).
Q: What surfaces can the robot operate on? A: Flat, smooth indoor surfaces only. It handles bumps up to 10 mm and inclines up to 5 degrees. Not suitable for wet, uneven, or outdoor surfaces.
Charging
Q: How long does it take to charge? A: Approximately 4.5 hours from empty to full. Partial charges take proportionally less time.
Q: How long does the battery last? A: Approximately 11 hours under unloaded conditions. Actual runtime varies with payload, task frequency, and environment.
Q: When should I charge? A: Charge when the battery drops to 20% or lower. You can also configure auto-return for charging at a custom threshold (5--50%).
Q: Can I use a non-original charger? A: No. Only use the original charger. Non-original chargers may damage the battery and void the warranty.
Q: Can the BellaBot Pro be charged with a charging pile (auto-dock)? A: No. The BellaBot Pro does not support auto-dock charging. It must be charged manually with the original charger.
Q: Can the robot automatically return to charge? A: Yes. Configure the Low Battery Auto Return threshold (5--50%) in Settings > Robot Functions > Function Settings > Charging Settings.
Q: Does the BellaBot Pro support 4G SIM cards? A: Yes. Insert a 4G SIM card for cellular connectivity. Wi-Fi is prioritised when both are enabled. The robot automatically switches to mobile network if Wi-Fi is weak.
Operation
Q: What is the minimum aisle width? A: 65 cm by default. Adjustable up to 75--85 cm in Passability Settings for items extending beyond the tray edges.
Q: How much weight can each tray hold? A: The specification lists 10 kg per tray. According to manufacturer documentation FAQ, the actual capacity is 14 kg per layer and 35 kg total.
Q: How do I pause the robot? A: Tap the screen once or press the lightning button. Tap or press again to resume.
Q: What is Recycle Mode? A: The robot travels to specified tables, collects used tableware, and returns it to a designated drop-off point.
Q: How does the advertising screen work? A: The 18.5-inch front screen displays promotions, menus, or branding. Upload content via the Business Management Platform or PuduLink app.
Q: How does the tail touch button work? A: When the robot arrives at a destination, touch the tail (back) area to complete the delivery task. The dot matrix screen shows a prompt.
Q: Does the robot respond to wave gestures? A: Yes. When idle, waving at the robot triggers an interactive response. Toggle in Settings > Interaction Settings > Gesture Control.
Q: What do the light strip colours mean? A: Red = error, Blue = delivering, Purple = birthday/interactive mode, White = returning, Yellow = paused.
Q: What is the call function? A: The robot responds to remote calls from the manufacturerLink, 4G watches, button callers, or third-party systems and travels to the call point automatically.
Q: How do I schedule multiple robots together? A: All robots must share the same map, same communication channel, and have ESP32 enabled. Choose Waiting Mode or Fast Mode for dispatch.
Q: Can the passability width be adjusted? A: Yes. The default is 65 cm. Increase to 75--85 cm in Passability Settings when carrying wider items.
Q: What is Smooth Mode? A: Limits speed to 0.5 m/s for carrying soup or liquid. Available across all modes. Tap the icon to cycle states, or long-press for long-term.
Q: What is the motor lock feature? A: Prevents the robot from being pushed or sliding. Two options: lock during emergency stop, lock when idle. Set in Settings > Password and Security > Motor Lock.
Q: How do I get back to the app home screen if the robot is stuck? A: Place two fingers on the screen and hold for 10 seconds.
Q: How do I configure the dot matrix screen text? A: Custom text (up to 50 characters, scrolling) is set per mode: Cruise Text, Welcome Text, Guide Text, Return Text.
Q: How do I import music? A: Connect robot and phone to the same Wi-Fi, then scan the QR code in Settings > Music. Up to 20 songs. Formats: mp3, wav, flac, aac, pcm, wma, ape.
Safety
Q: Can children interact with the robot? A: No. The robot is commercial equipment. Children should not touch, ride, push, or play with it.
Q: What cleaning products should I avoid? A: Do not use water, strong acids, or alkaline detergents. Use only a dry cloth for surfaces and lens cleanser for sensors.
Maintenance
Q: How do I clean the sensors? A: Power off the robot. Wipe all sensors (vision, depth, Lidar, tray detection, upward facing) with a clean cloth or lens cleanser. Address contamination immediately.
Q: How do I clean tangled hair from the wheels? A: Power off the robot. Manually remove hair, string, or debris from drive and auxiliary wheels. Lay on a protective mat for better access if needed. Do this weekly.
Q: How often should maintenance be done? A: Wheels, trays, and sensors weekly. Full body monthly. Always power off first.
Page 11: Service and Escalation
When to Contact Support
- The robot will not power on despite a charged battery and correct connections.
- The charger indicator shows no power across multiple outlets.
- Positioning fails repeatedly after verifying location, map, and sensor cleanliness.
- The screen remains blank when the light strip is on.
- The emergency stop switch will not release.
- Battery runtime has dropped below 6 hours under normal conditions.
- The advertising screen remains blank after content upload and reboot.
- The floor projector light does not activate after enabling and rebooting.
- The bumper sensor requires replacement or recalibration.
- Self-inspection fails after adding topological routes.
- Software updates fail repeatedly despite adequate battery and network.
- Motor or sensor error messages persist after rebooting and clearing obstructions.
- Any physical damage requiring replacement parts.
Before You Call
Have the following information ready:
- Model number: BLFD13
- Serial number: Located on the robot identification label
- Description of the issue: What the robot is doing (or not doing)
- Error messages: Exact wording of any on-screen error messages
- What you have already tried: Steps taken from this troubleshooting guide
- Operating environment: Venue type, floor type, temperature, any recent changes
- Whether other robots are affected (for multi-robot setups)
Support Contact
- HUTECH Robotics Support: ai.hutechrobotics.com
- Manufacturer After-Sales: techservice@pudutech.com